Chaplet of Divine Mercy ~ Chamorro Translation

I started compiling my recipes when my daughters were very young, intending to pass them on to them when they got older and took an interest in cooking.  I wanted them to learn about their Chamorro heritage, a large part of which centers around cooking.

Our language is another priceless treasure I want to pass on to them.  While not a very fluent speaker of our Chamorro language myself, I do know basic conversational words and phrases, most of which I’ve passed on to my  kids.  I’m now in the process of teaching them various prayers in Chamorro.

This post focuses on the translation of the Chaplet of Divine Mercy.  Feel free to share it with your friends and family. 🙂

Note:  If you scroll all the way to the bottom of this post, you can listen to/watch two videos of the Chaplet of Divine in Song (in English).

Chaplet of Divine Mercy (0)

Chaplet of Divine Mercy (1)

Chaplet of Divine Mercy (2)

Chaplet of Divine Mercy (3)

Chaplet of Divine Mercy (4)

Chaplet of Divine Mercy (5)

Chaplet of Divine Mercy (6)

Chaplet of Divine Mercy (7)

Chaplet of Divine Mercy (8)

Chaplet of Divine Mercy (9)

Chaplet of Divine Mercy (10)

Chaplet of Divine Mercy (11)

Corned Beef with Cabbage and Onions

This is another classic Chamorro comfort dish.  Most Chamorros grew up eating corned beef, maybe because it used to be inexpensive.  Now, it’s become something our family eats only once in a while since a can of corned beef has become quite pricey!

Made with canned corned beef, sliced cabbage and onions (and a few seasonings), this is another one of those quick and easy dishes that you can prepare and serve within minutes.

Feel free to substitute the cabbage with (or add) your favorite vegetables.  I like sliced eggplant and fresh green beans in this dish in addition to the cabbage.

Comment below to let me know how you like my recipe, or let me know your favorite way to prepare canned corned beef. 😉

Corned Beef with Cabbage and Onions

image

Ingredients:

  • 2 cans corned beef
  • 1 medium onion, sliced
  • 1 tablespoon chopped garlic
  • 1 teaspoon Dashida seasoning (or you can use salt)
  • 1/2 teaspoon black pepper
  • 1 small head cabbage, sliced

Directions:

1.  Sauté the corned beef in a large pan over medium high heat.

image

2.  Add the onions, garlic, Dashida, and black pepper.  Cook for a few minutes until the onions become translucent.

image

3.  Add the sliced cabbage to the pan.  Cook over medium heat until the cabbage wilts and softens enough to your liking, about 10 minutes.

image

image

4.  Serve with hot white rice and enjoy!

image

Japanese Salad Dressing

There is a sushi restaurant I frequent that serves a creamy white salad dressing with their salads that I just love.  It’s sweet, savory, and slightly tangy, and has a definite sesame flavor that makes this dressing stand out.

This is my version of that dressing.  It’s quick and easy to prepare; you can mix some up in just a few short minutes.  My recipe below makes enough dressing for several servings.  Keep it refrigerated and it can last for about a week.  In addition to tossing salad greens with this dressing, it’s perfect for a Japanese-style cole slaw; just drizzle it over finely shredded cabbage leaves and carrots and you’ll have a delicious and uniquely tasting cole slaw.

I use Kewpie mayonnaise instead of regular mayonnaise because it’s a little sweeter and richer.  You can find kewpie mayo at most Japanese or Asian markets.  However, be forewarned — kewpie mayo contains monosodium glutamate.  If you’re allergic to MSG, use regular mayo when you make this.

If you can interchange the types of mayo, why use kewpie, you may be wondering?  Well,  kewpie is creamier and slightly yellower than mayo brands like Best Foods or Hellman’s. That’s because kewpie mayo is made using only egg yolks — Hellman’s or Best Foods uses whole eggs.  Kewpie is also made with different types of vinegar, whereas the other regular mayo brands use lemon juice.

Give my recipe a try.  I think you’ll like it. 🙂

Japanese Salad Dressing

image

Ingredients:

  • 1 cup kewpie mayonnaise
  • 1 tablespoon soy sauce
  • 1 tablespoon chopped garlic
  • 1 tablespoon sesame oil
  • 2 tablespoons rice wine vinegar
  • 1 tablespoon mirin seasoning
  • 1/2 teaspoon sea salt
  • 3 tablespoons sugar
  • Pinch of black pepper

Optional Ingredients:

  • 1 tablespoon grated onion
  • 1 teaspoon grated ginger root

Directions:

Mix all of the ingredients together until creamy.  Serve over salad greens or shredded cabbage.  Refrigerate any unused dressing.

Enjoy!

image image


Smoked Beef Brisket – A slightly sweet, smoky version

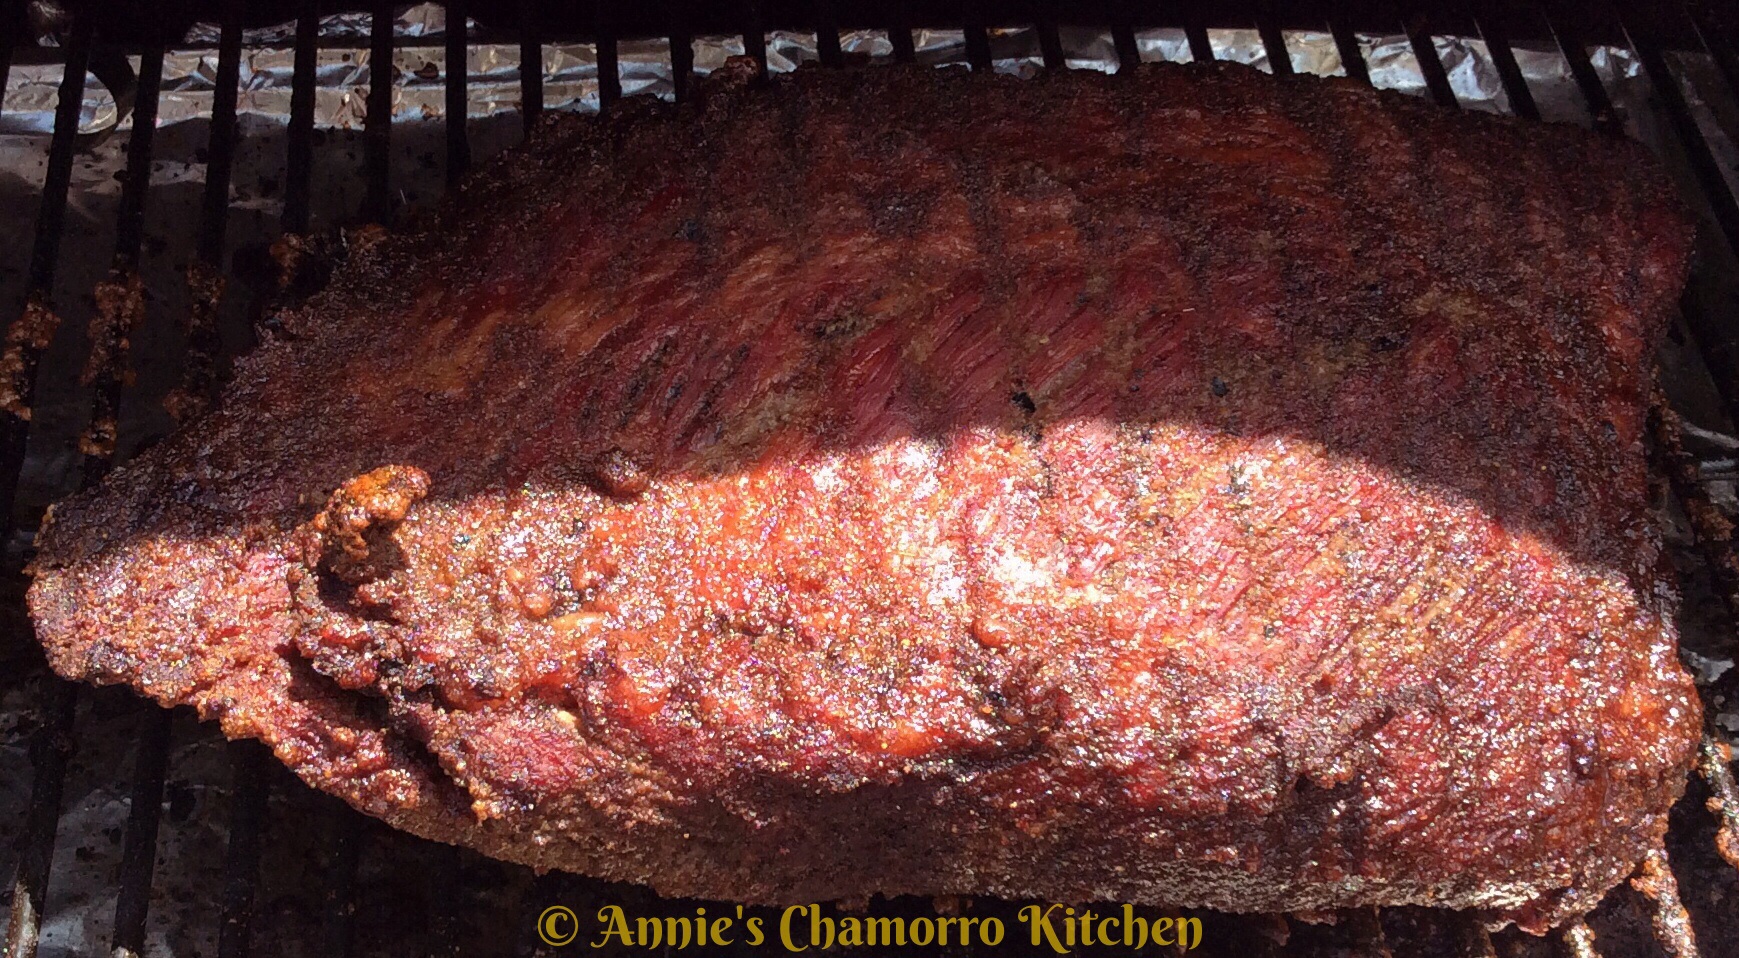
I love a good BBQ.  It’s rare that I use a dry rub when we BBQ at our house, especially since my daughter makes excellent marinades.  However, when it comes to brisket, I prefer using a dry rub.

I like to experiment with different spice combinations when coming up with recipes for dry rubs.  This one contains an unusual combination of espresso powder, brown sugar and cumin, among other things.  The sweetness of the sugar goes really well with the smokiness of the espresso and cumin.

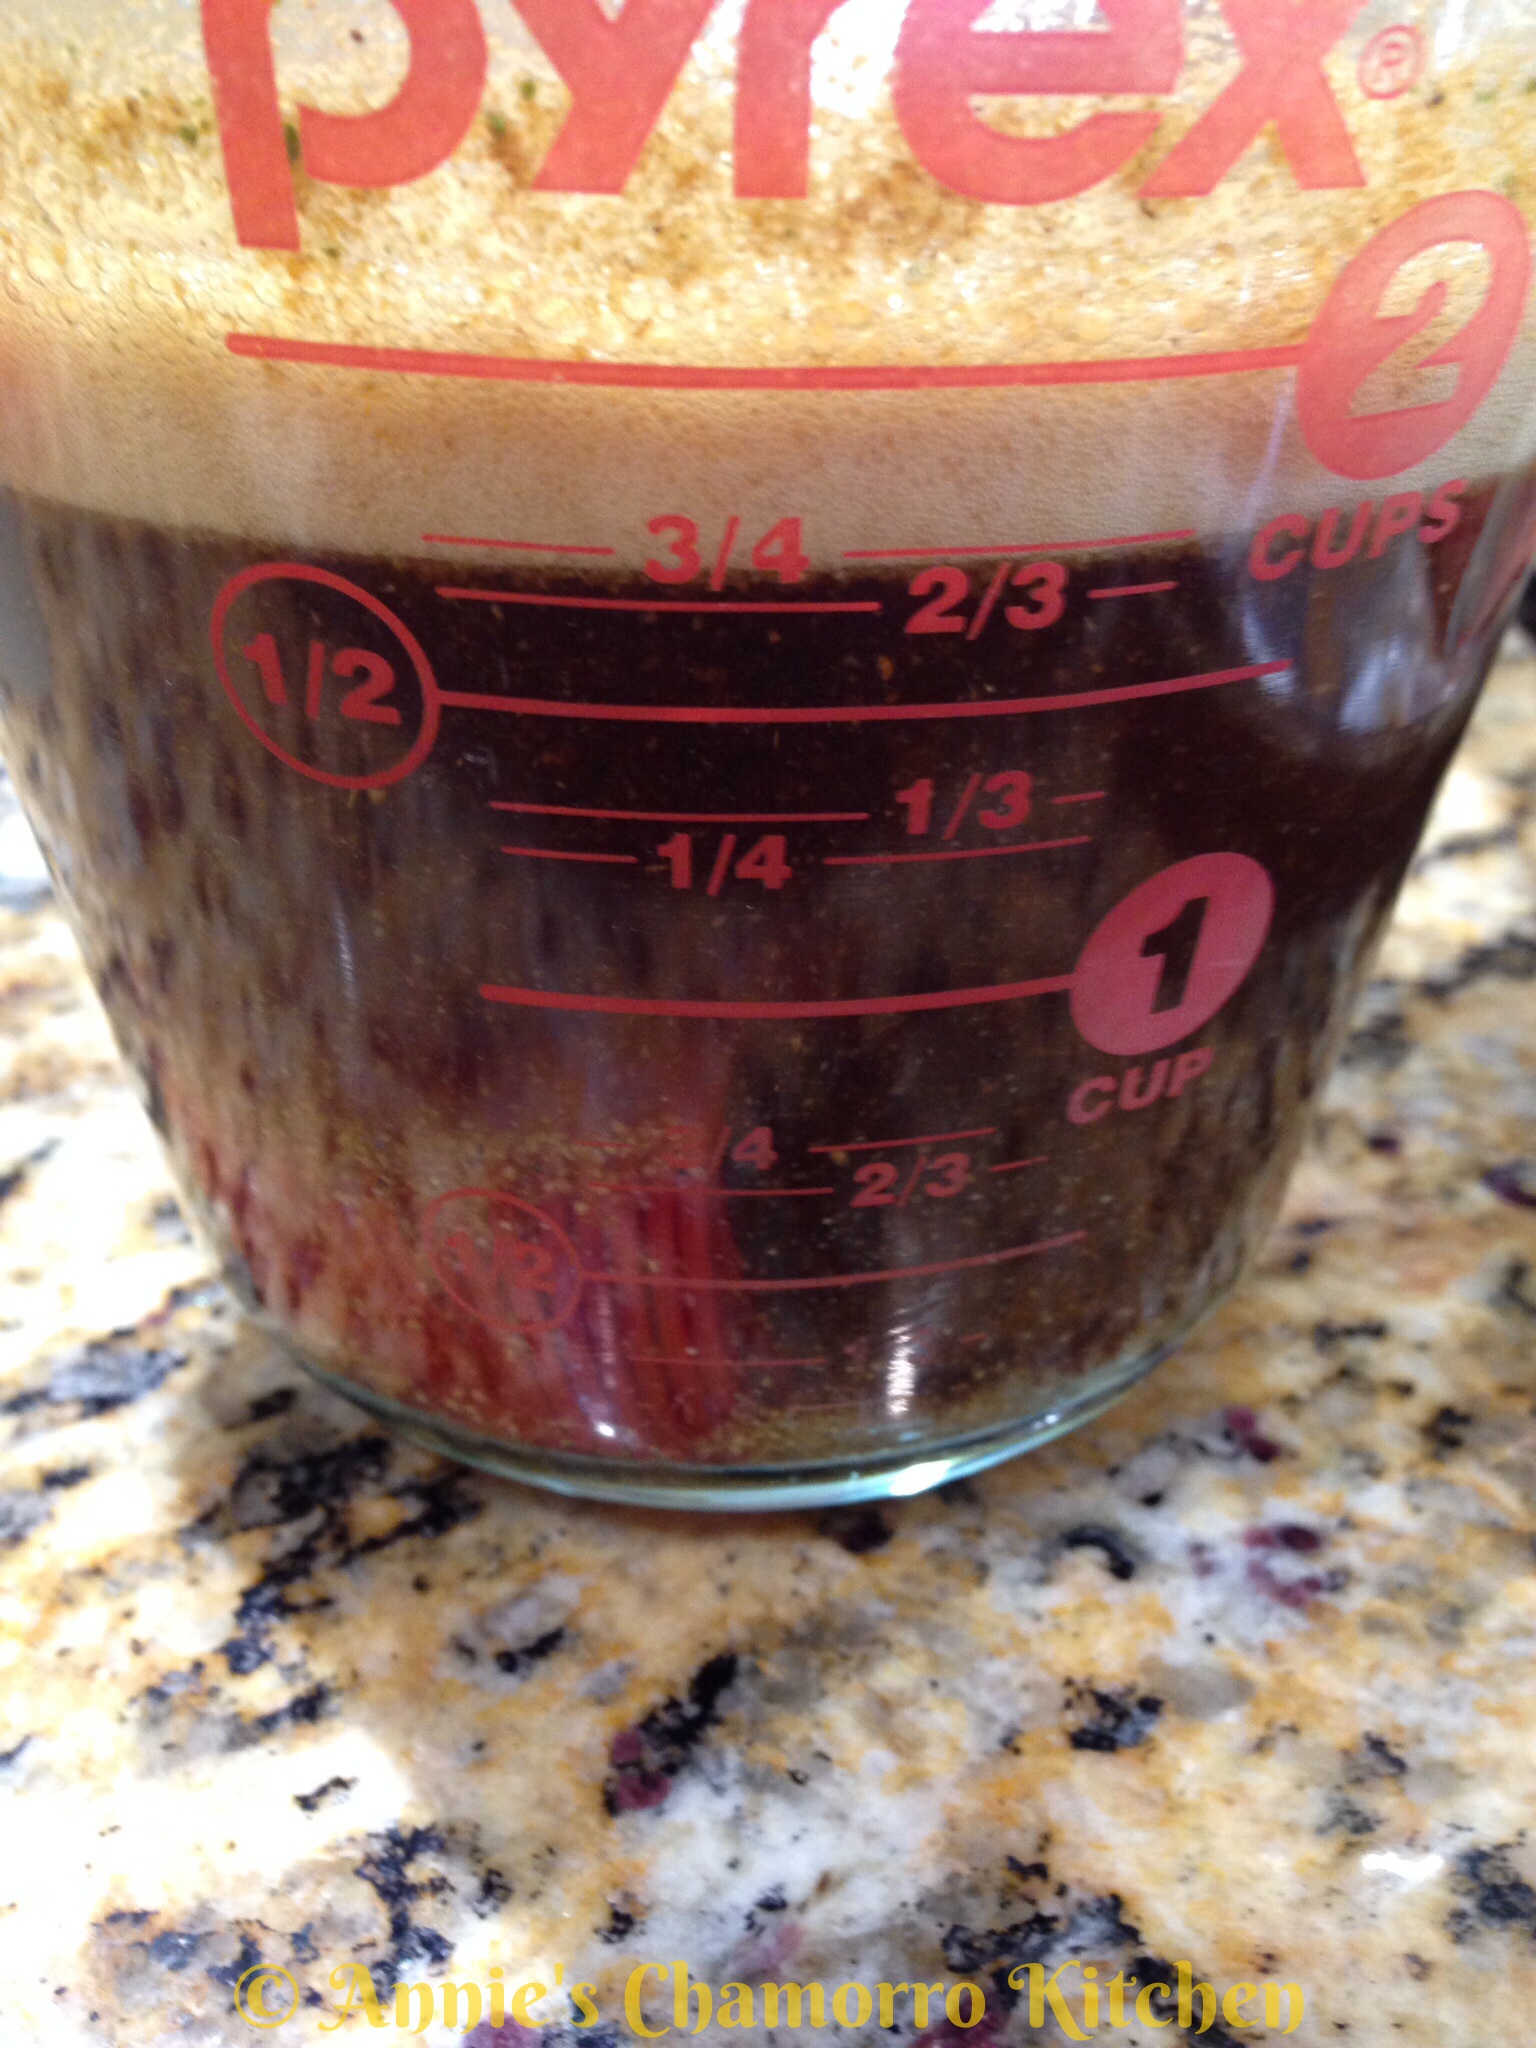
I also save some of the dry rub mixture to make a mop sauce to baste the brisket as it smokes.  All that’s needed to make the mop sauce is to mix a bottle of your favorite beer (ale works well with this recipe) with about 1/2 cup of the dry rub mixture.  Don’t worry–the alcohol cooks out by the time the brisket is done.

I own a smoker/grill, which is what I used to smoke my brisket.  You don’t need a smoker to make this, however.  You can bake this long and slow in your oven.  The result will still be finger-licking-good.

Give my recipe a try.  I think you’ll like it. 🙂

Smoked Brisket

image

Ingredients:

  • 1 cup brown sugar
  • 2 tablespoons cumin
  • 1 tablespoon espresso powder
  • 1 tablespoon salt
  • 1 teaspoon black pepper
  • 2 tablespoons garlic powder
  • 1 tablespoon onion powder
  • A nicely marbled brisket, about 7-8 pounds, with a nice layer of fat on one side
  • 1 bottle beer (I used a 12-ounce bottle of Alaskan ale)

Directions:

1.  In a small measuring cup, mix together the brown sugar, cumin, espresso powder, salt, black pepper, garlic powder and onion powder.

image

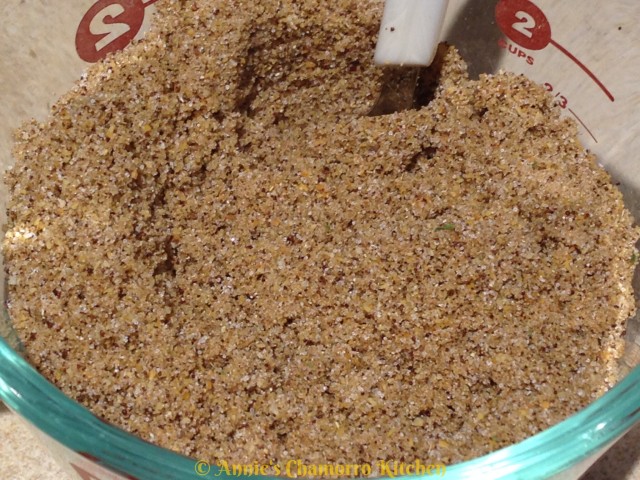
2.  Save 1/2 cup of the dry rub to make the mop sauce.  Spread the rest of the rub evenly over both sides of the brisket.

image

3.  Mix the beer with the remaining 1/2 cup of the dry rub mixture.  Set this aside.

image     image

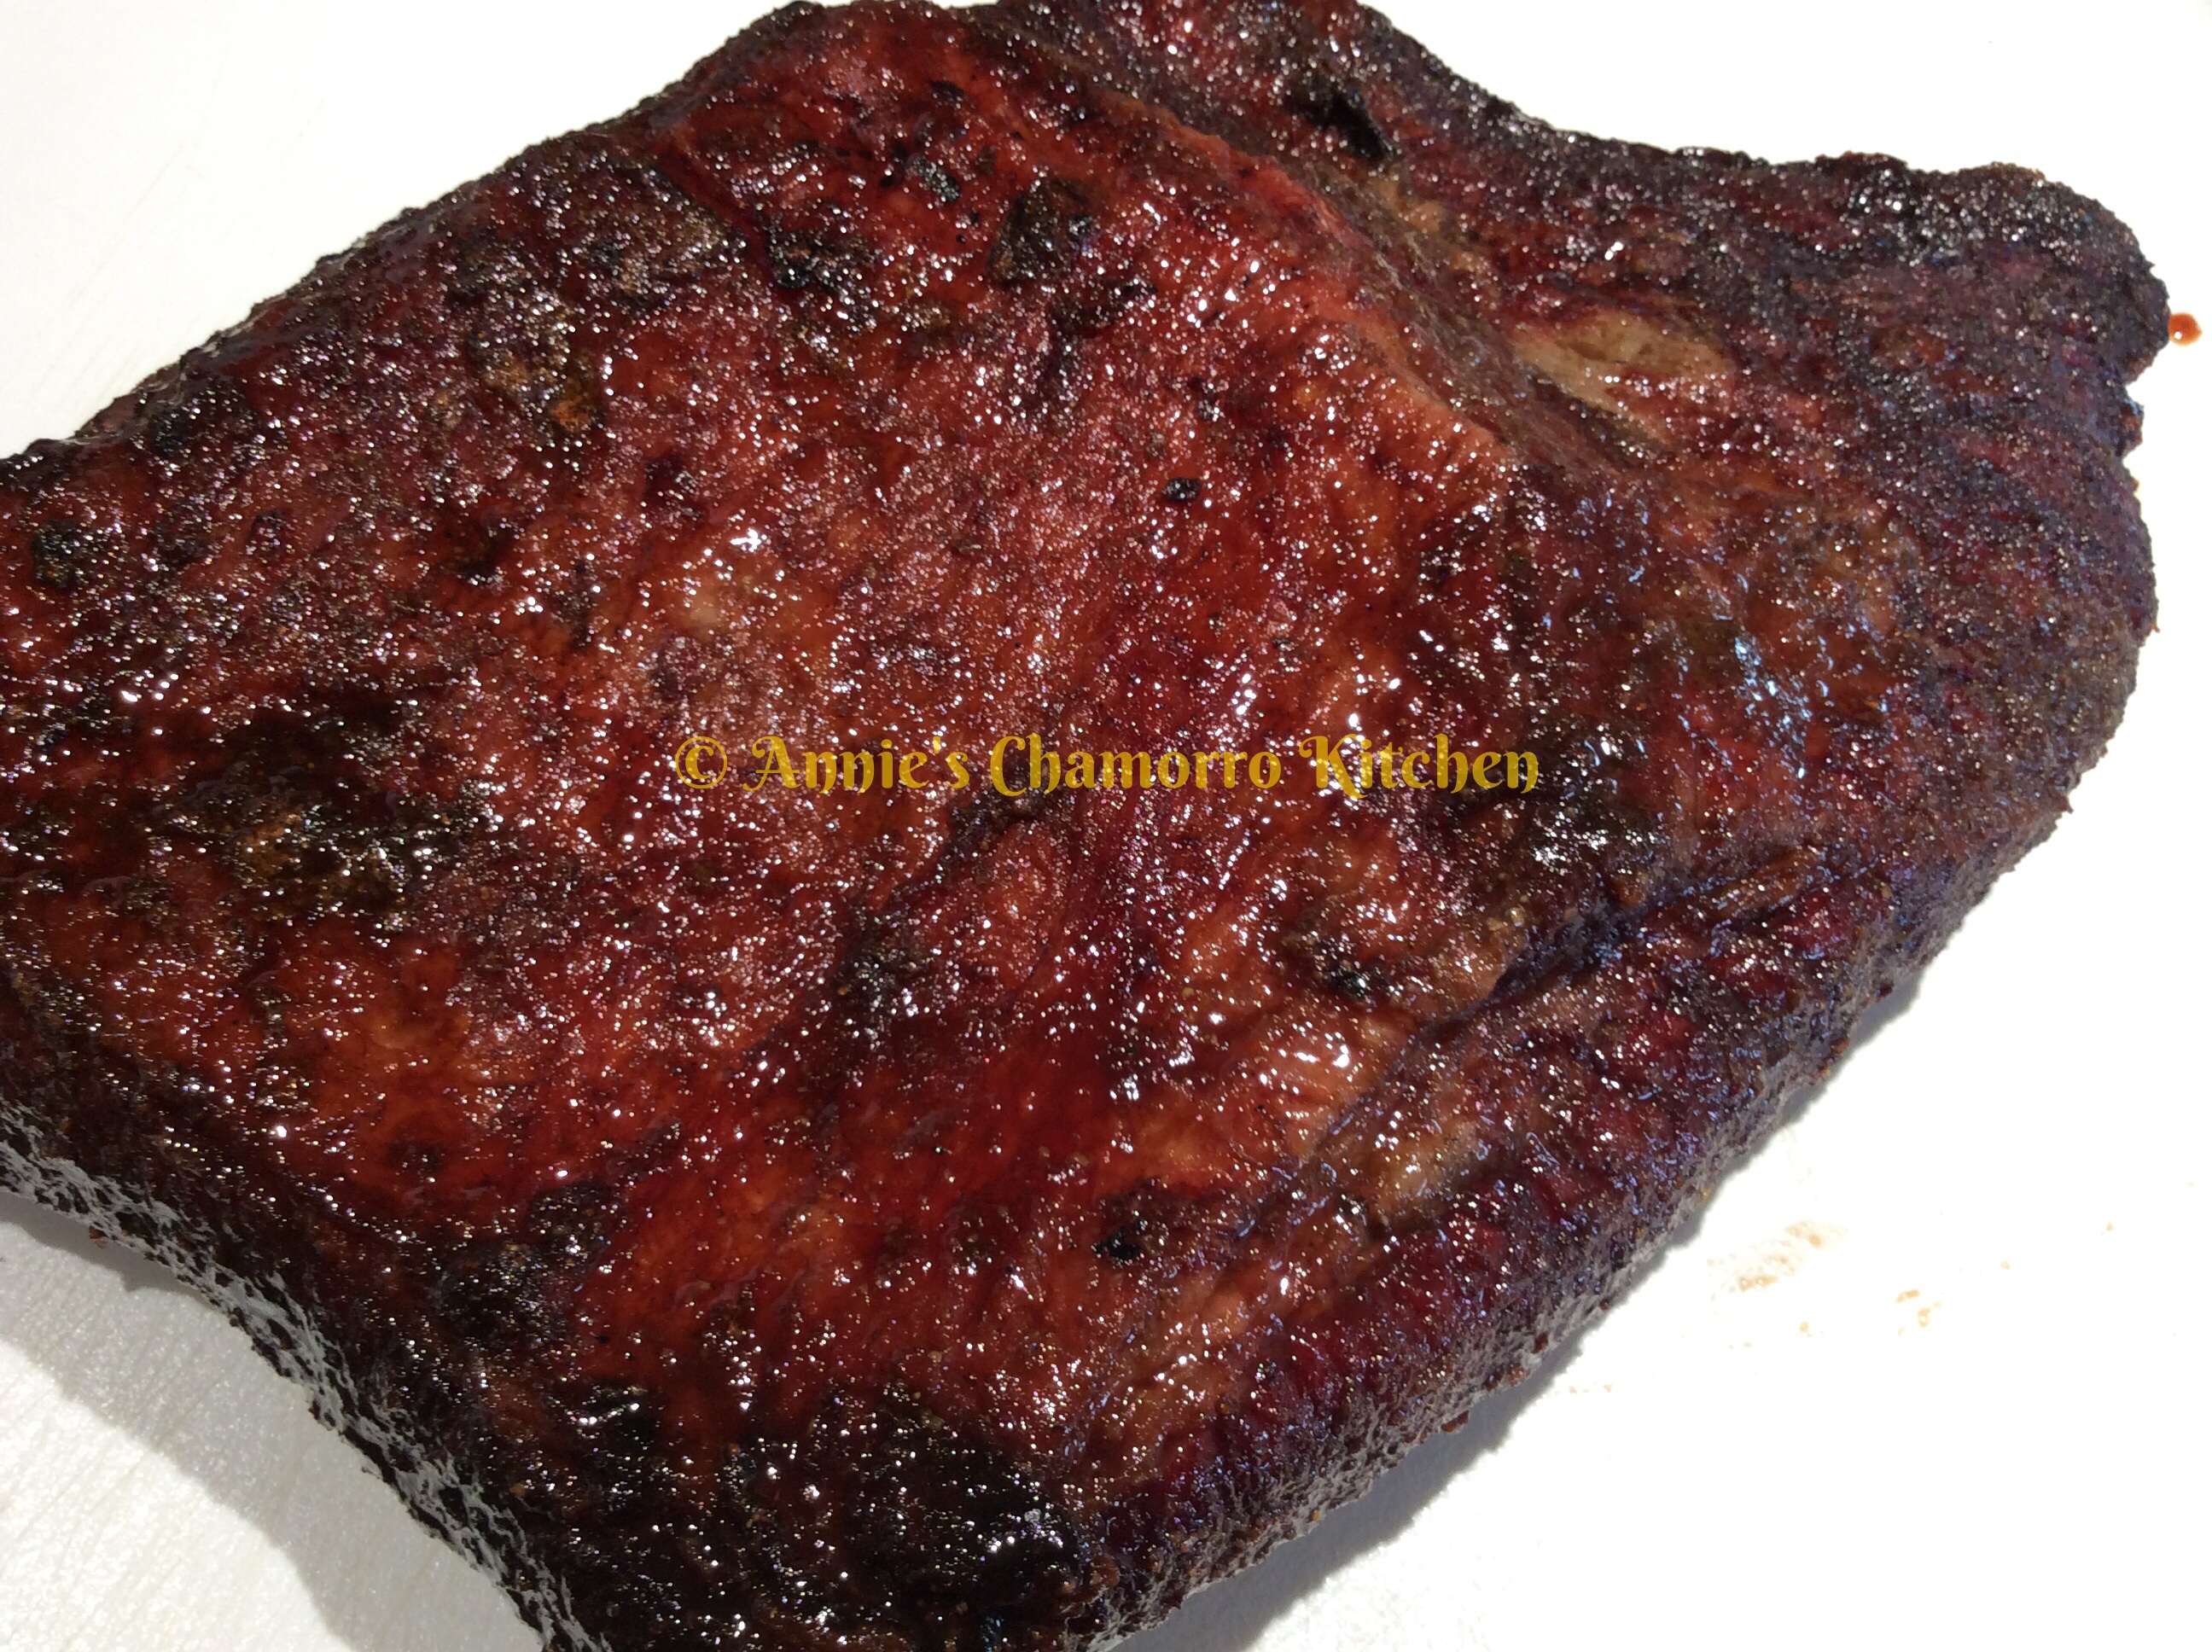
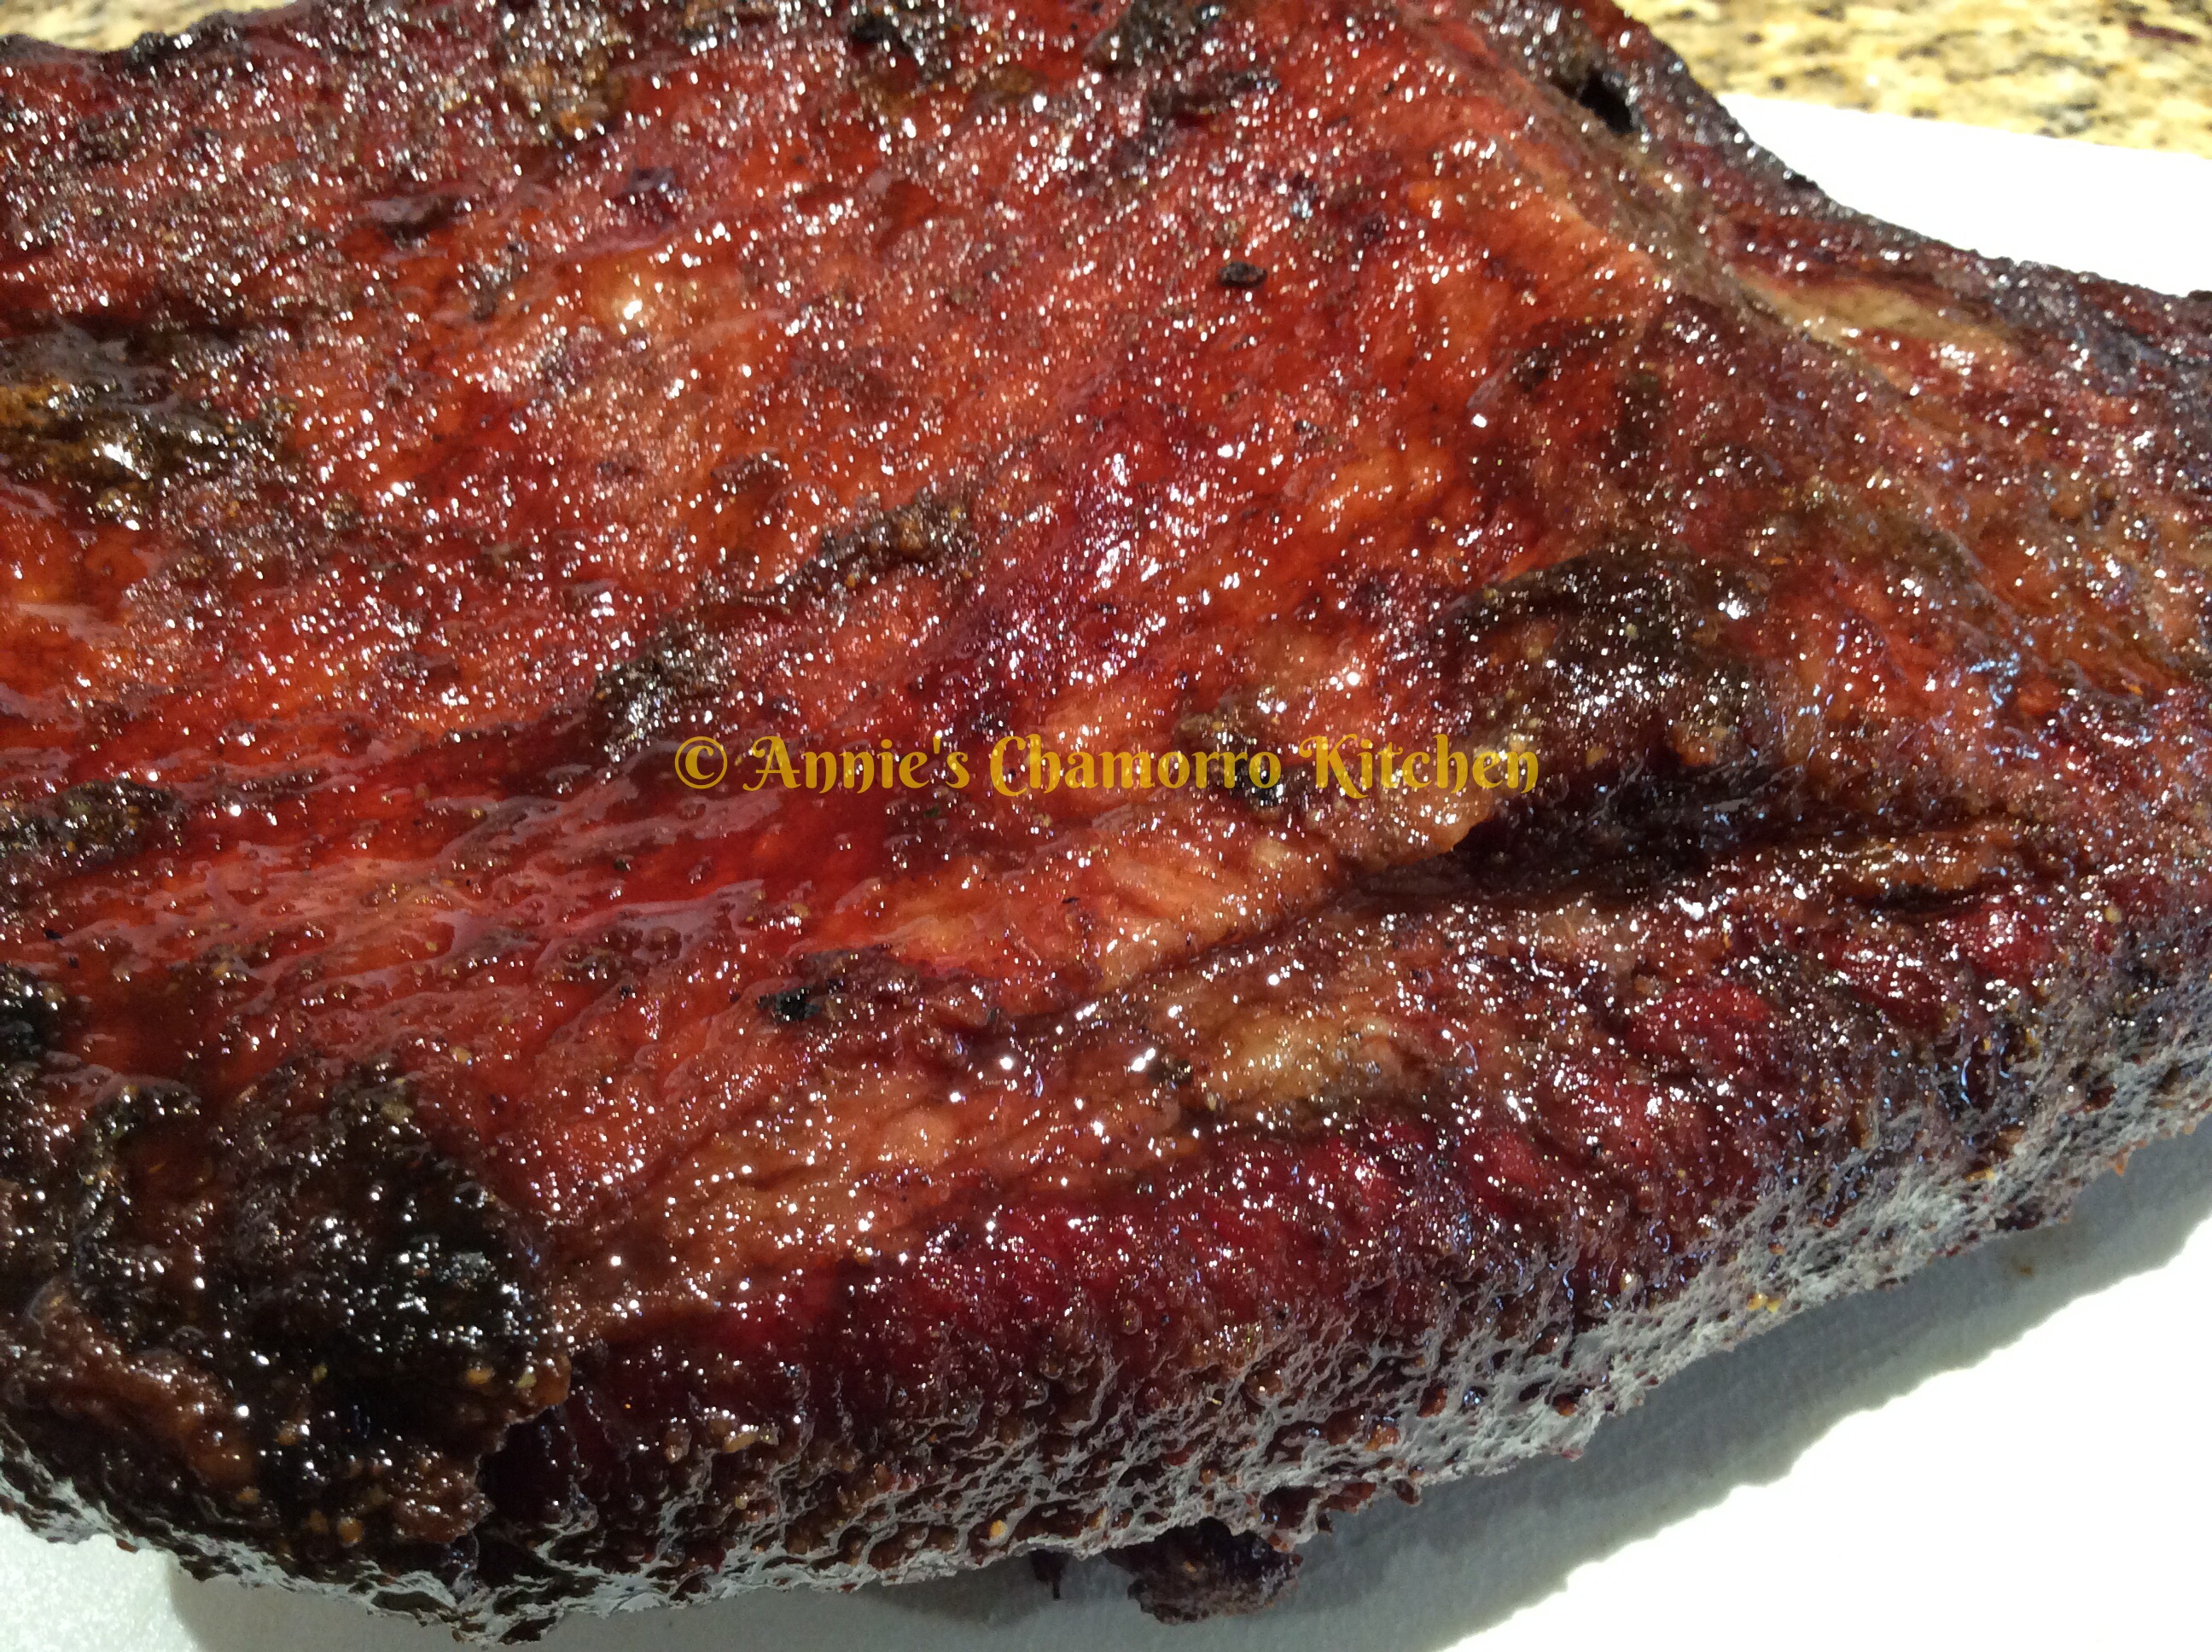
4.  If you own a smoker, place the brisket on the grill, fat-side facing up.  Smoke the brisket for one hour, then turn the temperature to 225 degrees to cook for the remaining time.  You’ll smoke/cook the brisket for a total of 6 hours.  Generously baste the brisket once every hour.

image

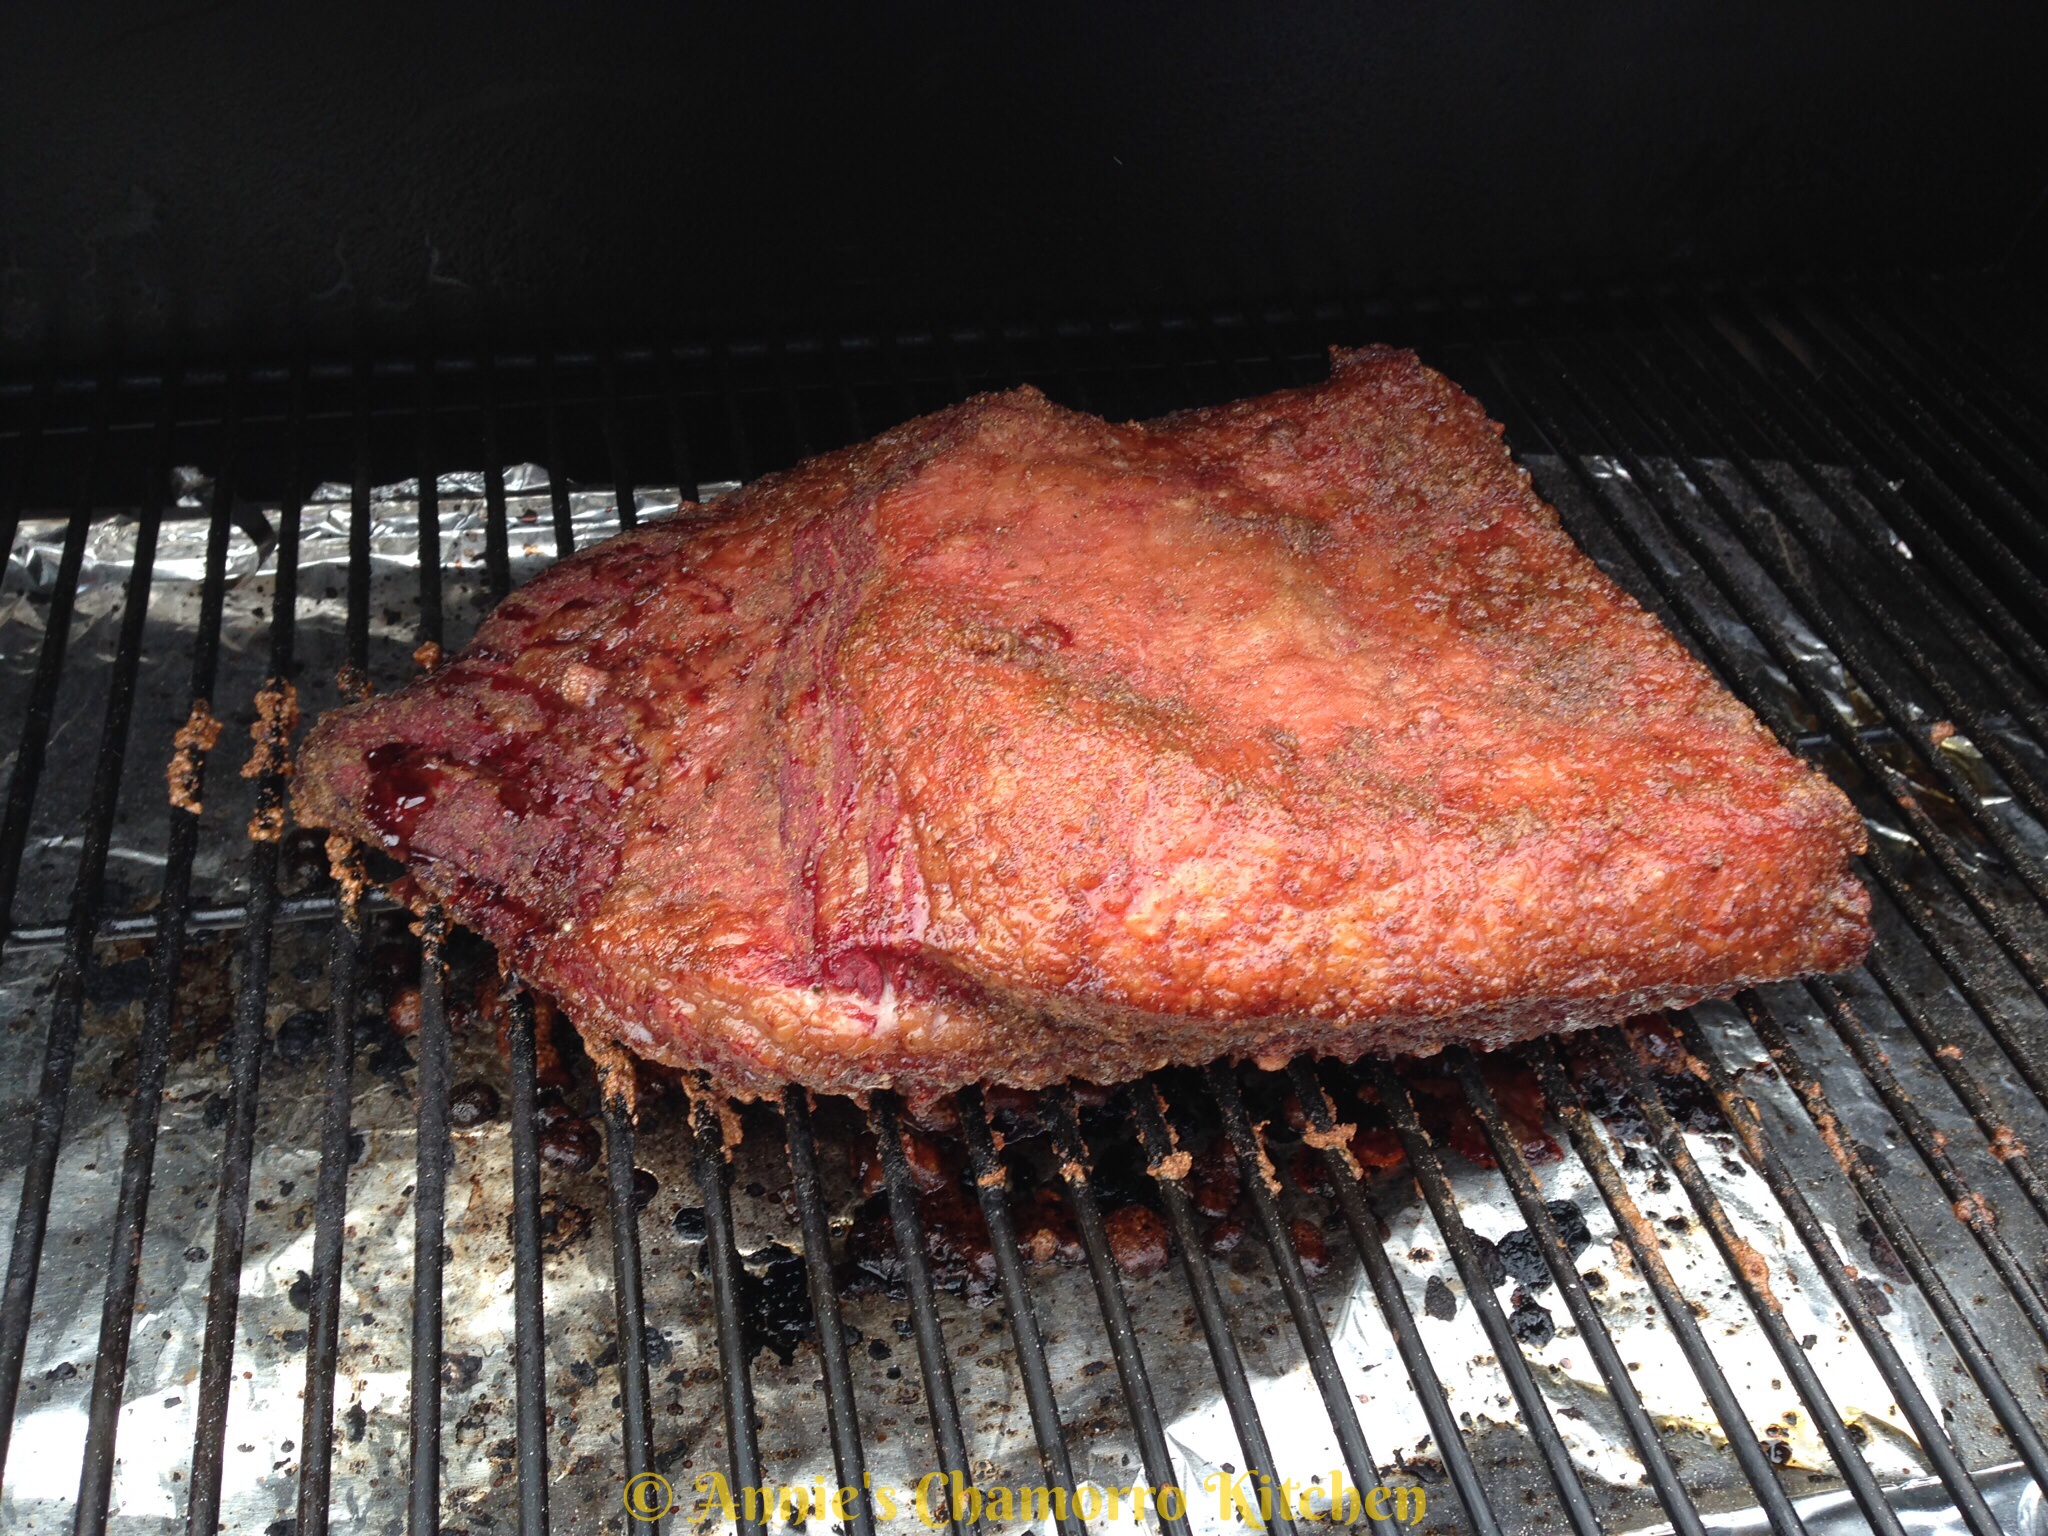
5.  Mid-way through the cooking time, after about 3 hours or so, flip the brisket over so that the fat is on the bottom.  Continue basting every hour; stop basting one hour prior to the brisket being done.

image

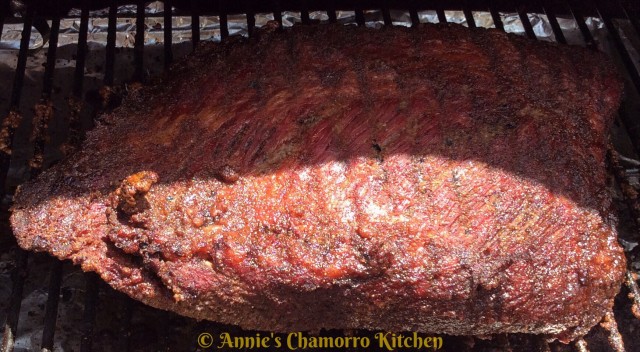
6.  When the brisket is done (after it’s been smoking/cooking for about 6 hours), remove it from the grill or oven.  Wrap the brisket in aluminum foil and let the brisket rest for 30 minutes.

image

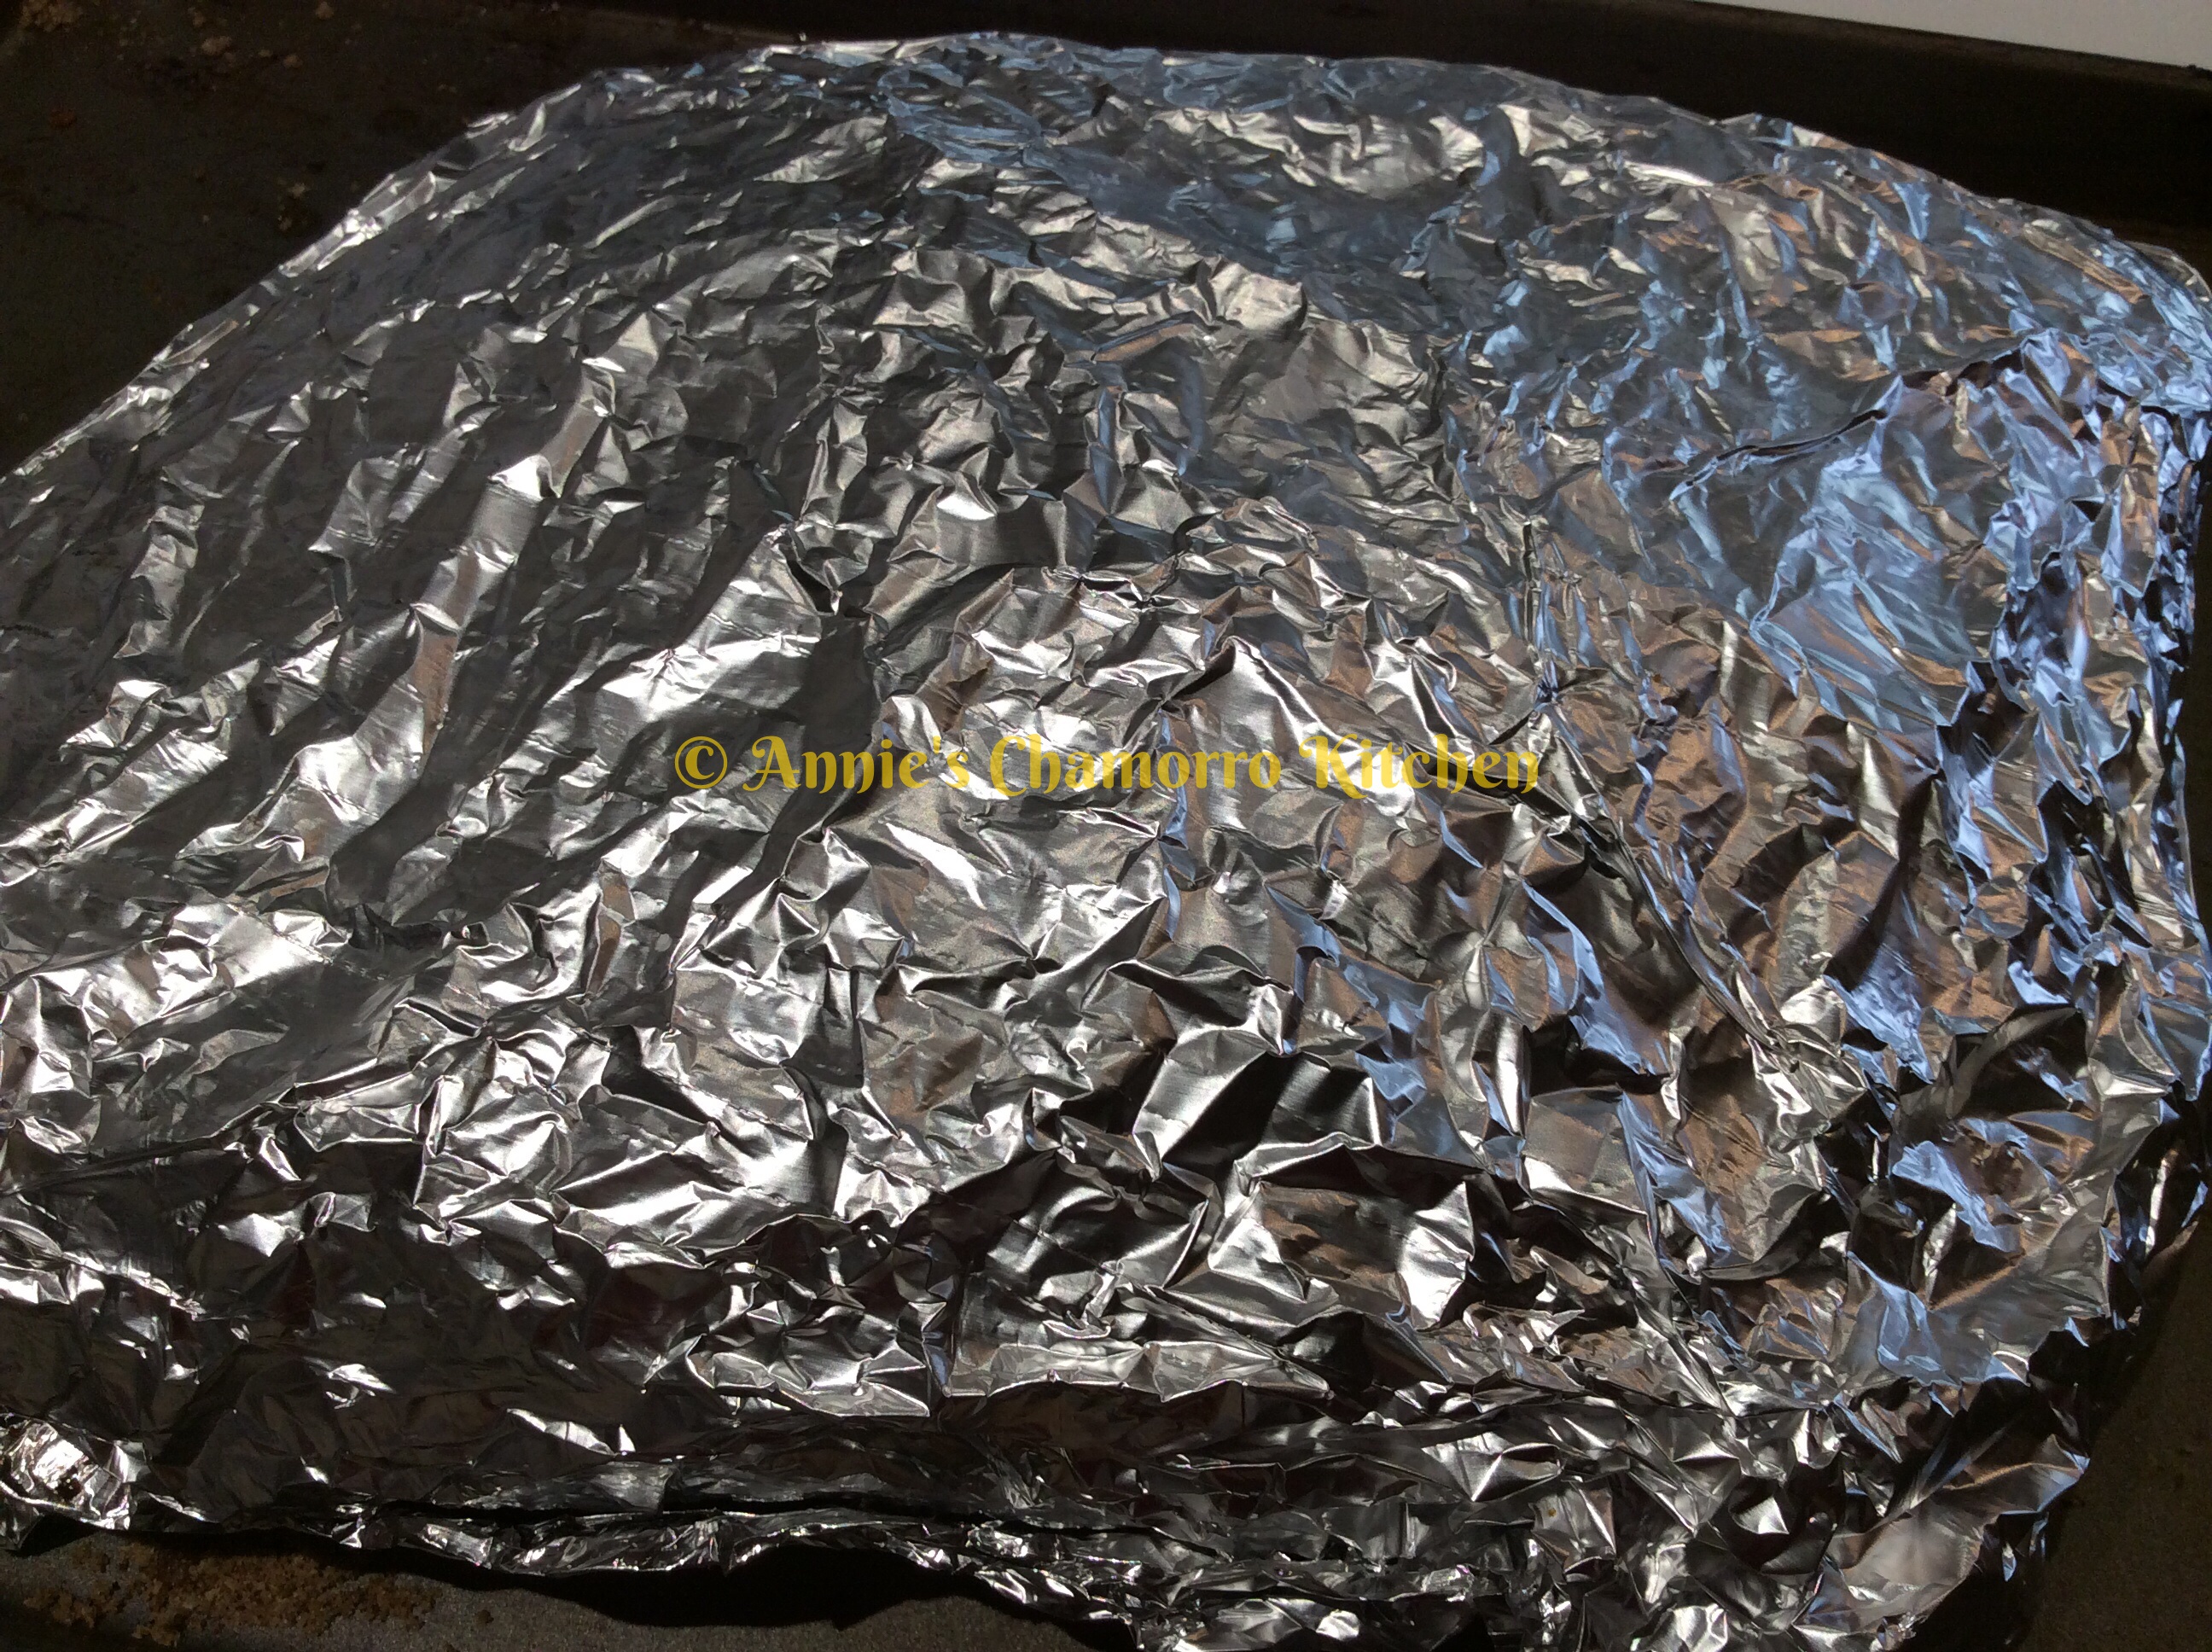
7.  After 30 minutes of resting, unwrap the brisket.

image

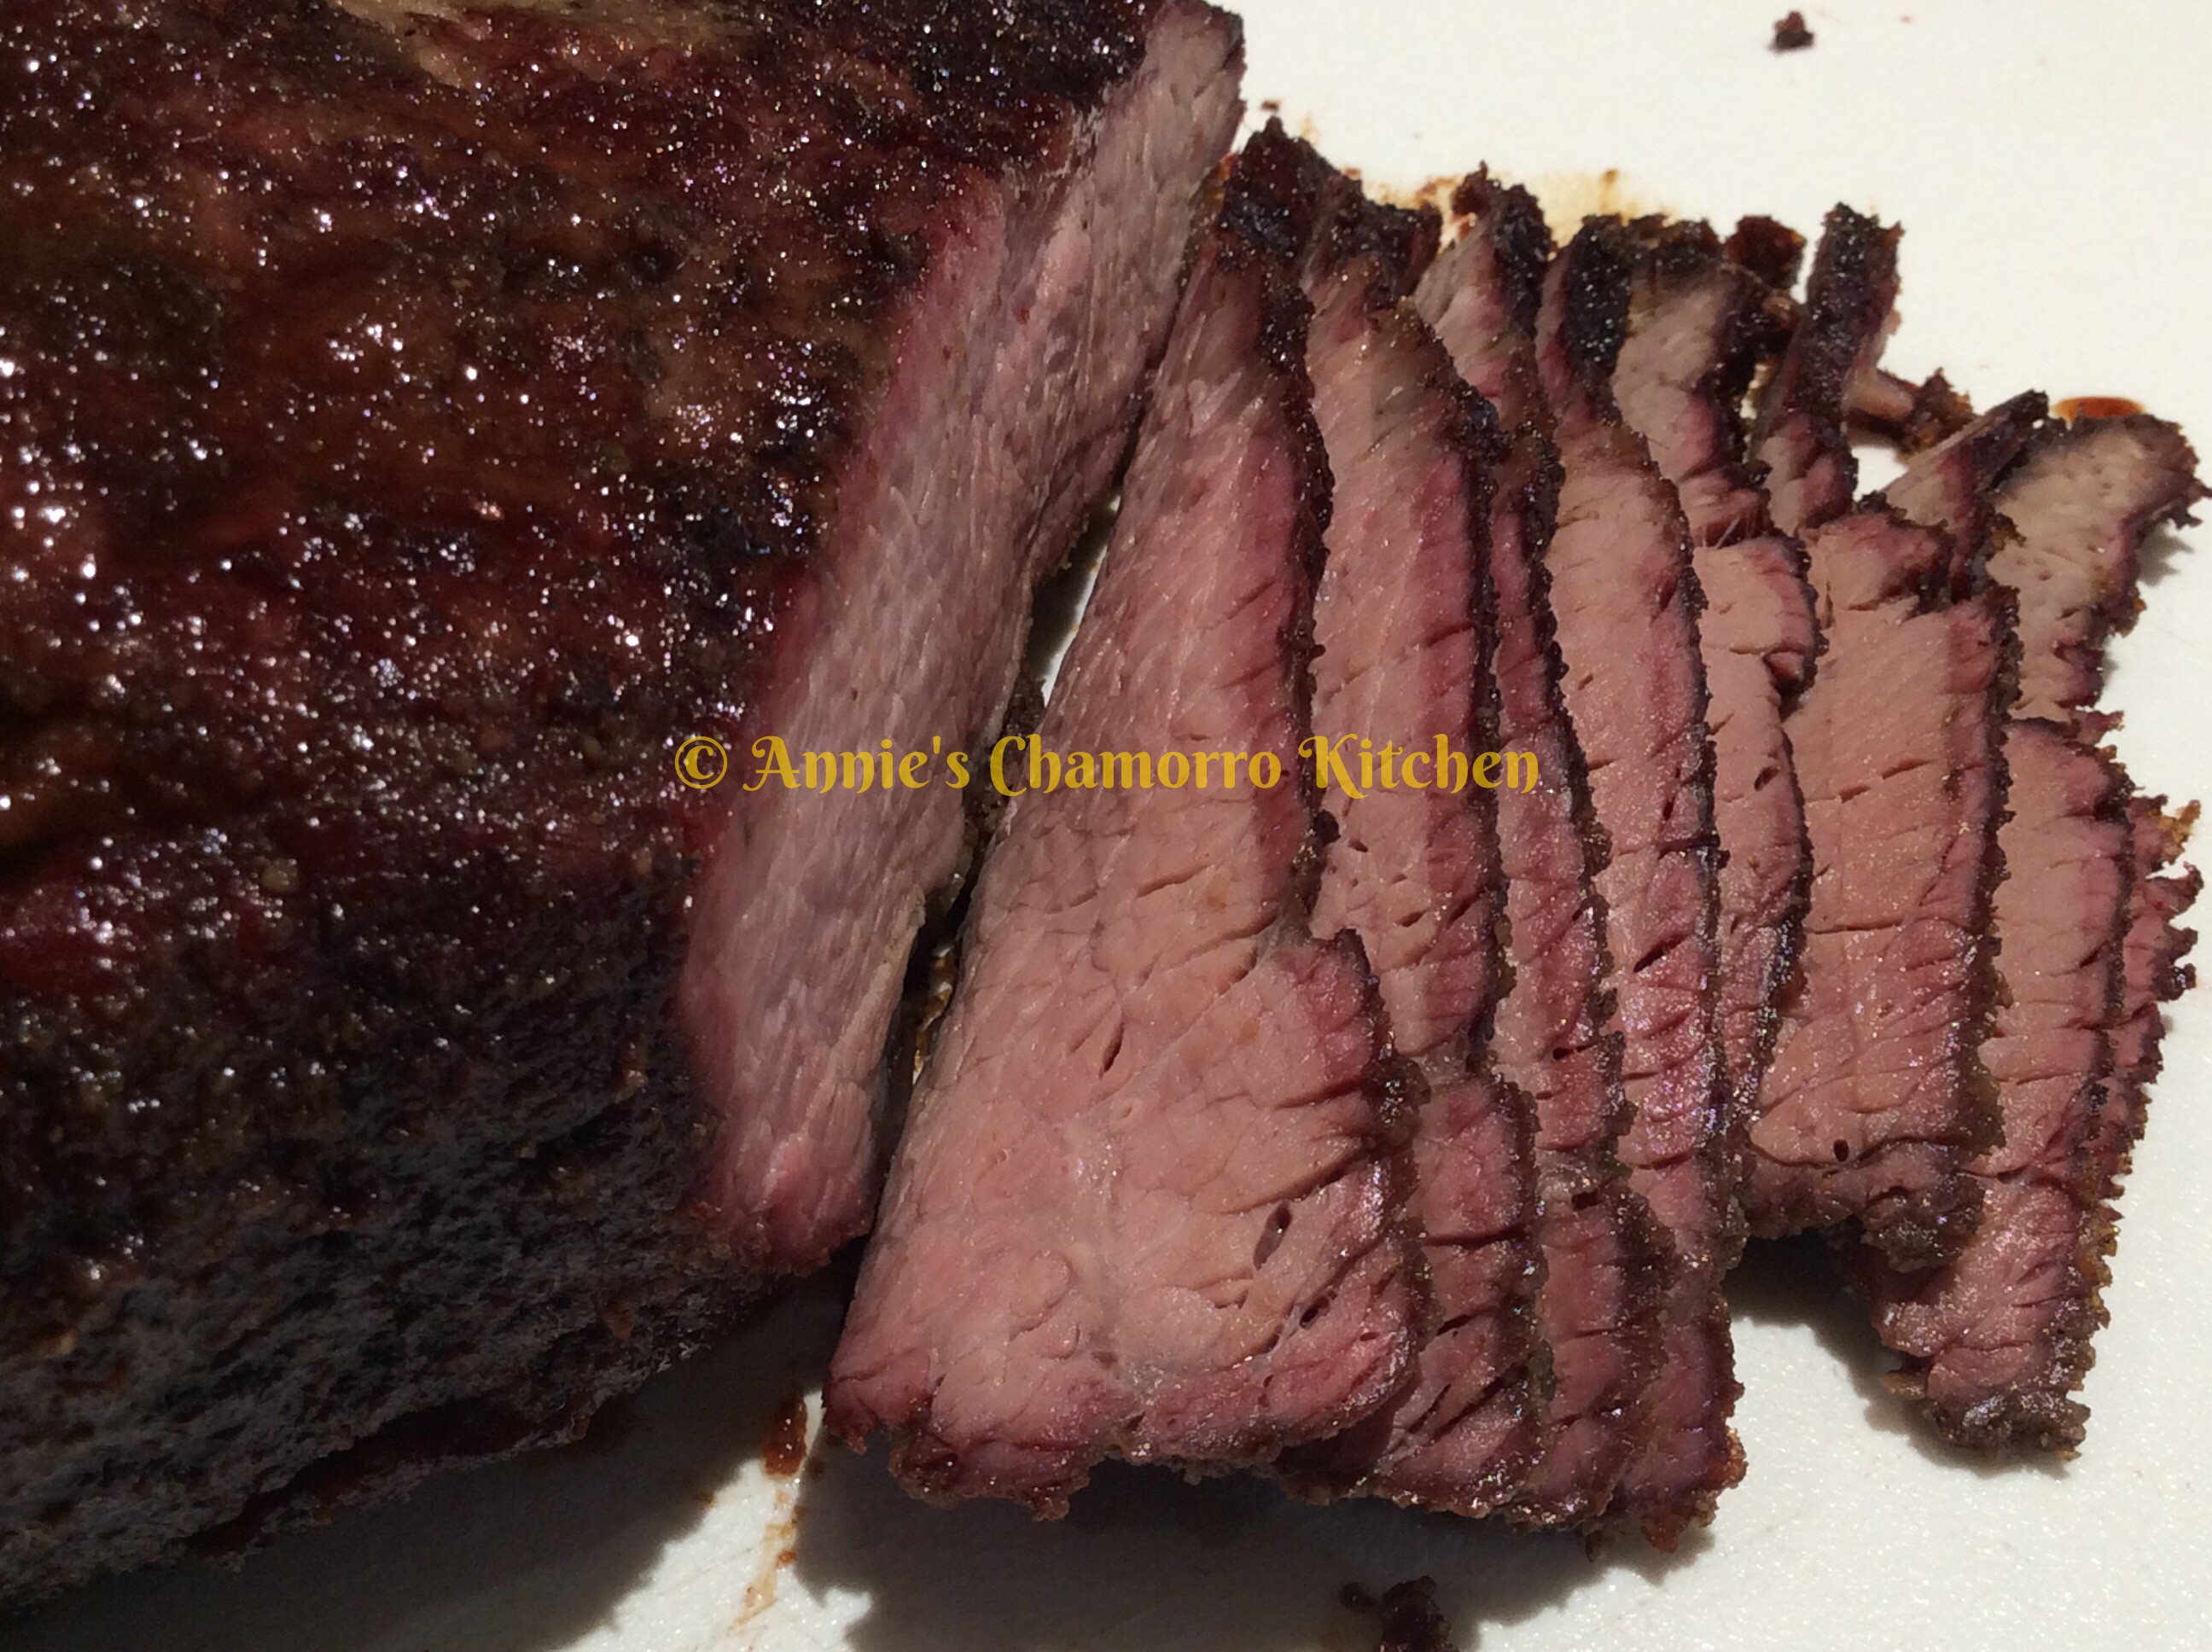
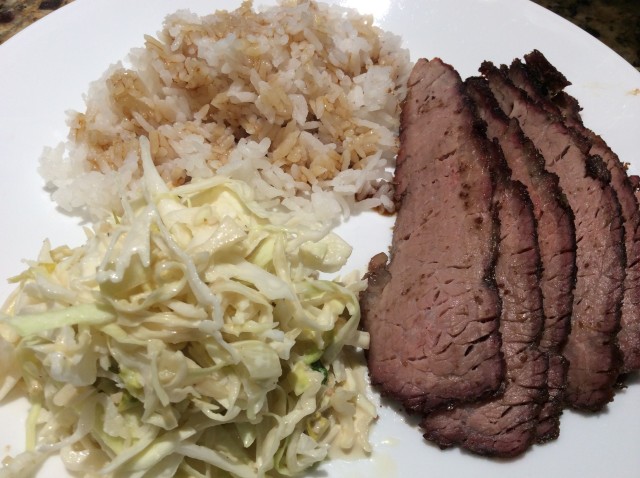
8.  Thinly slice the brisket, ensuring you cut across the grain of the meat.

image

Serve and ENJOY!

image

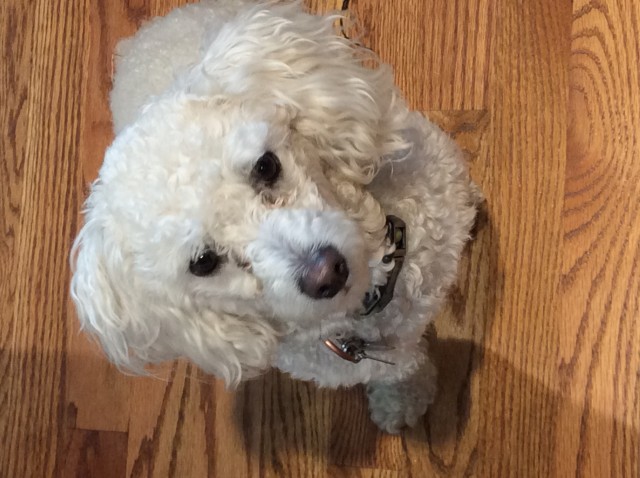
Our mini-poodle is waiting patiently for his share! 🙂

image

Spinach with Coconut Milk

This is a classic Chamorro dish that is a staple on most fiesta menus.

The traditional dish is called Gollai Hågun Suni, made with taro leaves rather than spinach.  I still remember watching my mom make this dish the traditional way.  She’d use a machete to cut a huge stack of taro leaves growing in our back yard.  After rinsing each leaf, mom would stack then roll them up, cigar-like, then cut the leaves into thin ribbons.  Mom then placed the taro leaves into a large pot filled with some water,  cooking them long and over low heat so that the leaves can cook down and tenderize before adding freshly pounded orange ginger or turmeric (we used a hammer back in the day to pulverize the ginger root), freshly squeezed coconut milk, the juice of lemons picked from mom’s tree, and diced hot peppers from the plants growing by the door to the outside kitchen.

In this day and age, convenience (and making necessary substitutions due to not having traditional ingredients readily available) dictates using spinach leaves rather than traditional taro in this recipe.  I buy frozen spinach that’s cooked and chopped — it saves so much time.  Just defrost and drain the spinach leaves, add the rest of the ingredients, heat, and serve!  What normally takes several hours if prepared the old Chamorro way now takes minutes.

Give my recipe a try.  It’s a great addition to your Chamorro fiesta menu. 🙂

Spinach with Coconut Milk

image

Ingredients:

  • 3 (10-oz.) packages frozen, cooked, and chopped spinach
  • 3 cans coconut milk
  • 2 tablespoons ground turmeric
  • 2 teaspoons sea salt, more or less, to taste
  • 2 teaspoons onion powder (you can use fresh onions, just saute them until the onions are softened)
  • 2 teaspoons lemon powder (or use freshly squeezed lemon juice), more or less, to taste
  • 1 teaspoon hot pepper paste or diced hot peppers, optional (add more or less, to taste)

Directions:

1. Place the frozen spinach in a colander (then place the colander inside a larger bowl) to thaw the spinach and allow any water to drain. After the spinach is completely thawed, squeeze the spinach to get rid of as much water as you can. Place the fully drained/squeezed spinach into a medium-sized pot.

image

2.  Add the coconut milk, turmeric, salt, onion powder, lemon powder, and hot pepper to the pot. Stir to combine the ingredients.

image

3. Cook the spinach over low heat, just until heated through. Do NOT bring the mixture to a boil or the coconut milk will start to separate.

image

4. Taste and add adjust the amount of salt, lemon power or juice, and hot pepper to your liking.  Serve and ENJOY!

image

« Older Entries Recent Entries »