Archive for August 30, 2013

Fresh Shrimp Kelaguen

I love shrimp kelaguen.  I love kelaguen, period, but shrimp kelaguen is at the top of the list, especially if it’s FRESH SHRIMP kelaguen.  Oh, and serve this up with fresh corn titiyas…man, oh, man, my mouth is watering just thinking about it!

For those of you who don’t know what kelaguen is, it’s kind of like ceviche.

Funny story…I had a recipe for fresh shrimp kelaguen, then my sister, Carolyn, shared hers as well.  I went back and compared our recipes and they were almost identical. Of course they would be nearly identical — we learned to cook from the best teacher in the world, OUR MOM. Here’s to all of our moms and dads, aunts, uncles, grandparents … thanks for teaching us so many things, especially how to make all this yummy Chamorro food!

So, back to fresh shrimp kelaguen.  This is a time consuming process, but it is WELL WORTH the effort.  If this is served at a fiesta, I ignore all other food and gorge myself on this delicacy, it’s that good.

Here is my sister, Carolyn’s recipe.

Give it a try and let us know how you like it.  Enjoy!

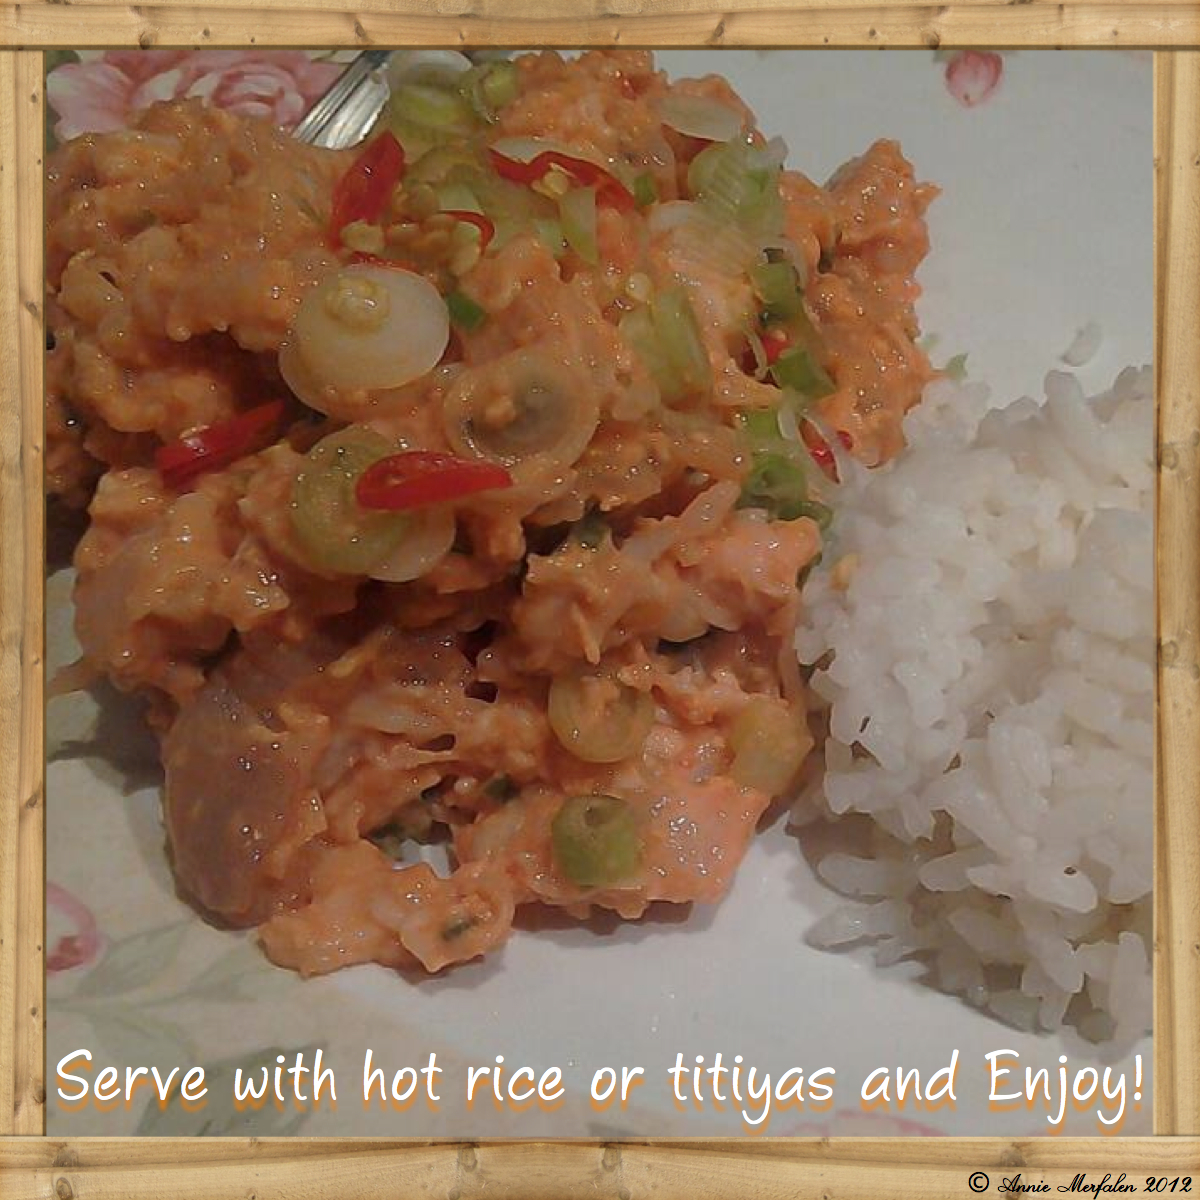
FRESH SHRIMP KELAGUEN

Recipe by Carolyn Merfalen

Carol's Shrimp Kelaguen 1

INGREDIENTS:

  • 5 pounds fresh shrimp, with the head and shell on
  • Salt, to taste
  • Lemon juice (or powder), to taste
  • 6-8 stalks green onions, sliced
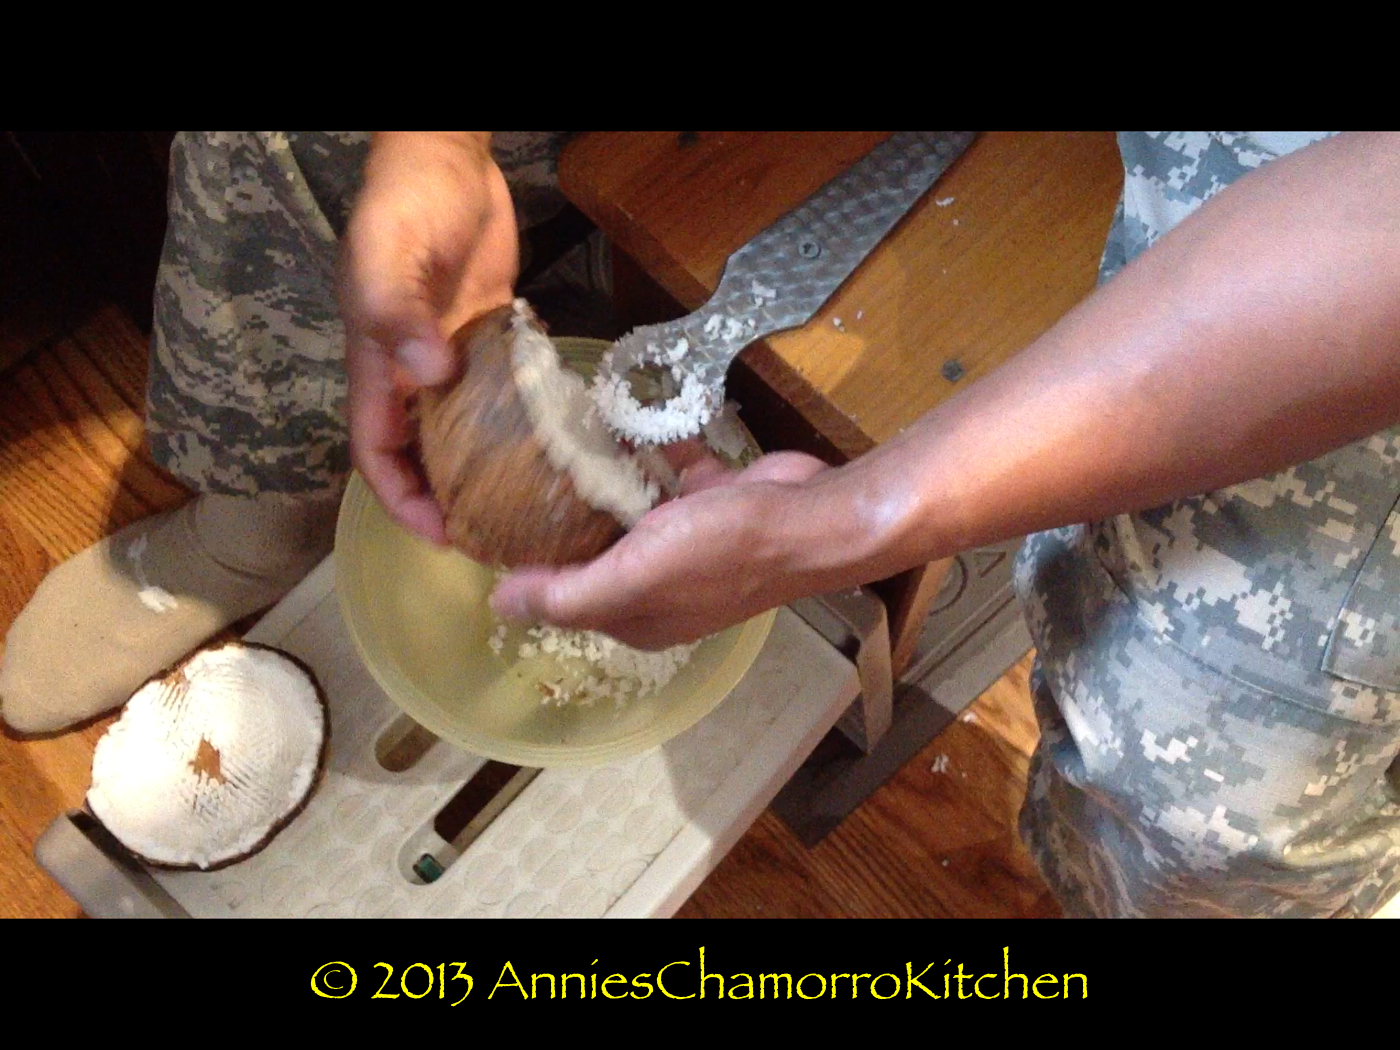
  • Freshly grated coconut
  • Hot Pepper, to taste

DIRECTIONS:

1.  Fresh shrimp (with the heads on) is best for kelaguen. You can, however, still make it using frozen shrimp (again, with the heads on).  I recommend pouring boiling water over the raw shrimp, to lessen its sliminess. Let the water run right off the shrimp, preventing it from puddling. You want to avoid it being cooked in the boiling water.

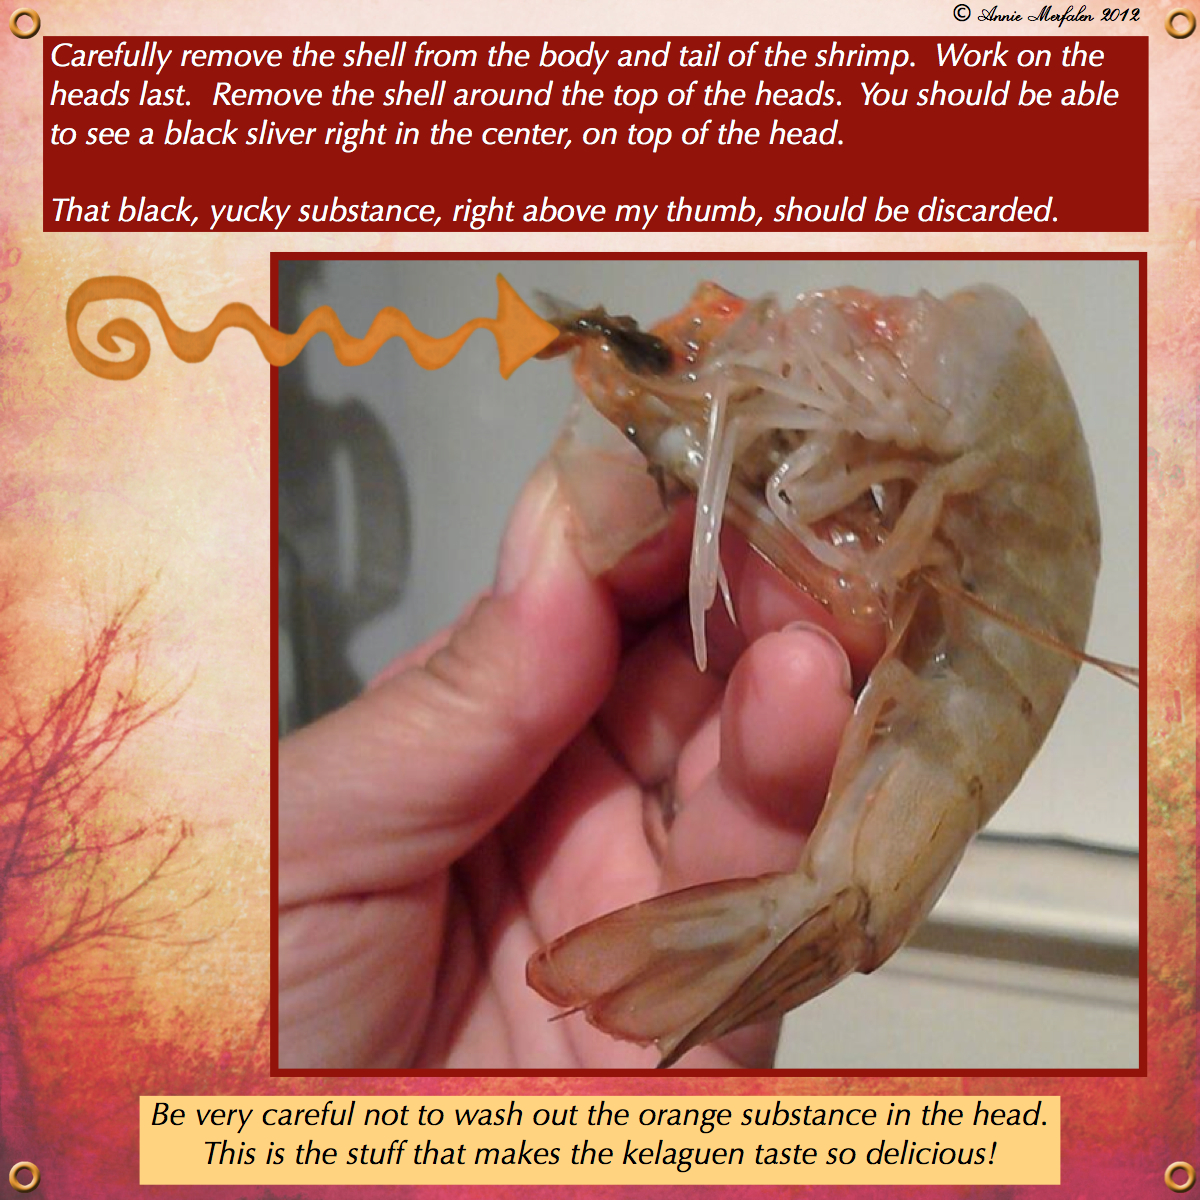
2.  Depending on your liking, you may keep the shells on. Fresh shrimp is best for this since the shells are very soft and easy to chew and swallow. Otherwise, carefully remove the shells from the body and tail of the shrimp, especially if you are using store-bought boxed frozen shrimp since those shells are hard.

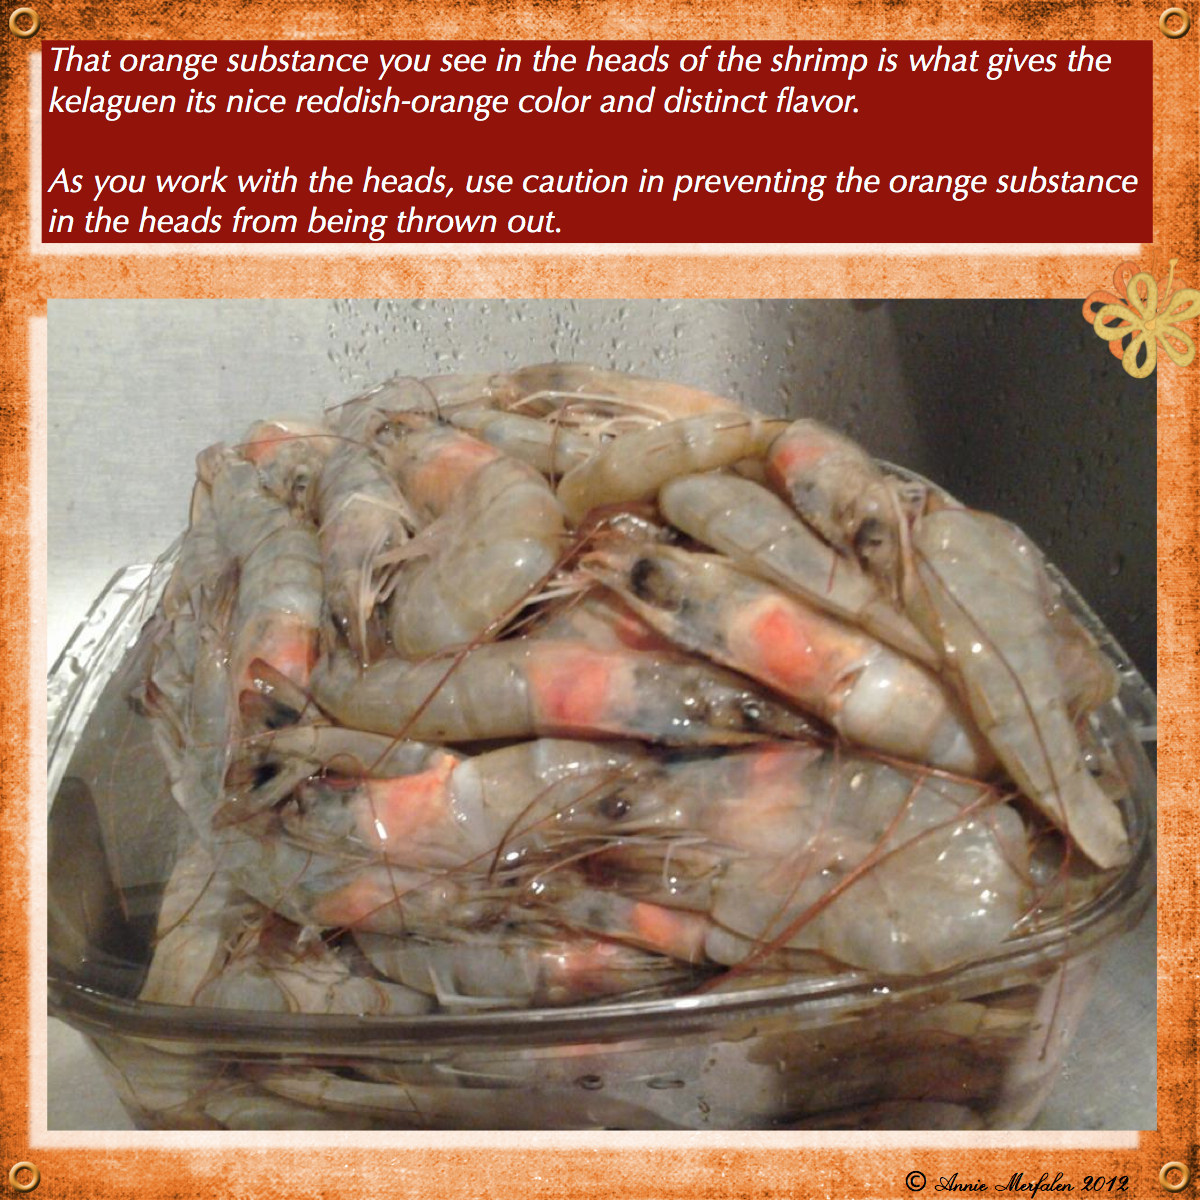
3.  Work on the heads last…carefully remove the shell around the top of the heads. You should be able to see a tiny black sliver right in the center, top of the head, after removing the shell. (I don’t know what it is, but it looks dirty. My mom also mentioned it’s bitter.)  As you work with the heads, use caution in preventing the orange substance in the heads from being thrown out. That orange substance is what gives the kelaguen its reddish color and very distinct flavor.

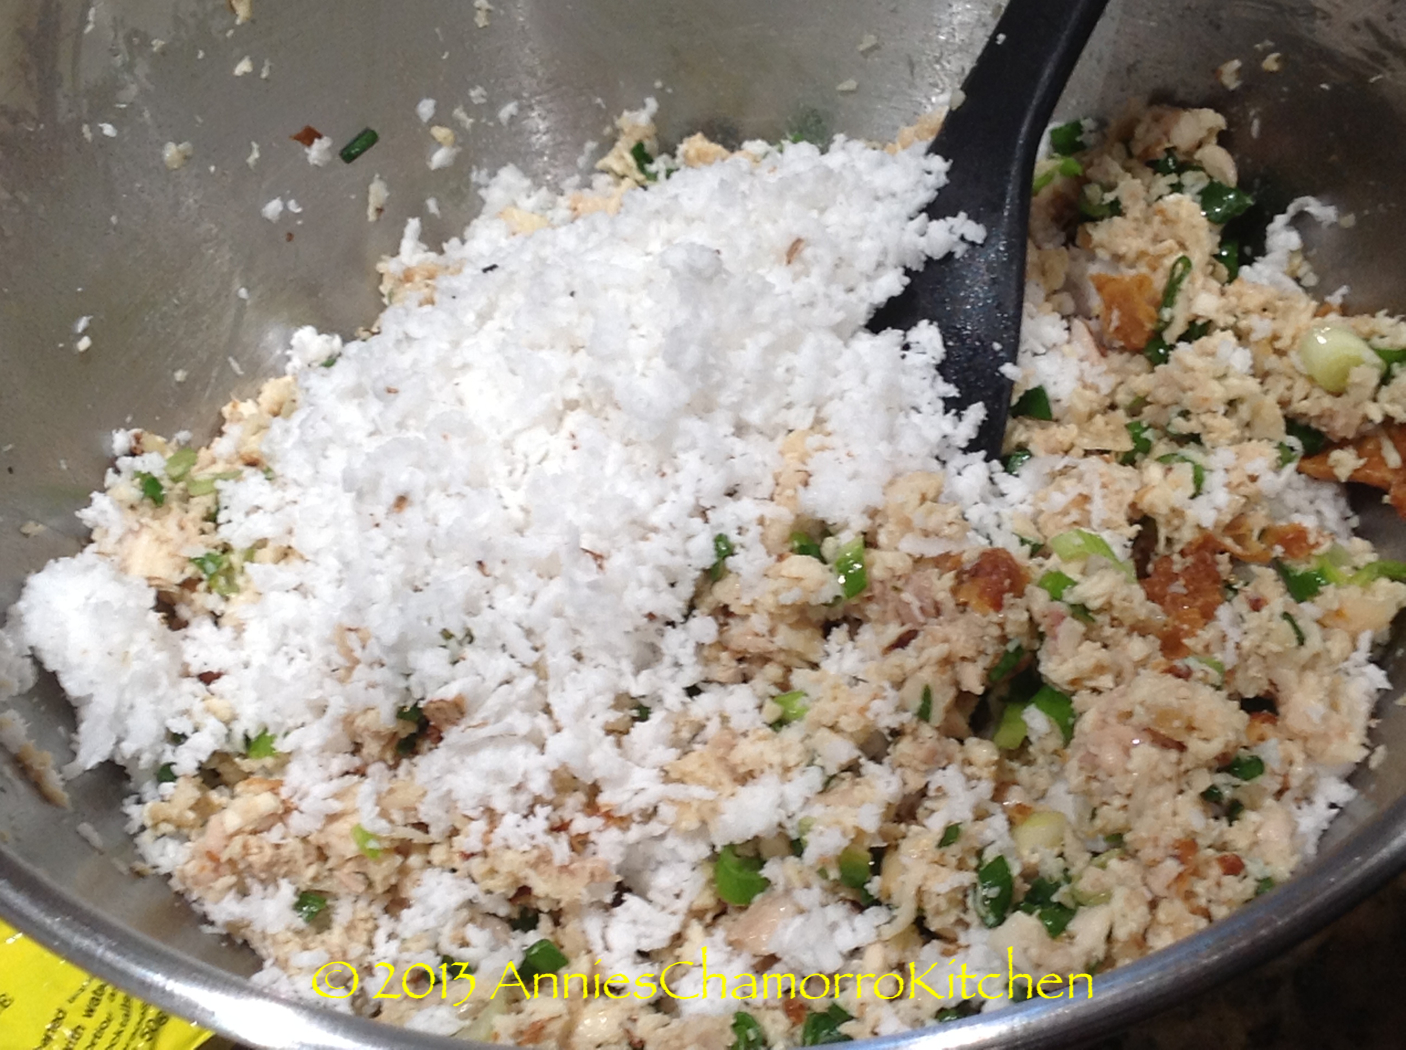
4.  Devein the shrimp, if the shells were removed. (I usually remove them and devein them.) Mash the shrimp a bit using a fork.

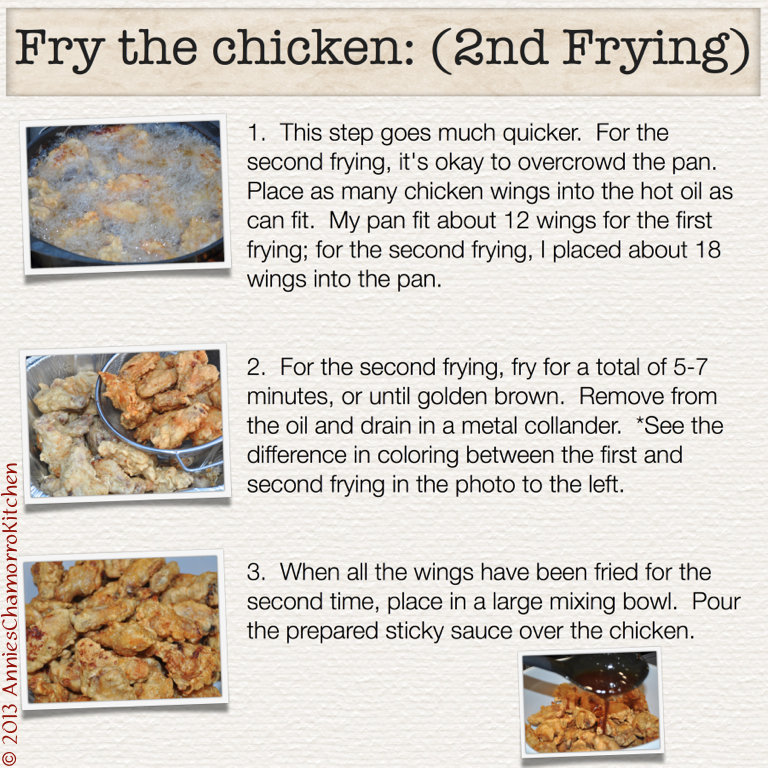
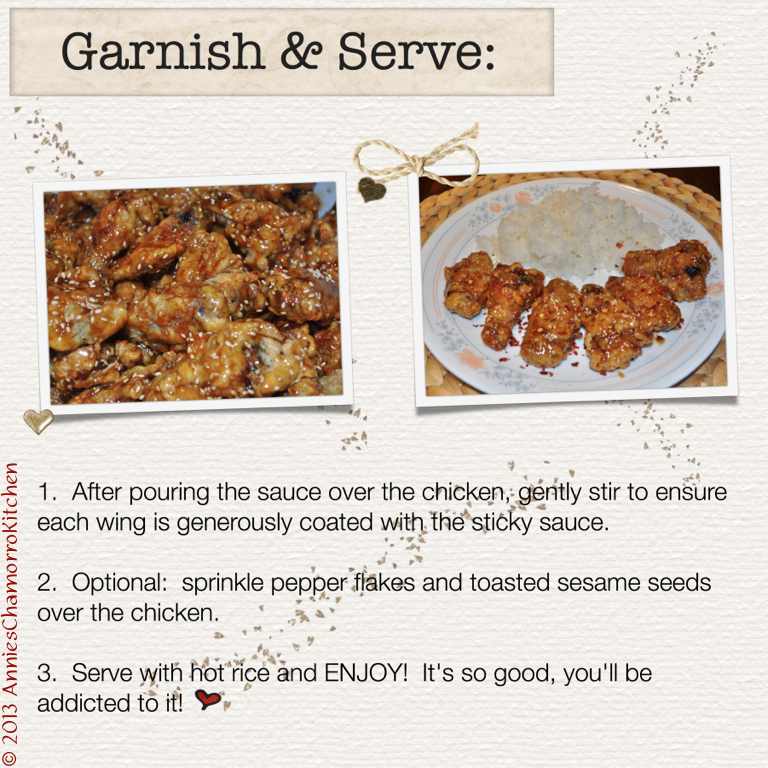
5.  According to taste, add lemon juice or powder, salt, finely diced green onions, freshly grated coconut, and red hot peppers.  Mix to combine.  Serve with titiyas or hot white rice and enjoy!  Absolutely delicious!

Carol's Shrimp Kelaguen 3

Carol's Shrimp Kelaguen 4

Carol's Shrimp Kelaguen 5

Champulådu

There are several Chamorro comfort foods that not only make me feel good right down to my bones, but bring back so many fond memories of growing up on Guam.

Champulådu is one of those dishes.  It’s a porridge of sorts, only made with rice, evaporated milk and CHOCOLATE!  I think that’s why I love it so much — who doesn’t love chocolate?

You don’t need too much rice for this dish.  A little goes a long way since you’ll be cooking the rice until it breaks down and thickens the liquid.

CHAMPULÅDU

15

Ingredients:

  • 1 cup uncooked rice, or 2 cups for a thicker “porridge”
  • 4 cups water
  • 1 can evaporated milk
  • 1/2 cup cocoa powder
  • 1/2 cup sugar

2

Cooking Instructions:

1.  Wash the rice and place in a medium sized pot.  Add water and cook over medium high heat.  Keep the pot lit on until the rice begins to boil.

3 4 6

2.  Once the rice comes to a boil, reduce the heat to medium-low; add cocoa powder, sugar, and milk.

8 7 10

3.  Whisk to combine all the ingredients.  Continue to cook at a low simmer over medium-low heat for approximately 30 more minutes.  The mixture should thicken considerably during this time.  If it’s too thick for your liking, add more milk then adjust the sugar to taste.  Serve warm and enjoy!

9 14

Grating Fresh Coconuts

When I was a little girl, one of my jobs during party preparations was to kåmyu  (grate) fresh coconuts.  I remember going through a pile of coconuts, shaking each one to ensure there was still coconut water in them (if it didn’t slosh with liquid, that meant it was bad).  I was too young and wasn’t allowed to husk them (we used the pointy end of a pick or a sharpened branch for this task), nor did my mom allow me to use the machete to crack open the coconuts, but I was a pro with the kåmyu!

kumyu 2
This kåmyu (and the photo) belongs to David A. Punzalan.

This wasn’t an easy job–at least not for a young kid about 8 or 10 years old.  I had to make sure I didn’t grate any of the coconut shell or I’d be picking them out of the bowl! The coconut flakes HAD to be nice and snowy white, and grated extra fine, especially if we were mixing it in with kelaguen.

Now that my family and I live in the states, we don’t have easy access to fresh coconuts.  We are at the mercy of what’s imported to our local grocery stores.  I can’t tell you how frustrating it is to come home from the store, crack open a coconut and find that it’s already spoiled.

The coconuts we buy come already husked (not that we own a pick anyway with which to husk them).  We don’t own a machete either, but we make due by using an extremely sharp meat cleaver.

Here is a video of my husband, Roland, using a cleaver to crack open a coconut.  He takes his time doing this, but only because he’s using a cleaver from my rather expensive knife set (he KNOWS not to damage my prized knife set!).  Anyhow, to use a cleaver to crack open a coconut, make small nicks around the middle of the shell until you’ve created a crack.  Hit it a little harder as the crack gets bigger, then carefully pry it apart.  Make sure the coconut water inside is clear and doesn’t smell (cloudy, sour smelling liquid is a sure sign of spoilage).

Have I mentioned that I have a crazy, goofy husband?  He just HAD to throw in his “signature” by messing with my video at the end.  LOL


Once you crack open the coconut, pull out your kåmyu and get to work grating.  The video below shows my 11 year old daughter gingerly grating the coconut (she’s still afraid of scraping her hands–but why should she be fearful of a thick piece of stainless steel with multiple sharp, jagged “teeth” sticking out of it?).  🙂


You can make lots of things with freshly grated coconut — coconut candy, make fresh-squeezed coconut milk, add it to kelaguen, or toast it for sprinkling over coconut cream pie.  Whatever you use it for, I’m sure you’ll enjoy it.  Fresh beats frozen or canned coconut any day.

Chicken Kelaguen with Freshly Grated Coconut


“Crack” Chicken

When I was stationed in Korea a few years ago, my family and I used to frequent a fried chicken place that served the most delicious chicken wings.

The menu included spicy (mouth on fire) wings, plain, but our favorite had a garlic-soy glaze on it.  They were so good (and addicting) that my friends and kids nicknamed it “crack chicken”.  🙂

This is my version of those wings.  A word of warning — it’s HEAVY on the garlic (just the way I like it).

Give it a try.  I think you’ll like it!  🙂

“CRACK” CHICKEN

crack chicken

INGREDIENTS FOR THE FRIED CHICKEN:

  • 5 pounds chicken wings (I like drummettes)
  • 1 tablespoon salt
  • 2 teaspoons black pepper
  • 4 tablespoons garlic powder
  • 1 cup flour
  • 1 cup corn starch
  • 4 eggs, slightly beaten
  • 1/2 cup water
  • oil, for frying

INGREDIENTS FOR THE SAUCE:

  • 2 cups water
  • 1/3 cup soy sauce
  • 2 cups loosely packed brown sugar
  • 1/3 cup honey
  • 1/2 cup rice vinegar
  • 1 teaspoon ground ginger
  • 5 cloves garlic, chopped (use 10 cloves if you LOVE garlic like I do)
  • 4 tablespoons corn starch
  • Optional: Pepper flakes

Cooking Instructions:

Make the Sauce:

1. Place the sauce ingredients (except for the cornstarch and 1/2 cup of the water) into a medium sized sauce pan; whisk to combine. Optional: Add pepper flakes (omit if you do not want your sauce to be spicy).

2. Cook over medium high heat until the mixture begins to boil. Reduce the heat to low; continue to cook at a low simmer, about 15 minutes. Turn the heat off and set the sauce aside.

3. When the chicken wings are done, reheat the sauce, bringing it back up to a boil. Mix together the cornstarch and 1/2 cup water; whisk into the boiling sauce. Bring the sauce back up to a boil; the sauce should begin to thicken. Cook for an additional 2 minutes then pour over the fried chicken.

Batter the Chicken:

1. Rinse the chicken. Place in a large mixing bowl.

2. Into the mixing bowl, add the ingredients for the fried chicken: salt, black pepper, eggs, garlic powder, flour, corn starch, and water. Using your hands, mix the chicken and the rest of the ingredients together. After mixing, the chicken should be fully covered in a thick batter.

Fry the Chicken (1st Frying):

1. Place the oil in a large frying pan or wok. Heat the oil over medium high heat, to about 375 degrees.

2. Carefully drop the chicken into the hot oil. Do not overcrowd the pan (the chicken needs room to cook).

3. Let the chicken cook for about 5 minutes on each side.

4. For the first frying, fry for a total of 10 minutes. Remove from the oil and drain in a metal colander. Set aside and continue to fry the remaining chicken. After all the chicken pieces have been fried for the first time, it is time for the 2nd frying. The 2nd frying will make the wings extra crispy and golden brown.

Fry the Chicken (2nd Frying):

1. This step goes much quicker. For the second frying, it’s okay to overcrowd the pan. Place as many chicken wings into the hot oil as can fit. My pan fit about 12 wings for the first frying; for the second frying, I placed about 18 wings into the pan.

2. For the second frying, fry for about 8 minutes, or until golden brown. Remove from the oil and drain in a metal colander. *See the difference in coloring between the first and second frying in the photo attached to this recipe.

3. When all the wings have been fried for the second time, place in a large mixing bowl. Pour the prepared sticky sauce over the chicken.

Garnish and Serve:

1. After pouring the sauce over the chicken, gently stir to ensure each wing is generously coated with the sticky sauce.

2. Optional: sprinkle pepper flakes and toasted sesame seeds over the chicken.

3. Serve with hot rice and ENJOY! It’s so good, you’ll be addicted to it!


The photos below illustrate my step-by-step process.  I hope this makes it easier to understand.  Give it a try and let me know how you like it.  🙂

1 - Crack Chicken

2 - Fried Chicken Ingredients

3 - Sauce Ingredients

4 - Make the Sauce

5 - Batter the Chicken

6 - First Frying

Oops!  # 4 (above) should read, “fry for a total of 10 minutes” (not 8).


7 - Second Frying

8 - Garnish and Serve

DSC_0098

« Older Entries