Archive for MEALS

“Crack” Chicken

When I was stationed in Korea a few years ago, my family and I used to frequent a fried chicken place that served the most delicious chicken wings.

The menu included spicy (mouth on fire) wings, plain, but our favorite had a garlic-soy glaze on it.  They were so good (and addicting) that my friends and kids nicknamed it “crack chicken”.  🙂

This is my version of those wings.  A word of warning — it’s HEAVY on the garlic (just the way I like it).

Give it a try.  I think you’ll like it!  🙂

“CRACK” CHICKEN

crack chicken

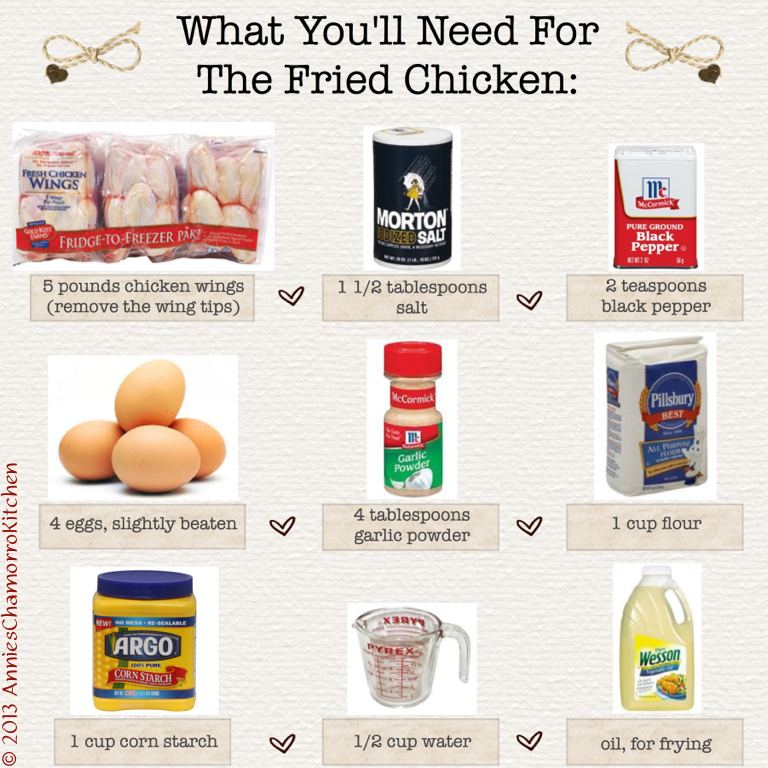
INGREDIENTS FOR THE FRIED CHICKEN:

  • 5 pounds chicken wings (I like drummettes)
  • 1 tablespoon salt
  • 2 teaspoons black pepper
  • 4 tablespoons garlic powder
  • 1 cup flour
  • 1 cup corn starch
  • 4 eggs, slightly beaten
  • 1/2 cup water
  • oil, for frying

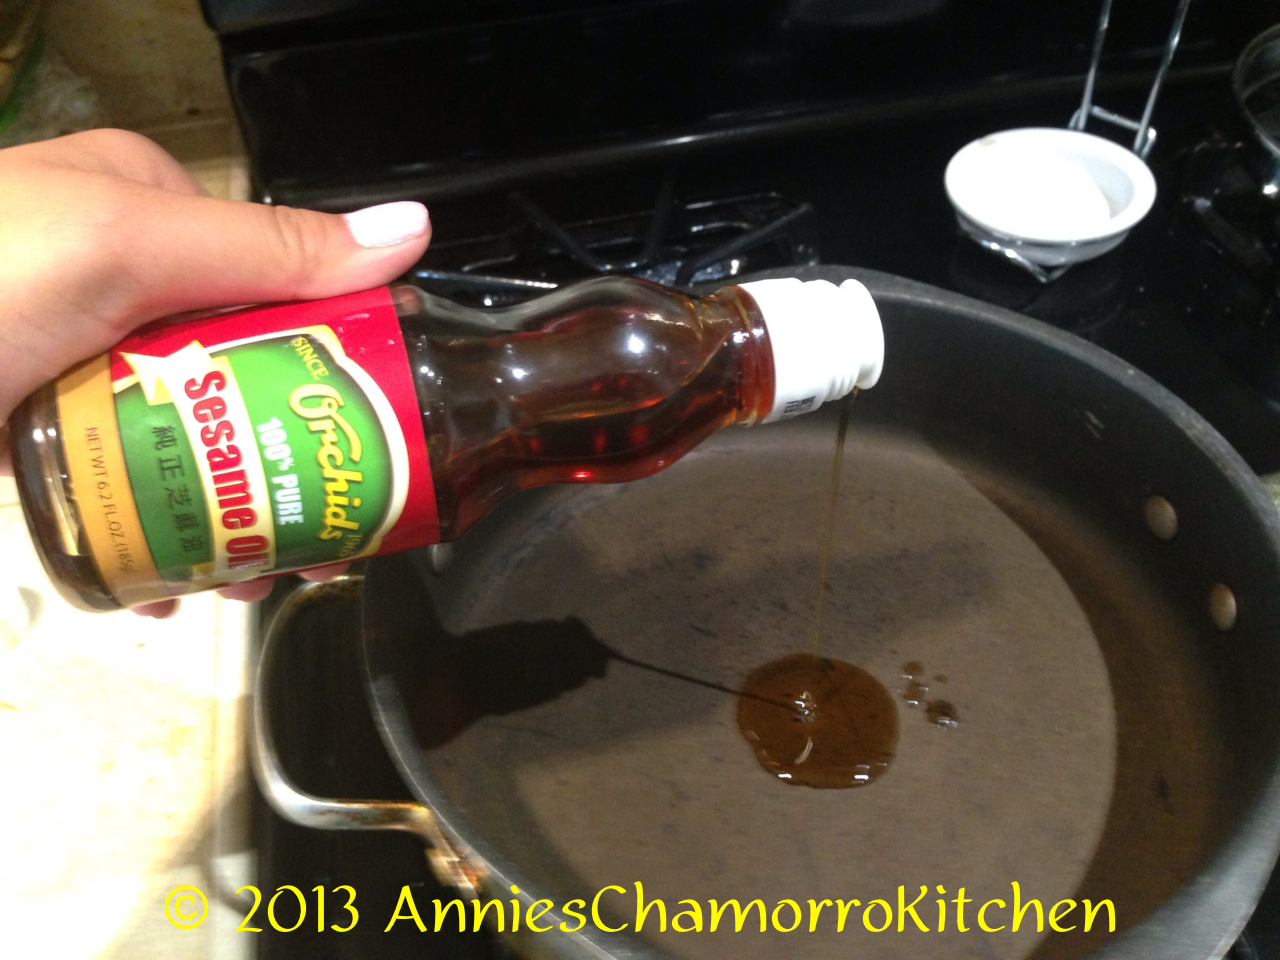
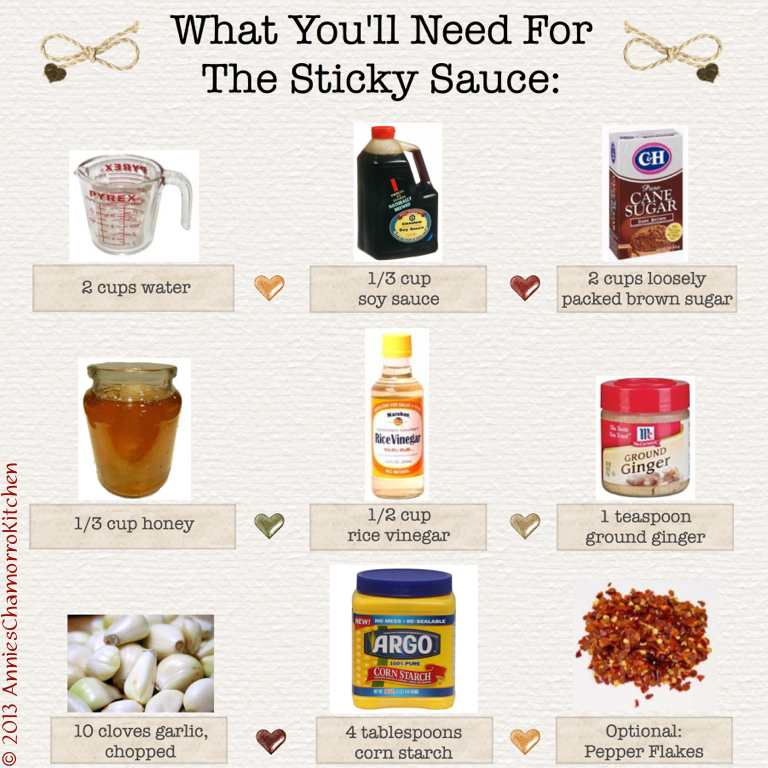
INGREDIENTS FOR THE SAUCE:

  • 2 cups water
  • 1/3 cup soy sauce
  • 2 cups loosely packed brown sugar
  • 1/3 cup honey
  • 1/2 cup rice vinegar
  • 1 teaspoon ground ginger
  • 5 cloves garlic, chopped (use 10 cloves if you LOVE garlic like I do)
  • 4 tablespoons corn starch
  • Optional: Pepper flakes

Cooking Instructions:

Make the Sauce:

1. Place the sauce ingredients (except for the cornstarch and 1/2 cup of the water) into a medium sized sauce pan; whisk to combine. Optional: Add pepper flakes (omit if you do not want your sauce to be spicy).

2. Cook over medium high heat until the mixture begins to boil. Reduce the heat to low; continue to cook at a low simmer, about 15 minutes. Turn the heat off and set the sauce aside.

3. When the chicken wings are done, reheat the sauce, bringing it back up to a boil. Mix together the cornstarch and 1/2 cup water; whisk into the boiling sauce. Bring the sauce back up to a boil; the sauce should begin to thicken. Cook for an additional 2 minutes then pour over the fried chicken.
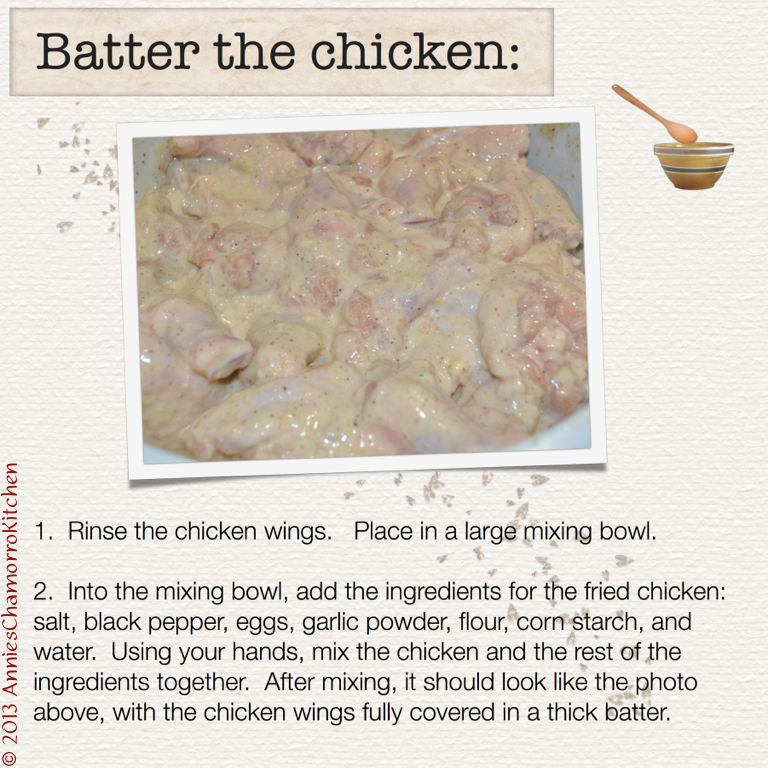
Batter the Chicken:

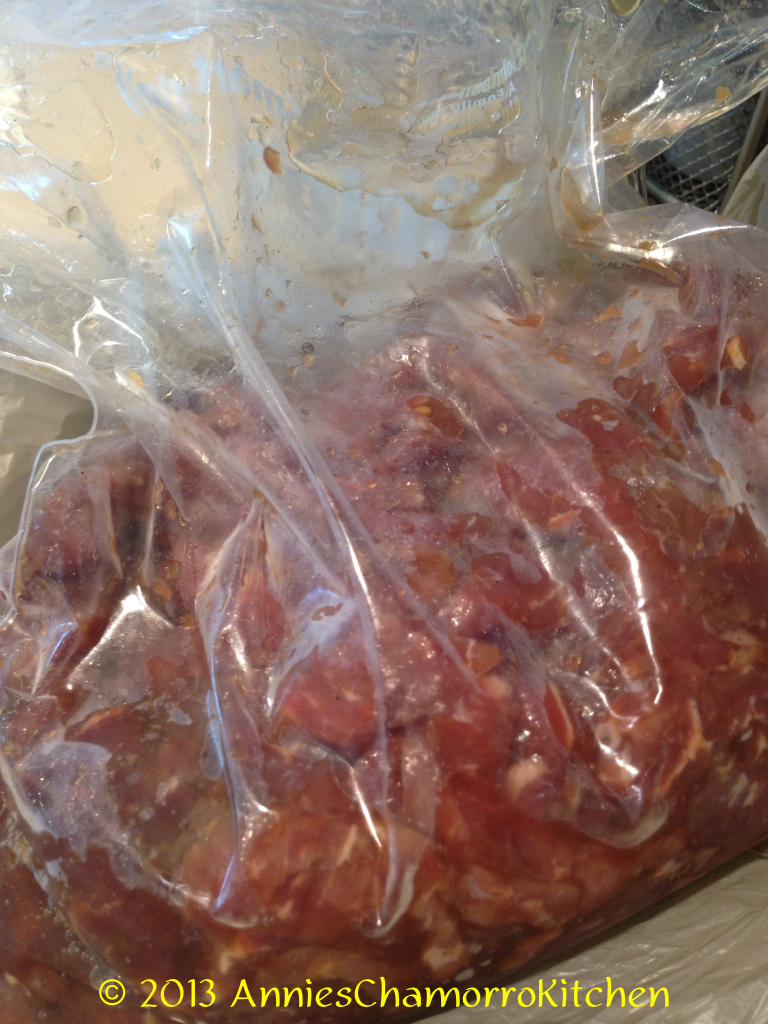
1. Rinse the chicken. Place in a large mixing bowl.

2. Into the mixing bowl, add the ingredients for the fried chicken: salt, black pepper, eggs, garlic powder, flour, corn starch, and water. Using your hands, mix the chicken and the rest of the ingredients together. After mixing, the chicken should be fully covered in a thick batter.

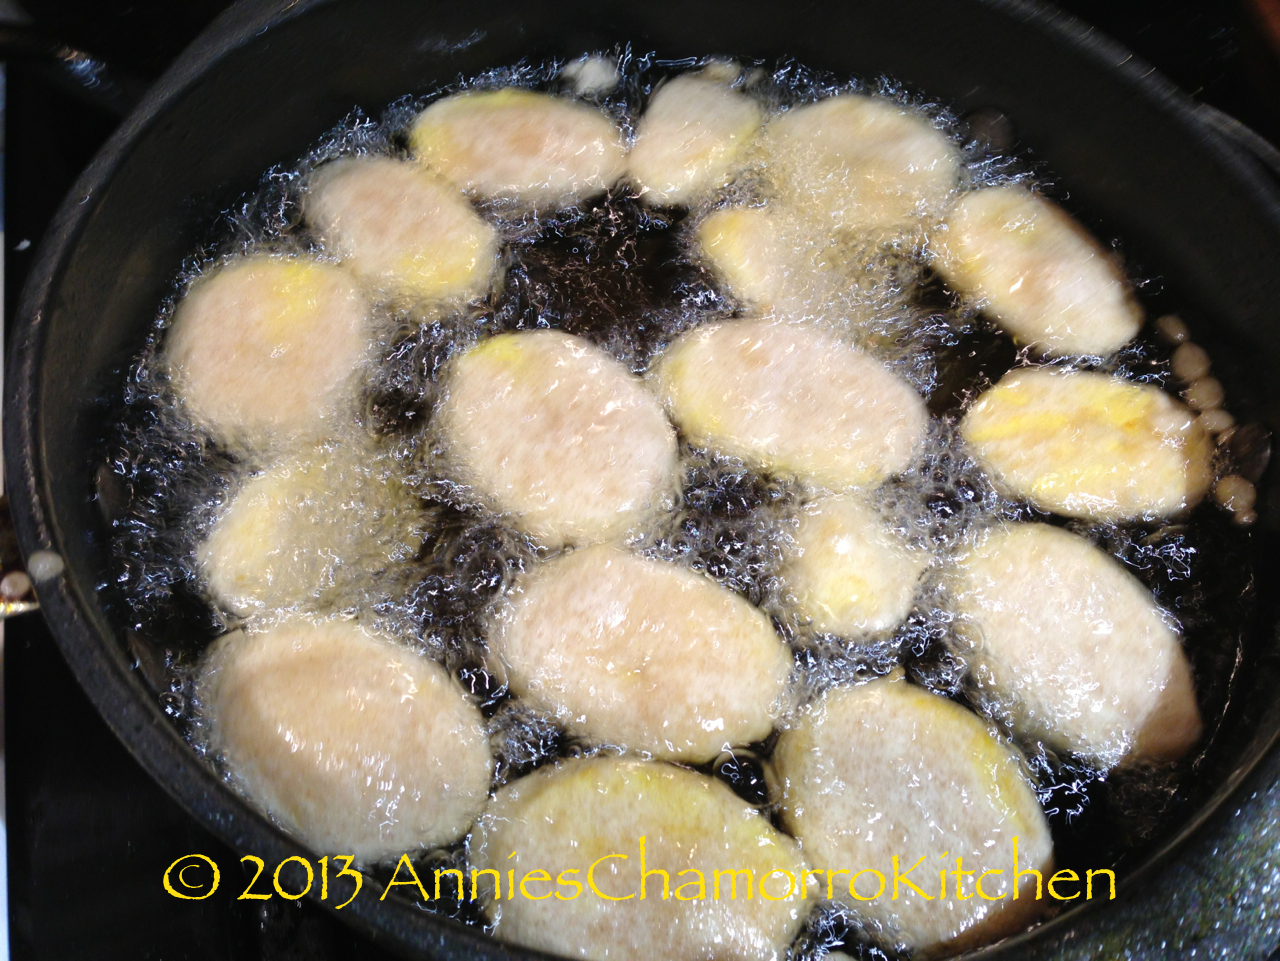
Fry the Chicken (1st Frying):

1. Place the oil in a large frying pan or wok. Heat the oil over medium high heat, to about 375 degrees.

2. Carefully drop the chicken into the hot oil. Do not overcrowd the pan (the chicken needs room to cook).

3. Let the chicken cook for about 5 minutes on each side.

4. For the first frying, fry for a total of 10 minutes. Remove from the oil and drain in a metal colander. Set aside and continue to fry the remaining chicken. After all the chicken pieces have been fried for the first time, it is time for the 2nd frying. The 2nd frying will make the wings extra crispy and golden brown.

Fry the Chicken (2nd Frying):

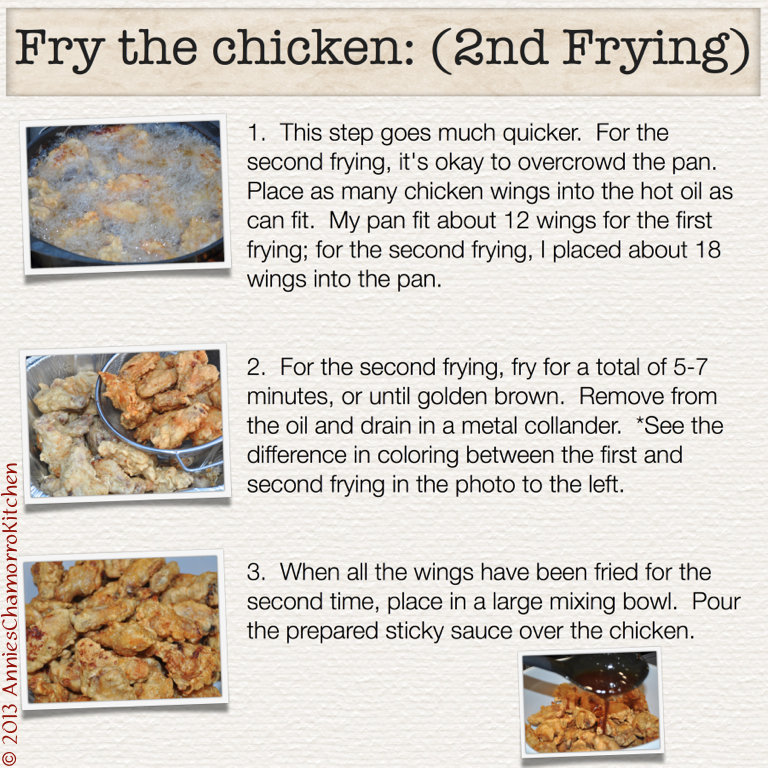
1. This step goes much quicker. For the second frying, it’s okay to overcrowd the pan. Place as many chicken wings into the hot oil as can fit. My pan fit about 12 wings for the first frying; for the second frying, I placed about 18 wings into the pan.

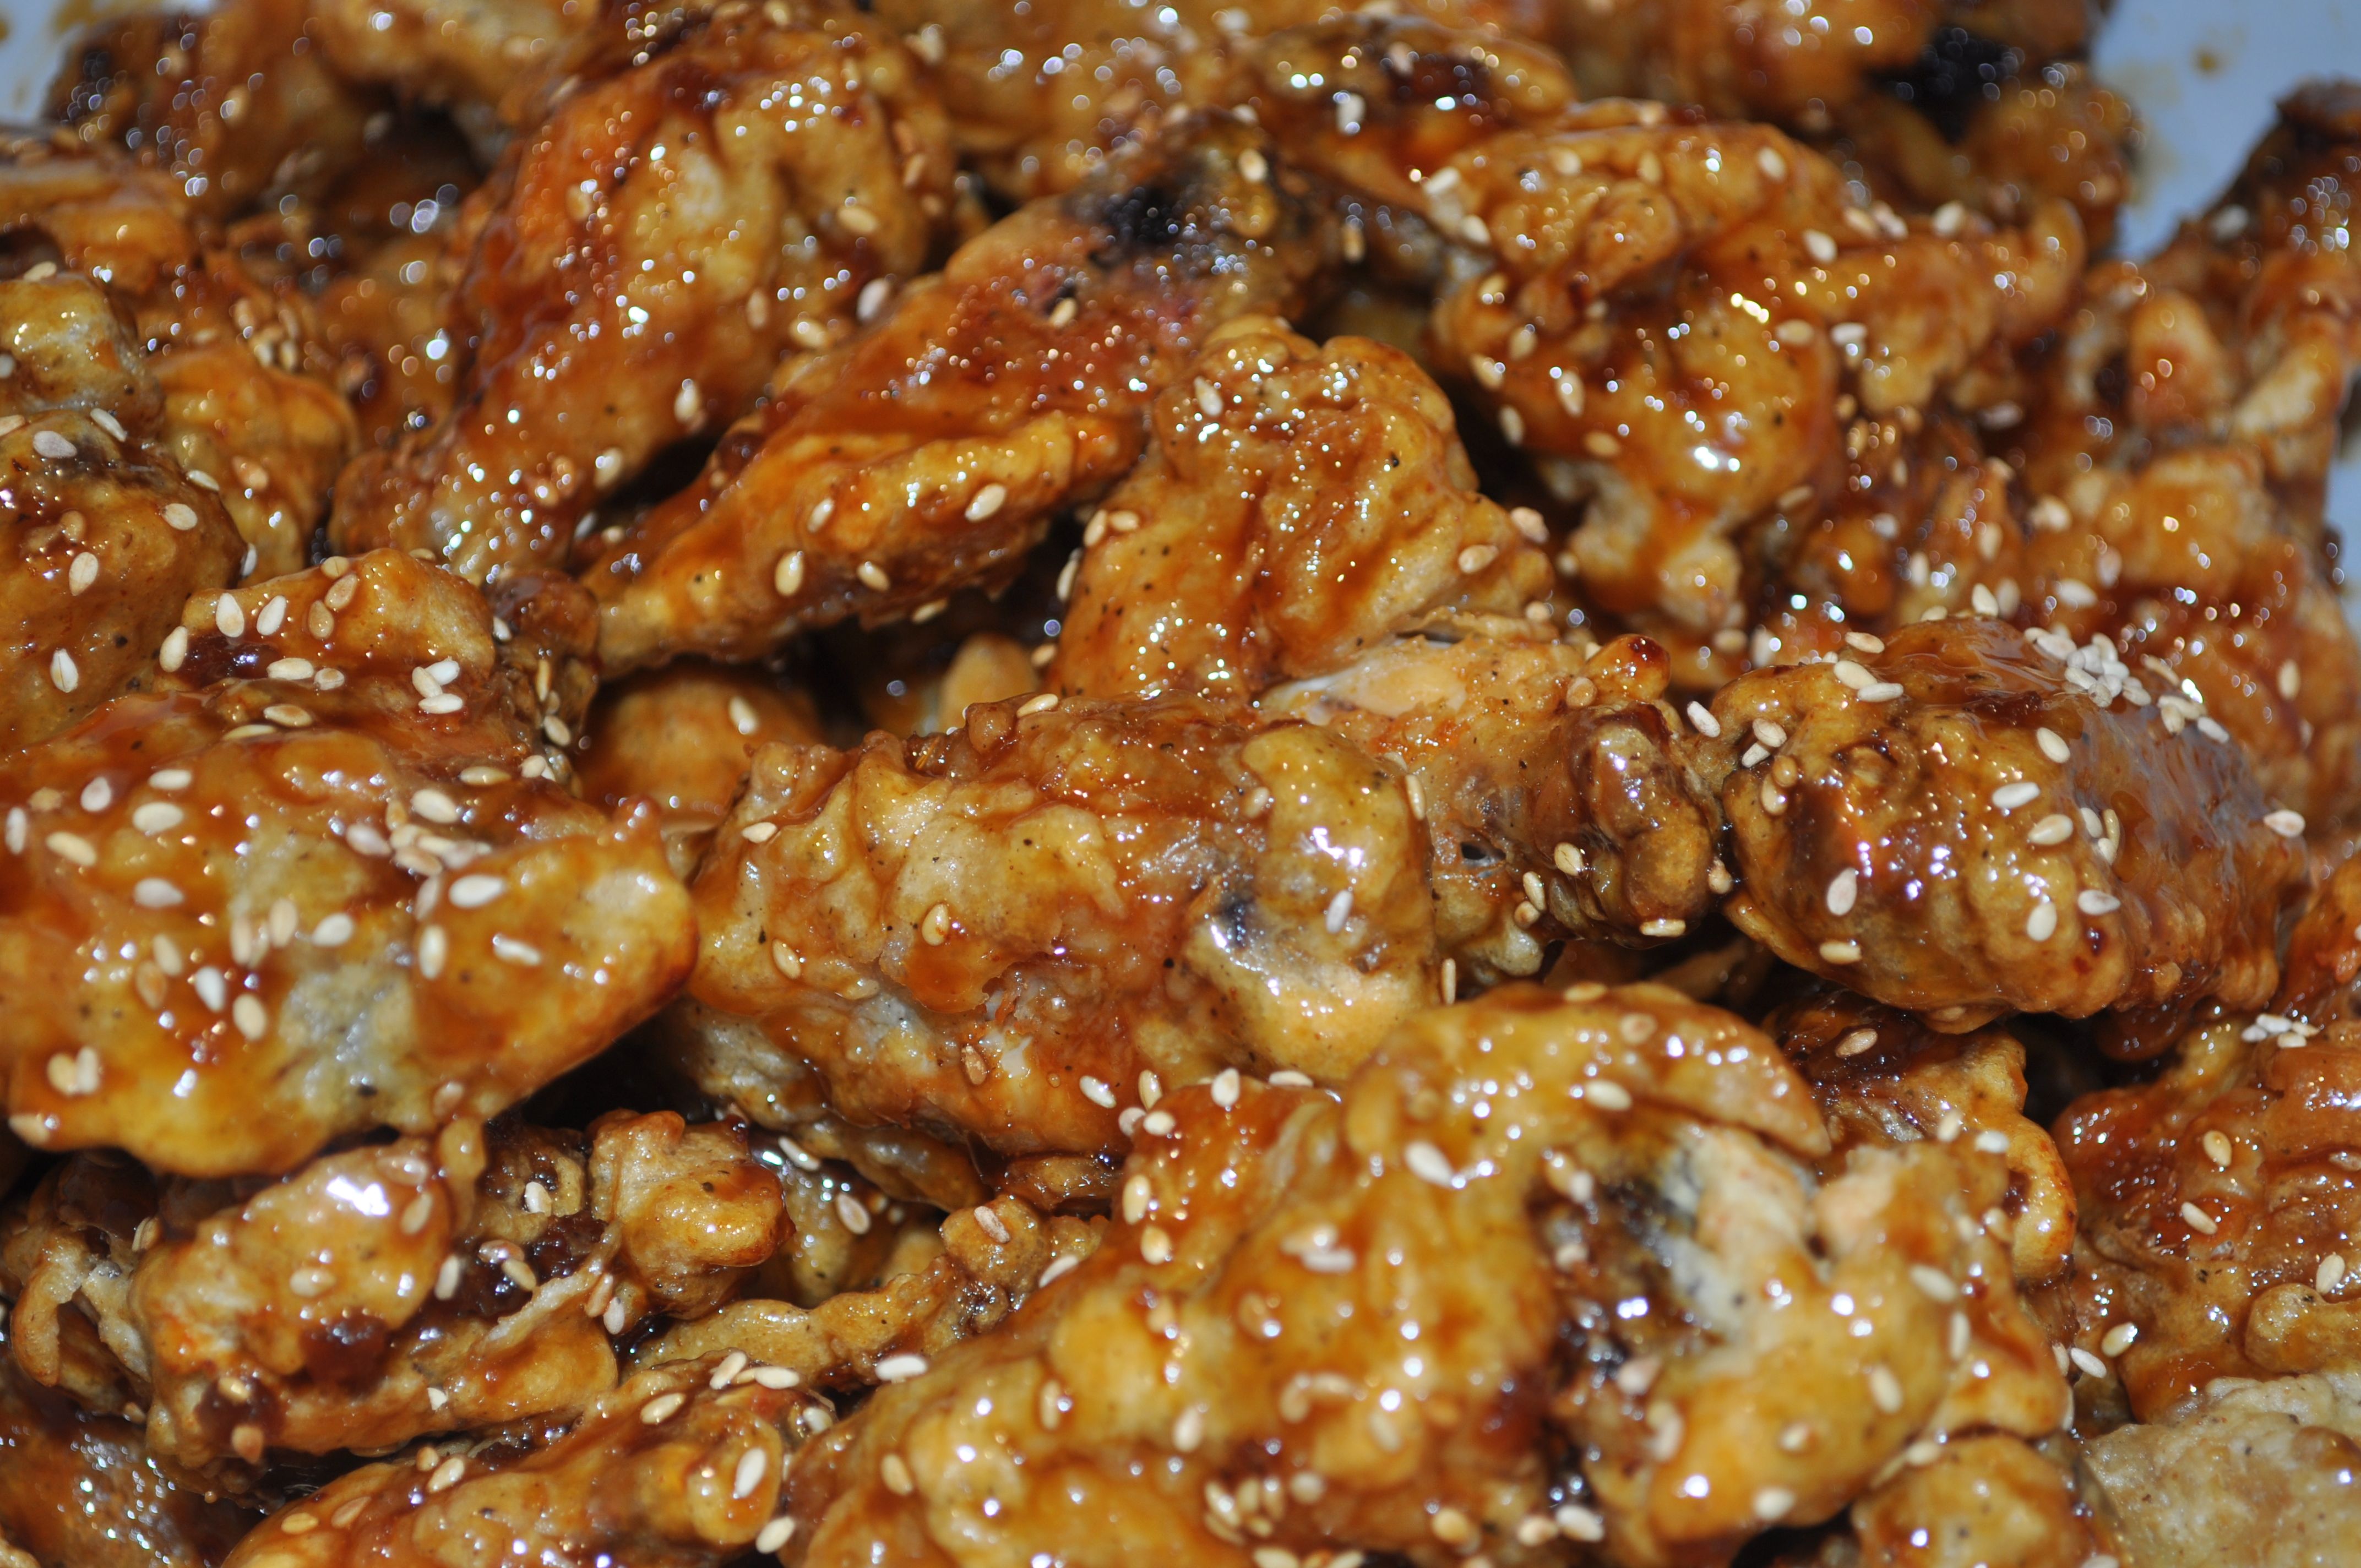
2. For the second frying, fry for about 8 minutes, or until golden brown. Remove from the oil and drain in a metal colander. *See the difference in coloring between the first and second frying in the photo attached to this recipe.

3. When all the wings have been fried for the second time, place in a large mixing bowl. Pour the prepared sticky sauce over the chicken.

Garnish and Serve:

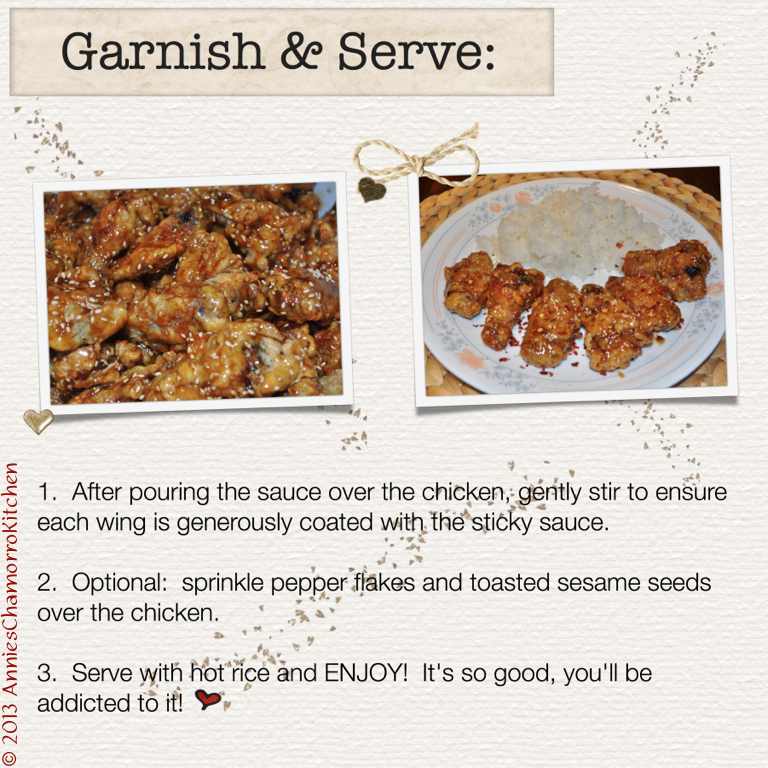
1. After pouring the sauce over the chicken, gently stir to ensure each wing is generously coated with the sticky sauce.

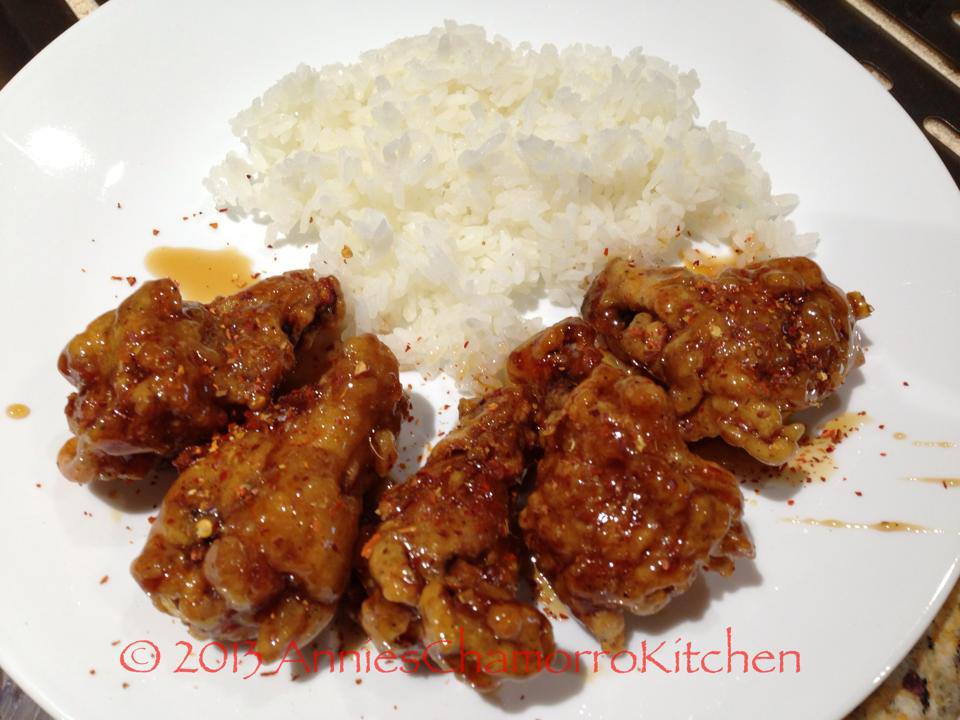
2. Optional: sprinkle pepper flakes and toasted sesame seeds over the chicken.

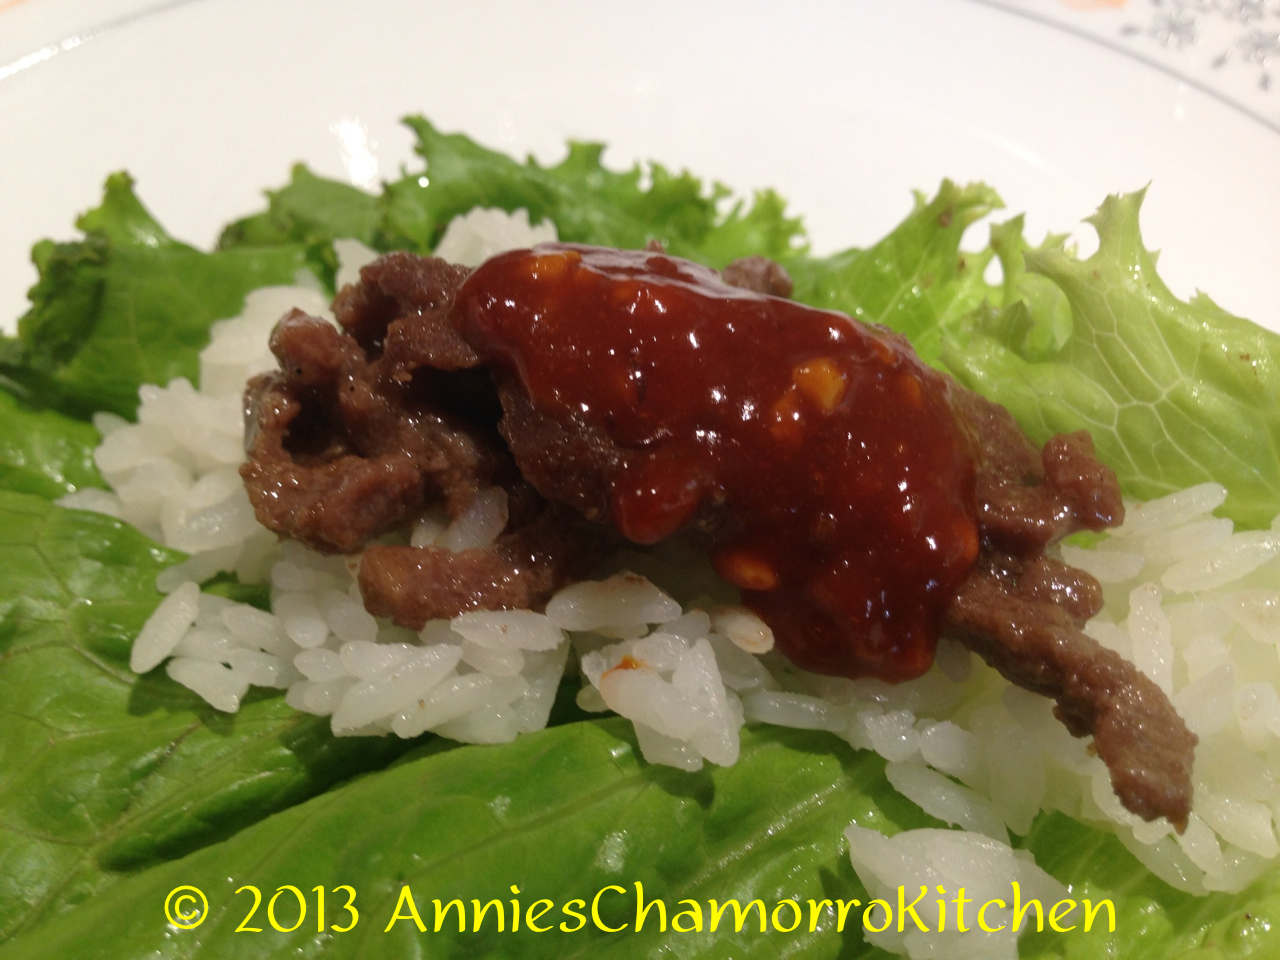
3. Serve with hot rice and ENJOY! It’s so good, you’ll be addicted to it!


The photos below illustrate my step-by-step process.  I hope this makes it easier to understand.  Give it a try and let me know how you like it.  🙂

1 - Crack Chicken

2 - Fried Chicken Ingredients

3 - Sauce Ingredients

4 - Make the Sauce

5 - Batter the Chicken

6 - First Frying

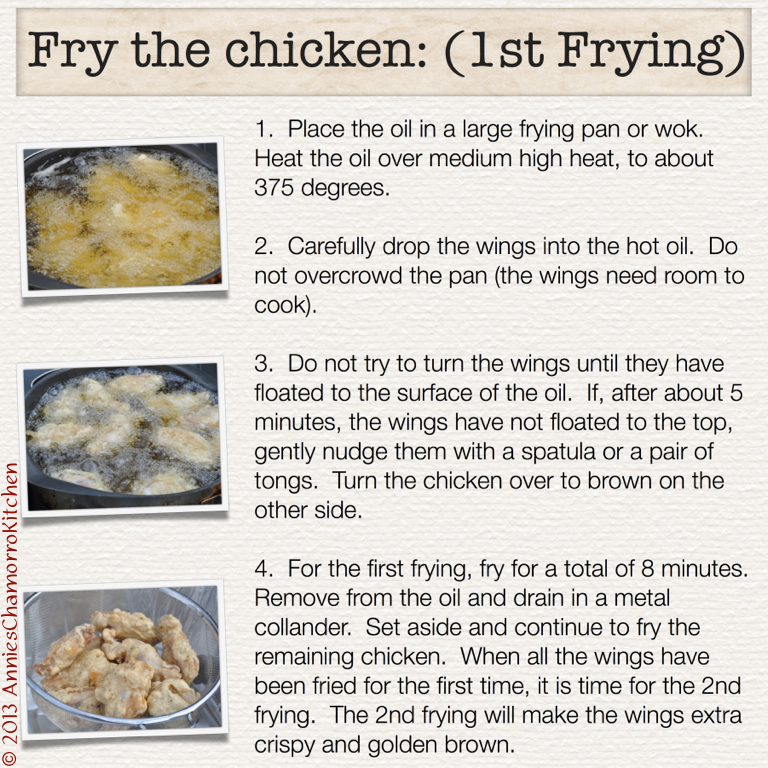
Oops!  # 4 (above) should read, “fry for a total of 10 minutes” (not 8).


7 - Second Frying

8 - Garnish and Serve

DSC_0098

Print Friendly, PDF & Email

Madoya (Battered and Fried Bananas)

Here’s another very simple dish I’d like to share with you.  It’s called Madoya (pronounced ma-dô-ja), lightly battered then fried slices of banana.

This is another dish that brings back lots of amazing memories of growing up on Guam.  My aunt and uncle used to grow cooking bananas (see the photo below) and give our family several “hands” whenever they harvested some.   (A “hand”of bananas is what a section of bananas out of a bunch is called; it’s also referred to as a “tier”.)

The photo below was taken over 20 years ago.  My parents and aunt/uncle used to grow and sell vegetables at the (then) Harmon flea market, then subsequently at the Dededo flea market.  I used to LOVE going with them.  We’d get to the flea market well before any roosters were awake to set up our stand.  This photo shows (from L-R) my aunt, dad and mom (and another vendor checking out the competition) setting up green onions, kangkung, bread fruit, and several varieties of bananas for sale.  That’s Saba banana in the bottom left.

Mom - 018


This is a close up view of Saba banana.  It’s a great cooking banana, and is great for making madoya, golai åppan (bananas cooked with coconut milk and sugar), banana lumpia, grilled bananas, or even eaten as-is.

saba banana


I didn’t have any Saba bananas today, but I did have ripe plantains.  Be sure to read my post for grilled plantains — I have photos showing what ripe ones look like.

When I make madoya, I like for the banana to be the star of the show.  Therefore, I don’t make a super thick batter.  Instead, I make my batter thin, yet still thick enough to provide a nice coating when fried.

Give my recipe a try.  I think you’ll like it.  🙂


MADOYA

IMG_0618

INGREDIENTS:

  • 2 ripe plantains
  • 3/4 cup all-purpose flour
  • 1 cup water
  • 1/2 teaspoon cinnamon
  • 1 tablespoon sugar
  • Oil, for frying

DIRECTIONS:

1.  In a small bowl, whisk together the flour, water, cinnamon and sugar.

IMG_0607

The batter should drip quickly when you lift the whisk out of the bowl.  It’s much thinner than pancake batter.  (Sorry for the fuzzy photo below.)

IMG_0612

2.  Peel and slice the plantains into small slices (you can also slice them length-wise instead of across).

IMG_0613

3.  Place the banana slices into the batter.  Use a fork to gently stir the slices into the batter, carefully separating them (be careful not to mash the bananas).

IMG_0614

4.  Heat your oil.  Once the oil is ready, carefully drop in each slice.  Don’t put too many in at once or else they will stick together.

IMG_0620

5.  Fry until golden brown on both sides.  Remove from the oil; place the fried bananas on papers towels to drain.  Serve and enjoy!

IMG_0618


Print Friendly, PDF & Email

Korean Lettuce Wraps (Ssambap)

When my family and I lived in Seoul, we had a favorite restaurant that was nestled along the Han River.  Like many Korean BBQ restaurants, this one served the popular dishes, Ssamgyeopsal (BBQ pork belly), Bulgogi, Galbi, Denjang Chigae, Yukejang, Kimchi Chigae, and another one of my favorites — Ssambap, or lettuce wraps, or what foreigners call Beef and Leaf.

This is delicious with just the lettuce leaf stuffed with rice, the meat of choice (I’m using bulgogi in this recipe), and ssamjang, but it’s also delicious with a piece of grilled garlic, a slice of grilled hot green peppers, and a piece of kimchi all wrapped in a neat little package — or as little as you can make it with all of that stuffed into the lettuce leaf.

During my first tour to Korea over a decade ago, a Korean officer told me that to be “polite”, one must never wrap more than what can be stuffed into your mouth in one bite-sized serving.

But to do that, you can’t wrap as much “stuff” (kimchi, garlic, pepper, meat, rice, etc) into it without having your cheeks bulge out for being so full.

Try as I might to make these into small lettuce wraps, I always end up taking two or three bites with one little package.  I guess this is okay if you’re making this at home.  And make this at home is a must — it’s so delicious that you cannot overlook this dish.  A word or warning, though.  If you add grilled garlic to this, I advise you to make this on a Friday so that you have all weekend to get the smell out of your pores by the time you have to go to work on Monday.

It’s either that or invite your entire office staff to your house for dinner so that you can ALL smell the same for the next couple of days!  🙂

All kidding aside, this is a very simple dish to make.  Give it a try — I know you’ll like it.  🙂

Enjoy!


KOREAN LETTUCE WRAPS (SSAMBAP)

Beef and Leaf - 15

INGREDIENTS:

Bulgogi:

  • 2 pounds lean beef, cut into strips
  • 1 cup soy sauce
  • 1/4 cup vinegar
  • 1/4 cup honey
  • 1 tablespoon minced garlic

Ssamjang:

  • 1/2 cup Korean pepper paste, or Gochujang
  • 2 tablespoons soy sauce
  • 1 tablespoon sesame oil
  • 1 tablespoon minced garlic
  • 1 tablespoon sugar
  • Sesame seeds
  • Optional:  1 stalk green onions, sliced thinly

 Other Ingredients:

  • 1 head of green, leafy lettuce
  • 2 tablespoons sesame oil, for stir frying the bulgogi
  • Cooked white rice
DIRECTIONS:

1.  Place the beef into a ziplock bag.  Add the rest of the ingredients.  Seal the bag; allow the meat to marinate for a couple of hours.

Beef and Leaf - 03

2.  Place 2 tablespoons sesame oil into a large skillet.  Add the contents of the ziplock bag — the meat and marinade together.  Cook over medium high heat until the meat is done and the sauce has thickened.

Beef and Leaf - 01

Beef and Leaf - 07

3.  In a small bowl, mix together all of the ingredients for the ssamjang.  Set aside.

Beef and Leaf - 11 Beef and Leaf - 12

4.  Separate and rinse the lettuce leaves.  Dry with a paper towel.

Beef and Leaf - 10

5.  Assemble the lettuce wraps.  Place a lettuce leaf on a plate.  Add rice, bulgogi, and ssamjang.  Optional:  add a piece of kimchi.  Roll up into a little package or wrap, eat, and ENJOY!

Beef and Leaf - 13 Beef and Leaf - 14 Beef and Leaf - 15 Beef and Leaf - 17

Beef and Leaf - 16

Beef and Leaf - 09 

Print Friendly, PDF & Email

Japchae (or Chapchae), Korean Stir-fried Noodles with Vegetables

I love Korean food.  Japchae is one of my favorites because it has noodles, beef, and a lot of my favorite vegetables like mushrooms, onions, carrots and spinach leaves.

During my first tour to Korea (I served there twice), I remember ordering Japchae and rice from the Korean place on base.  About 15 minutes after placing my telephone order, I’d listen intently for the revving of the Adashi’s moped as he tried to climb the hill to my BOQ (Bachelor Officer’s Quarters).  The sound of the overworked moped meant dinner was about to be served!

This is a quick dish to make, but as my former Korean nanny told me, there is an art to putting it together.  The ingredients must be layered, then gently mixed (by hand) to evenly distribute them without mashing anything.  This is how I make my japchae all the time–cooking each type of ingredient separately (the meat is cooked separate from the vegetables) then layered and mixed.  It is, after all, how Ajima did it, and that’s how it shall be done.

The japchae pictured below was actually cooked by my teenaged daughter.  She whipped it up so quickly that she forgot to take photos of the step-by-step process.

We WILL make this again, however.  When we do, I’ll be sure to take photos of each step and update this recipe.

Don’t let that stop you from making this dish.  It’s so easy–if my teenager can do it, so can you.  Give it a try.  I know you’ll like it.

ENJOY!

JAPCHAE

Japchae

Japchae


INGREDIENTS:
  • 2 pounds beef, sliced thinly
  • 2 tablespoons minced garlic
  • 1/4 cup soy sauce
  • 1/8 cup sugar
  • 6 tablespoons sesame oil
  • 1 small bag of carrots, pre-cut into strips (or 1 large carrot, julienned)
  • 1 medium onion, sliced
  • 1 package button mushrooms, sliced
  • 1 package shitake mushrooms, sliced (see note below)
  • 1 bag of fresh spinach leaves
  • 10 stalks green onions, cut into 2-inch pieces
  • 1 bag Korean vermicelli (sometimes called starch noodles, glass noodles or sweet potato noodles), called Dangmyun in Korean

This is what one brand of Dangmyun looks like:

dangmyung

I also use this brand a lot:

dangmyung 2


NOTE:  If you’re using dried shitake mushrooms, soak them in a bowl of warm water until soft.  Squeeze all the water out of the rehydrated mushrooms then slice thinly.


DIRECTIONS:

1.  Fill a large pot half-full with water and bring to a boil.  Add the bag of vermicelli noodles.  Cook for 4 minutes or until the noodles are soft. Drain then place in a large mixing bowl.

2.  In a large pan or wok, place the beef, sugar, soy sauce and 2 tablespoons sesame oil.  Stir fry over medium heat until the meat is done.  Stir often to prevent scorching.  Remove the meat from the pan when it’s cooked through; place it in the large mixing bowl, on top of the noodles.  Leave any sauce or drippings in the pan.

3.  Add 2 tablespoons of sesame oil to the pan.  Add the carrots and onions.  Stir fry over medium heat until the carrots are slightly wilted and the onions have begun to caramelize.  Once done, remove from the pan and add to the mixing bowl, on top of the cooked meat.

4.  Add the remaining 2 tablespoons of sesame oil to the pan along with both types of mushrooms.  Stir fry for a couple of minutes until the mushrooms have wilted and browned.  Add in the spinach leaves and green onions.  Cook for another couple of minutes, just until the spinach leaves have wilted slightly.  Remove from the pan and add to the mixing bowl, on top of everything else.

5.  Using your impeccably clean hands (I wear cooking gloves–you can buy this in any drug store; they’re the thin, plastic, disposable kind), mix all of the ingredients together.

6.  Do a taste test — if you think it needs more soy sauce or needs a little more sugar, add it in at this time, then mix some more.

7.  Serve as a meal, or alongside Korean BBQ Short ribs (or Galbi, in Korean).  Enjoy!

Japchae

Print Friendly, PDF & Email

Beef Stir Fry with Eggplant, Mushrooms and Bean Sprouts

Beef…it’s what’s for dinner.  🙂  I love that commercialized tag line.

Beef stir fry is another one of those versatile dishes that you can change by adding different vegetables.  I like using whatever looks freshest at the grocery store.  Use whatever vegetables you like, or modify this further by substituting the beef with chicken, pork, or even shrimp!  You can even make this a vegetarian dish by stir frying firm tofu in place of the beef.  The options are virtually endless.

Beef Stir Fry

Ingredients:

  • 3 pounds thinly sliced beef
  • 3 tablespoons sesame oil
  • 1/2 teaspoon black pepper
  • 1 teaspoon accent (or aji), optional
  • 8 cloves garlic, minced
  • 1 medium onion, sliced
  • 1 head broccoli, cut into small pieces
  • 2 medium Japanese eggplants, sliced
  • 1 package sliced mushrooms, about 2 cups
  • 1/2 cup soy sauce
  • 1 tablespoon hoisin sauce
  • 4 tablespoons Korean seasoned soybean paste (see note)
  • 1 bag fresh bean sprouts

Directions:

1.  In a large pan or wok, brown the beef over high heat along with the sesame oil, black pepper, accent and garlic.

DSC_0057

DSC_0060

2.  When the beef is browned, add the onions, broccoli, eggplant and mushrooms. Cook over medium high heat until the eggplant and mushrooms have wilted slightly.

DSC_0061

DSC_0067

DSC_0068

DSC_0069

3.  In a small bowl, mix the soy sauce, hoisin sauce, and Korean seasoned soy bean paste. NOTE: If you can’t find the soybean paste, substitute with like amounts of hoisin sauce. Add the soy sauce mixture to the pot; stir to combine all the ingredients.

4.  Add the bean sprouts. Reduce the heat to low and simmer for about 5 minutes until the bean sprouts have wilted only slightly.

DSC_0070

5.  Serve with hot rice and enjoy!

This makes enough for about 8-10 servings.

  DSC_0081

Print Friendly, PDF & Email
« Older Entries Recent Entries »