Archive for September 15, 2013

Fried Boston Cream Pie Donuts

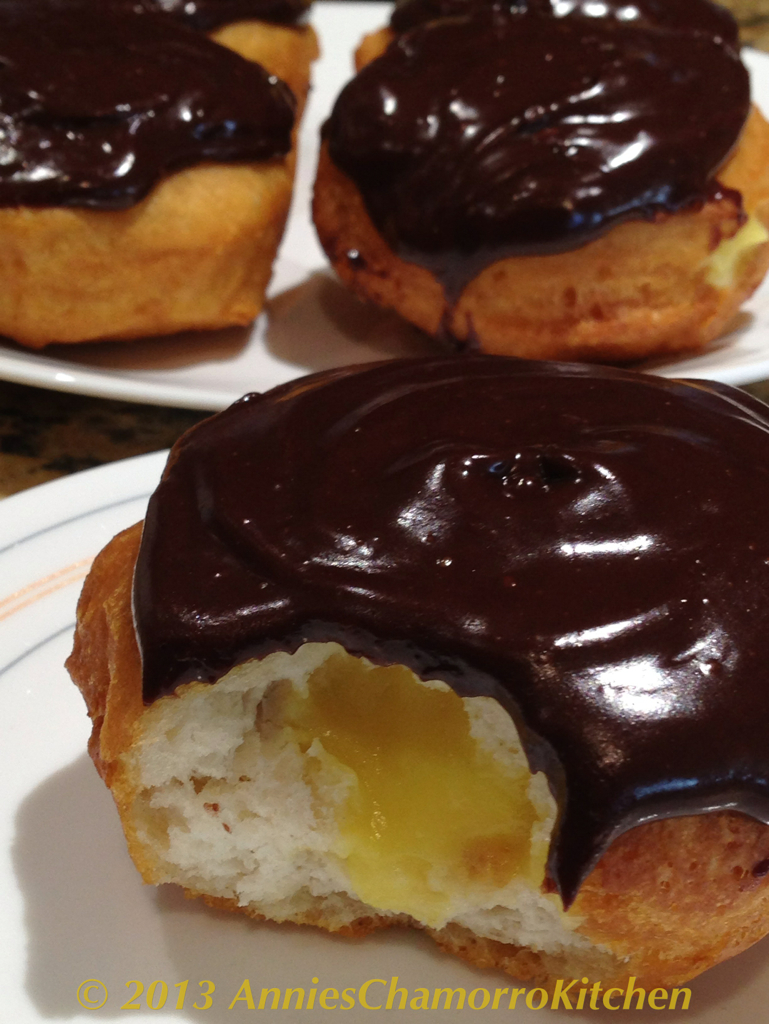
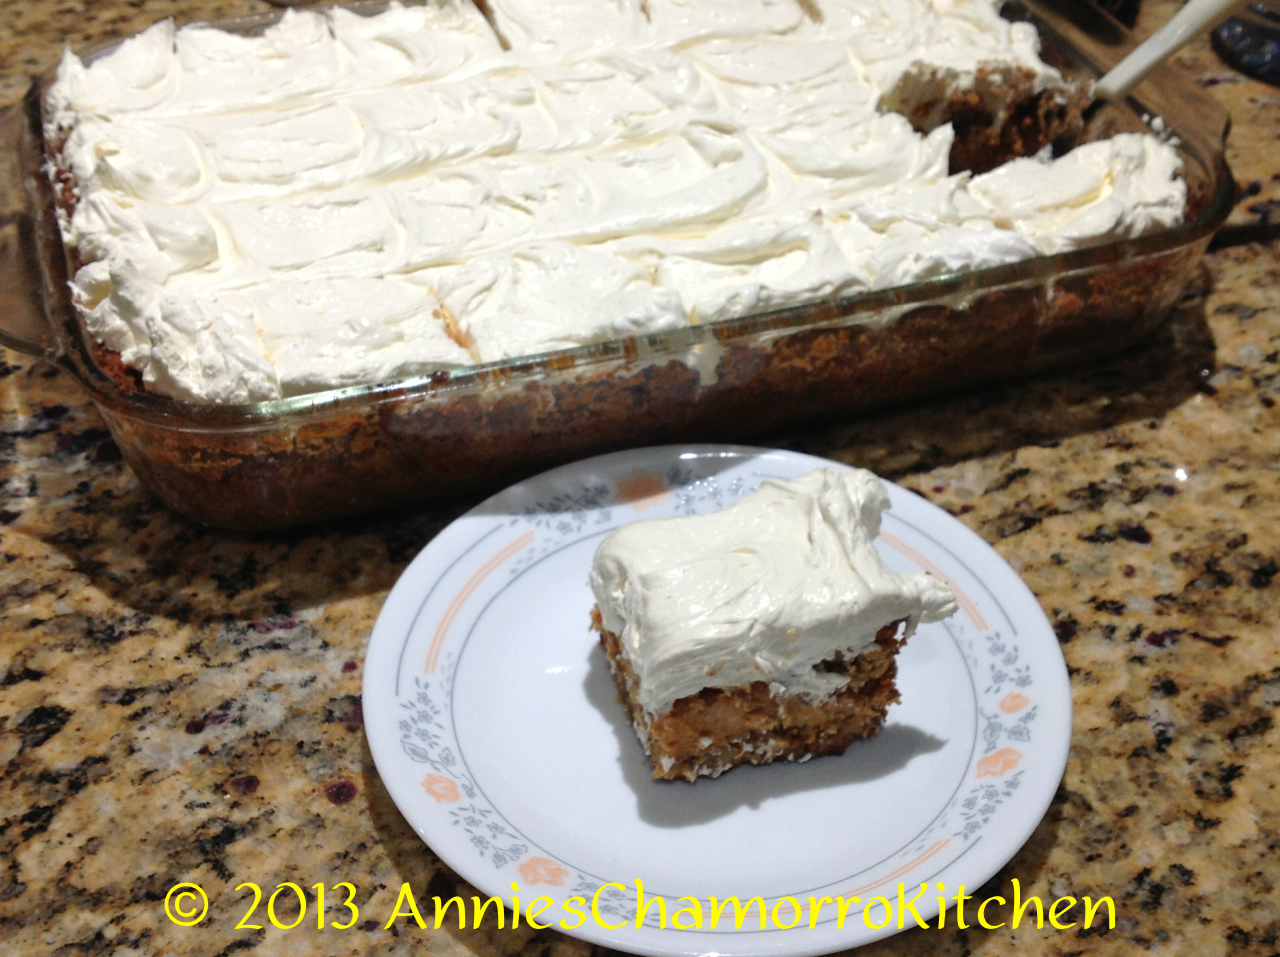
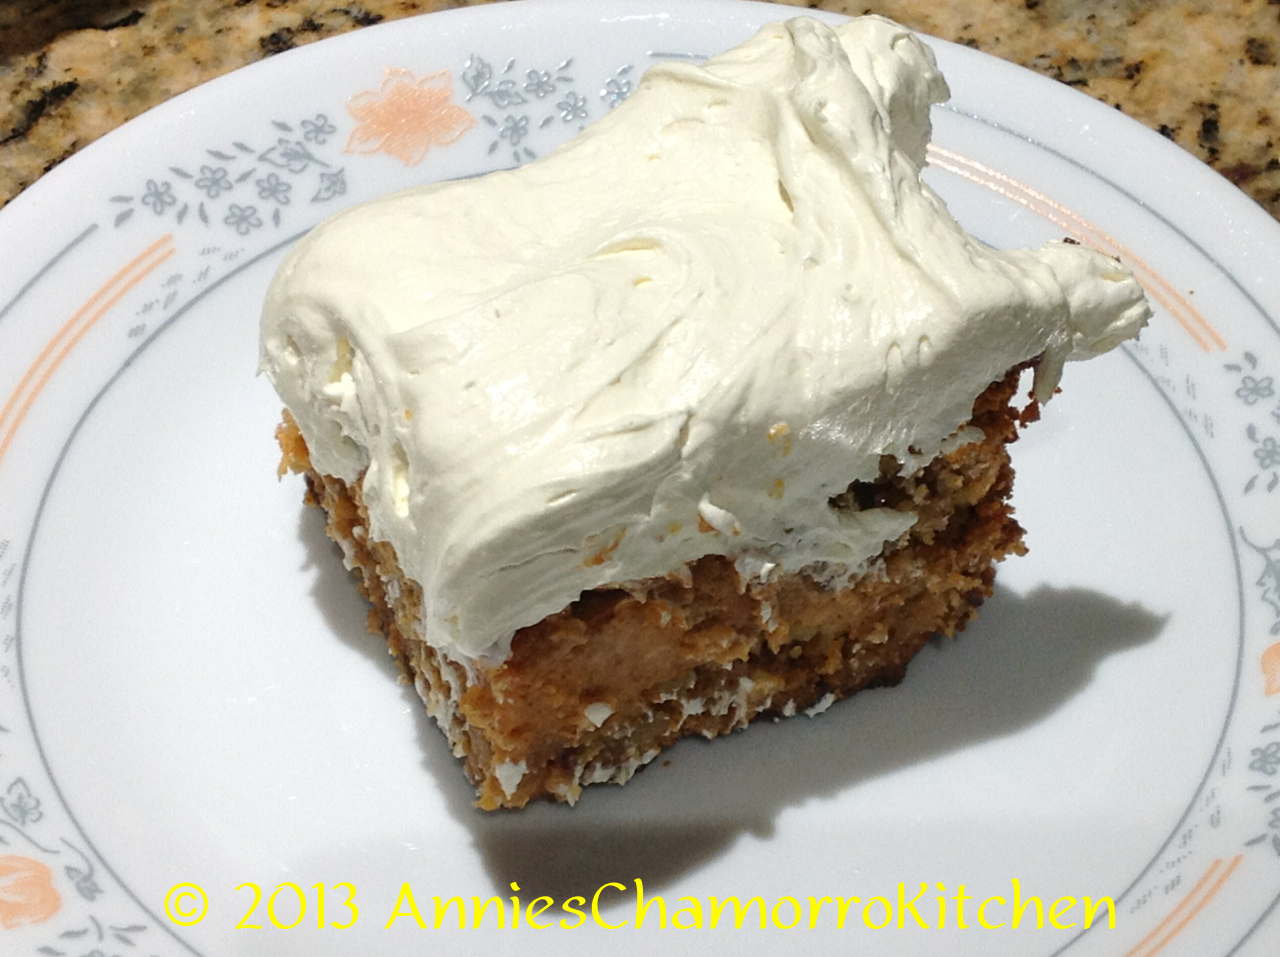
One of my youngest daughter’s favorite desserts is Boston Cream Pie.  She also loves, loves, loves donuts!  Once, when she was about 2 years old, she went “missing” in the house.  After looking high and low, I found her sitting at the dining table–her head barely peeked over the height of the table–with a Krispy Kreme donut in each hand and her cheeks stuffed full with as much donut as could fit!  This recipe is one her favorites–who could blame her; it’s a fried, stuffed, chocolatey piece of heaven if you ask me!

I normally make my yeast donuts from scratch — mix flour, milk, egg, butter, sugar, yeast, etc. — but sometimes semi-homemade is just as delicious.  These decadent donuts are perfect to whip up when you’re in the mood for a quick and easy dessert.  They are superb for potlucks and bake sales too since they’re super easy to make!

Give my recipe a try.  I think you’ll LOVE them.  🙂

This recipe makes 16 donuts.

INGREDIENTS:

  • Fried “shortcut” Donuts (see below)
  • Vanilla pudding filling (see directions below)
  • Chocolate ganache (see recipe and directions below)

IMG_0934


DONUT INGREDIENTS:
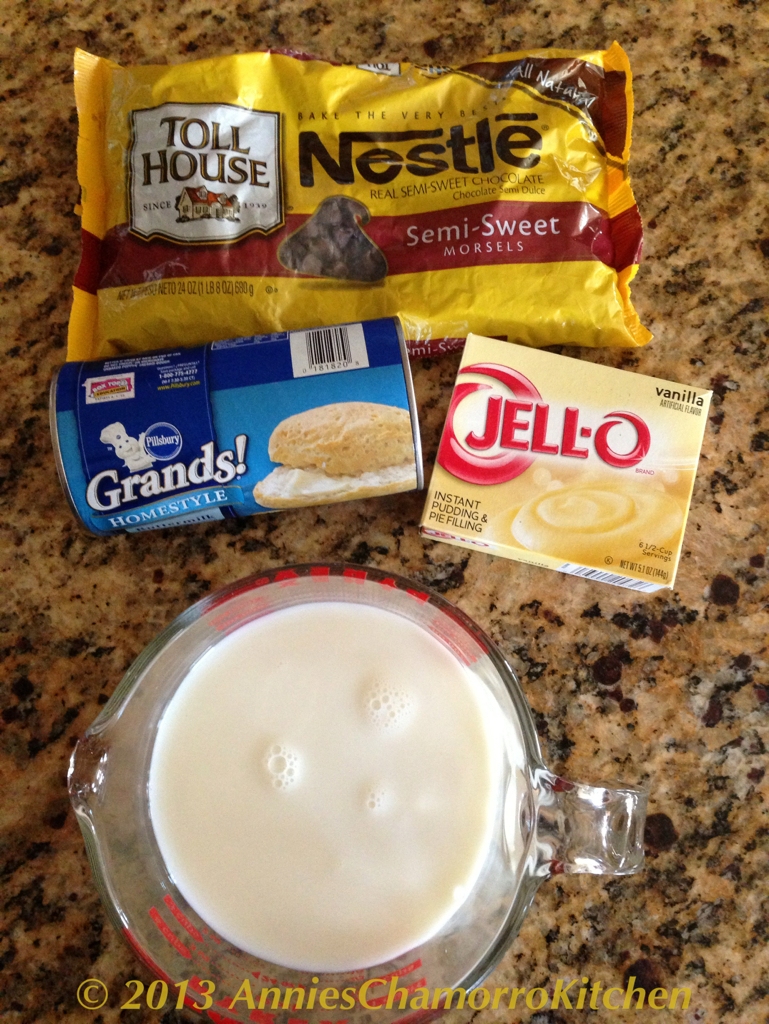
  • 2 packages Pillsbury brand Homestyle Biscuits (contains 8 biscuits each)
  • Oil, for frying
Make the donuts:

1.  Separate the biscuits.

IMG_0938

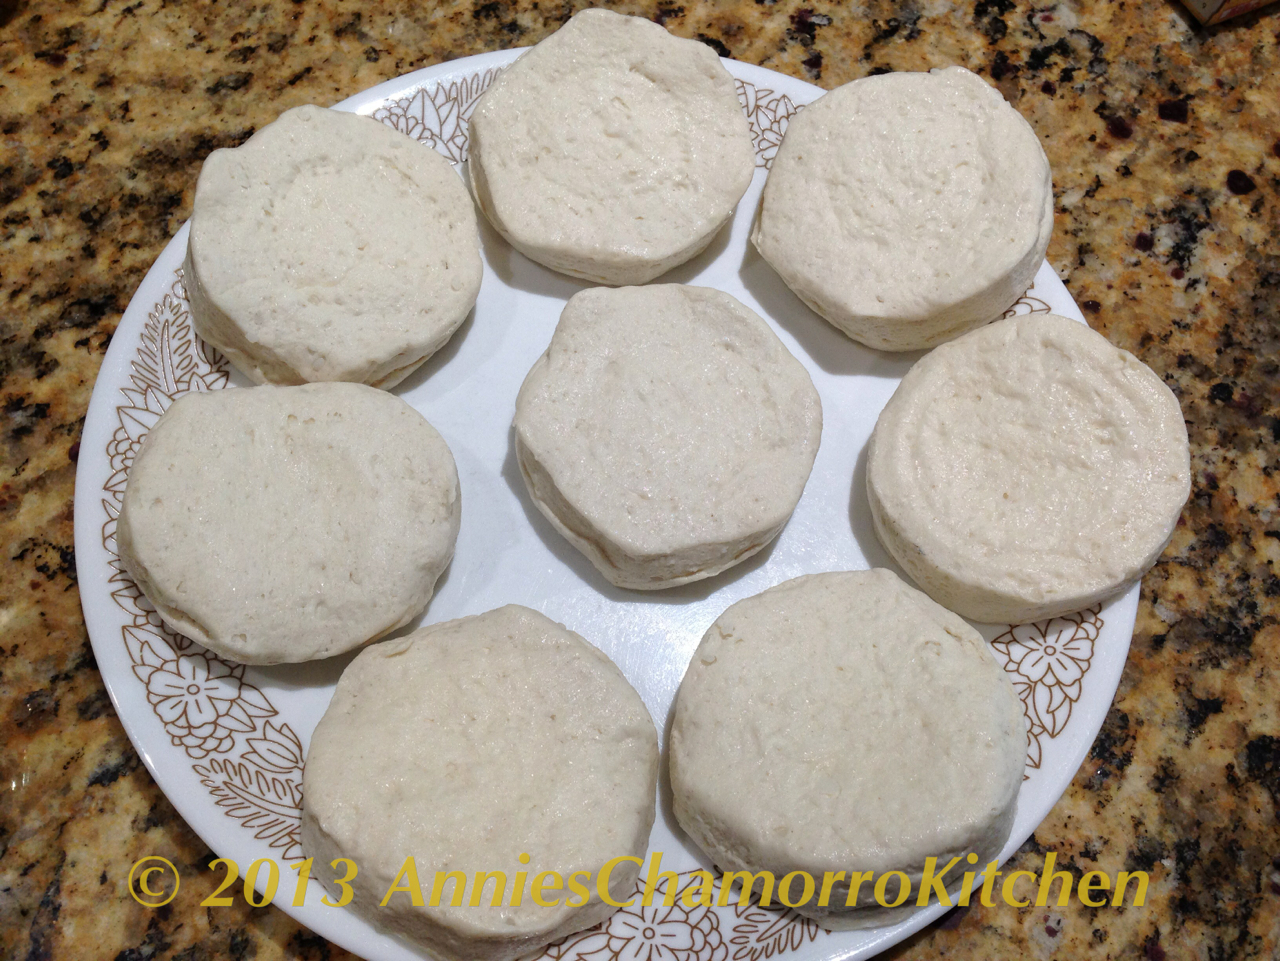
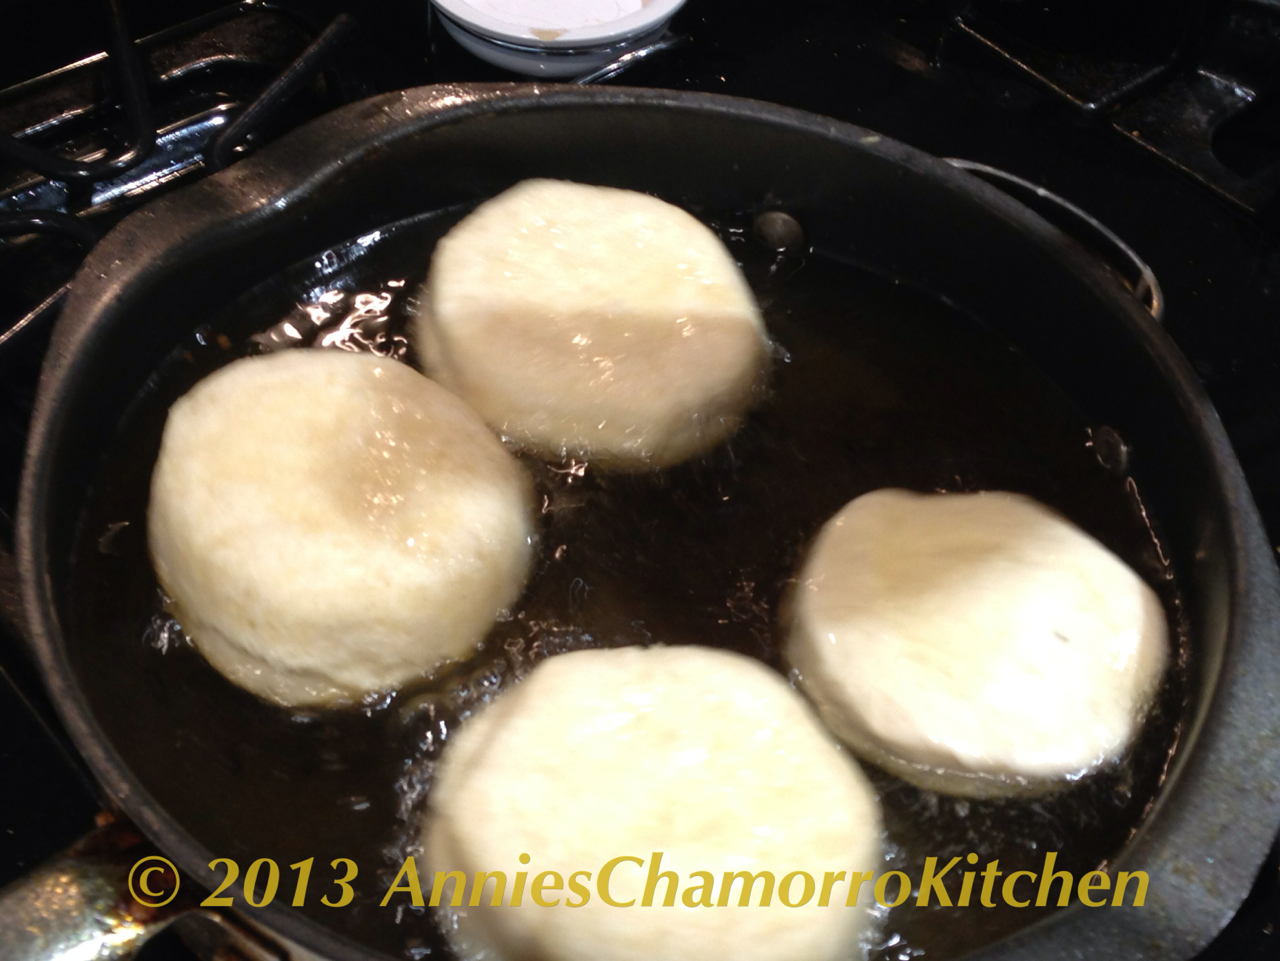
2. Fry each biscuit in hot oil.  Do not overcrowd the pan or the biscuits will stick together when you first drop them in the hot oil. 

IMG_0941

I was able to fit 4 biscuits in a pan at one time without them touching.

IMG_0942

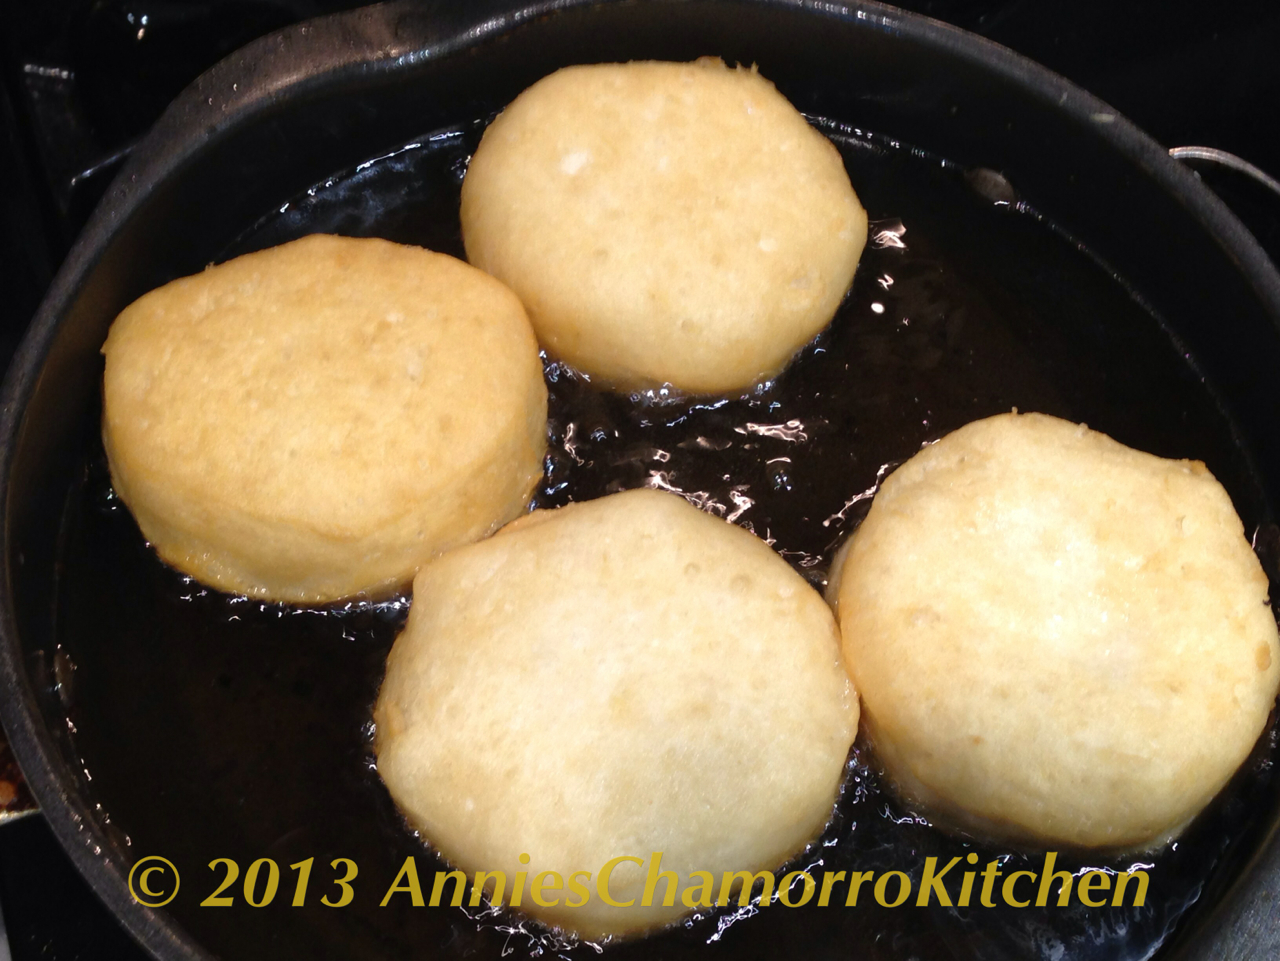
Flip the biscuits over periodically, to ensure even browning on both sides.

IMG_0943

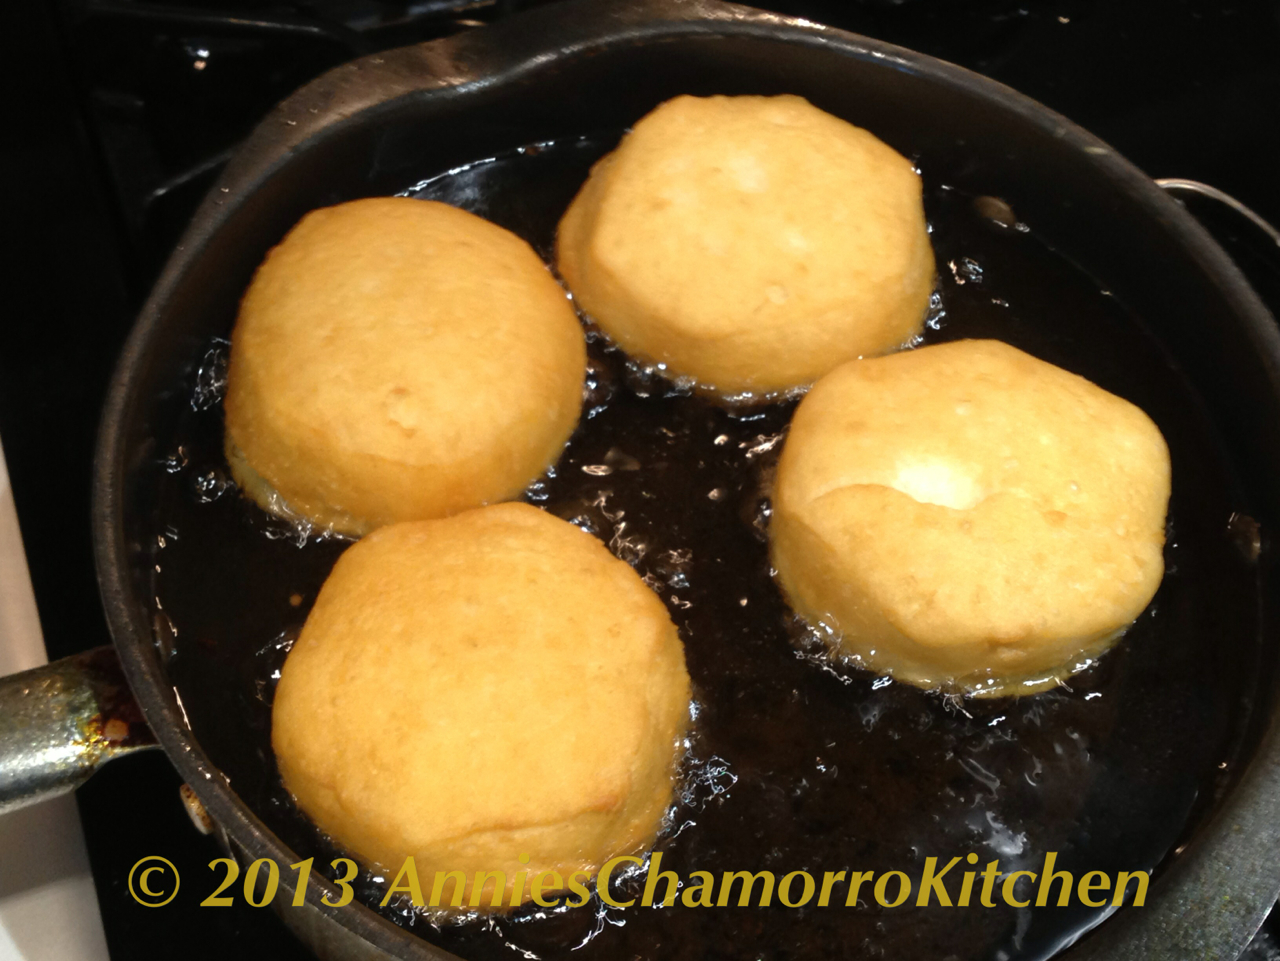
They’re almost ready!  I want them just a little darker brown.
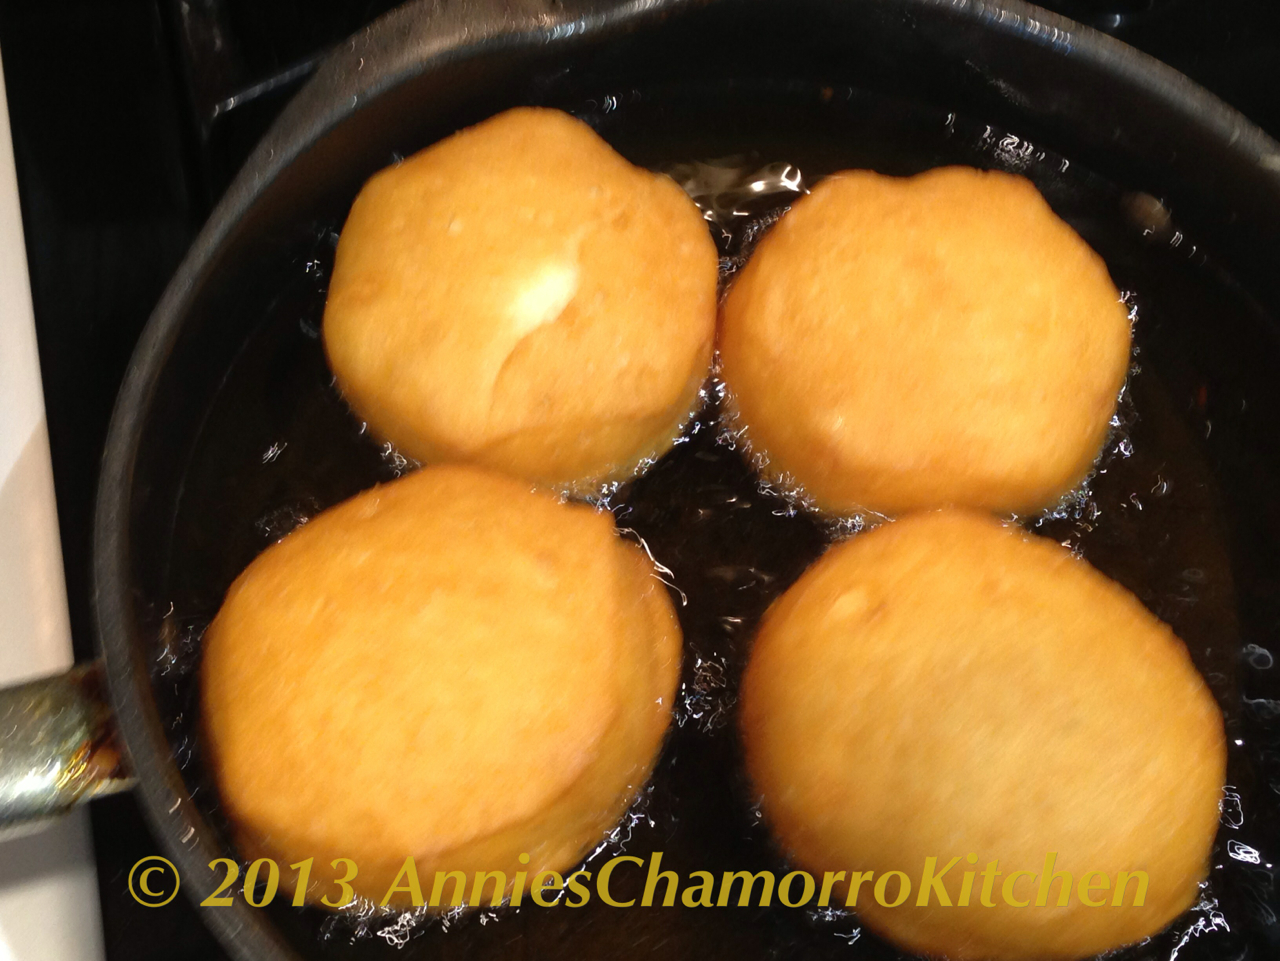
IMG_0944

Perfect! 

IMG_0945

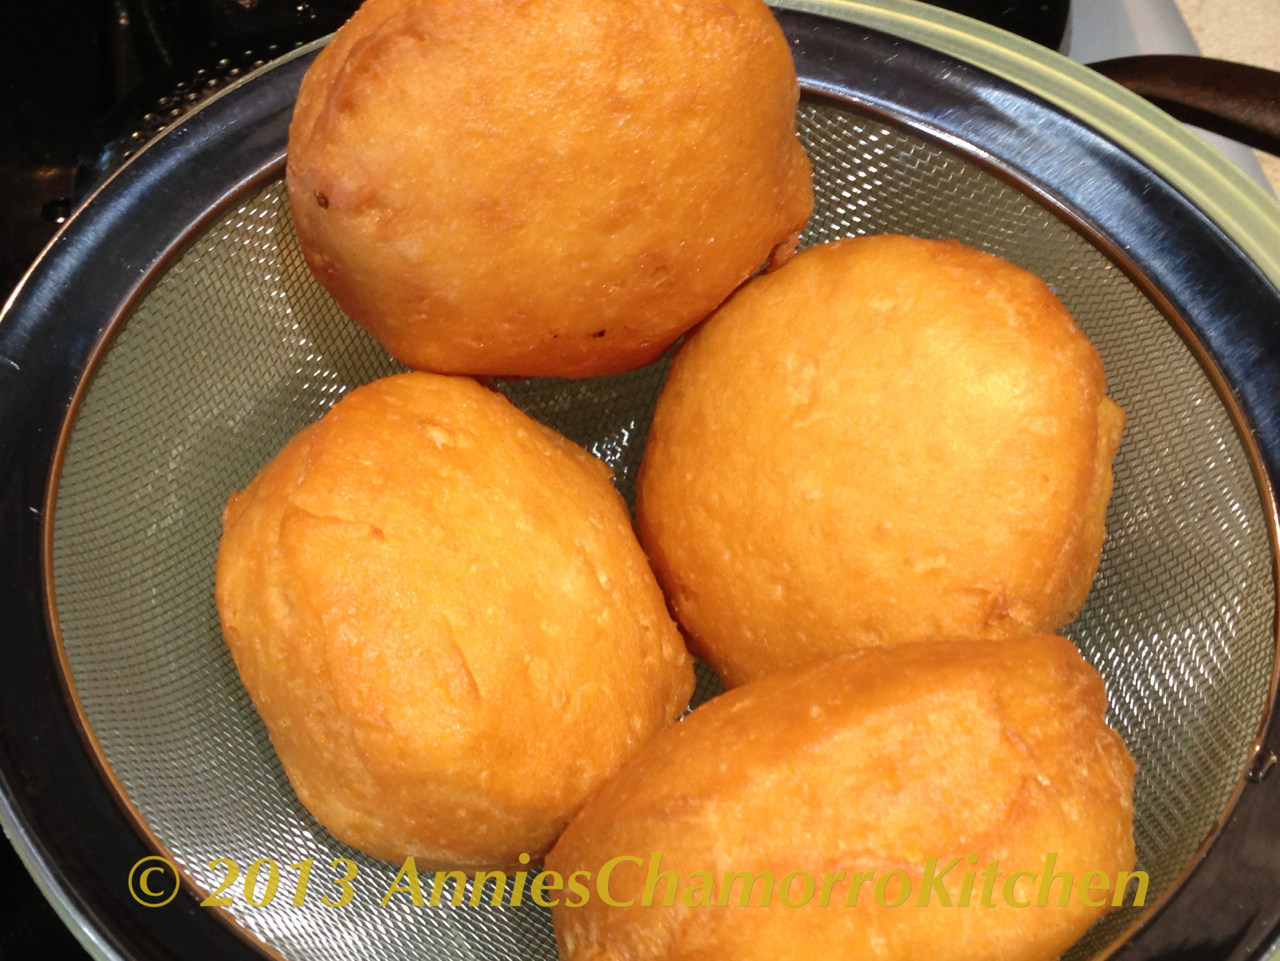
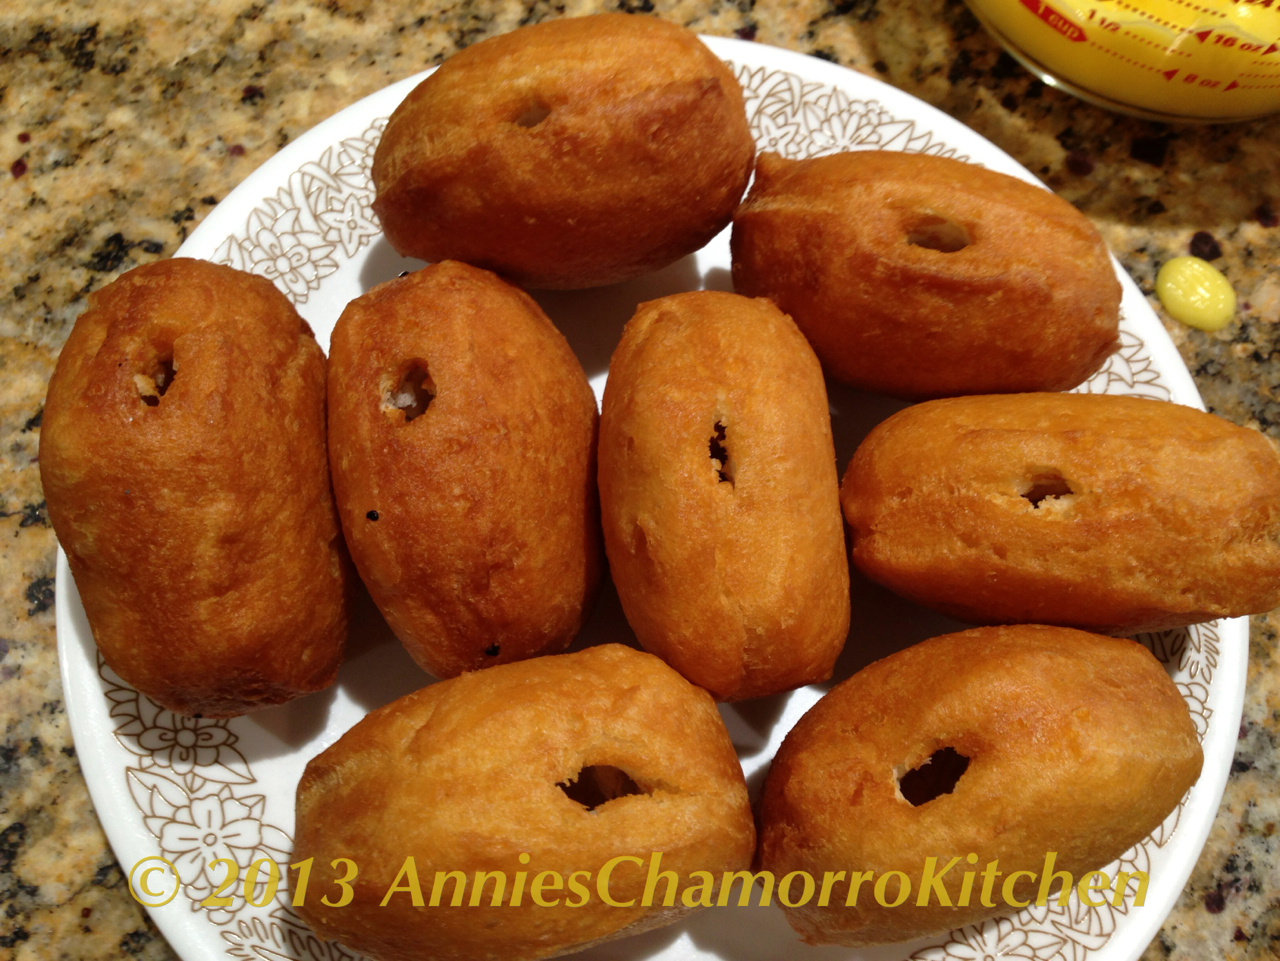
Remove the donuts from the oil and let them drain in a metal strainer/colander.  Finish frying up the rest of the biscuits.

IMG_0946


PUDDING FILLING INGREDIENTS:
  • 1 large box (5.1 ounces) instant vanilla pudding mix
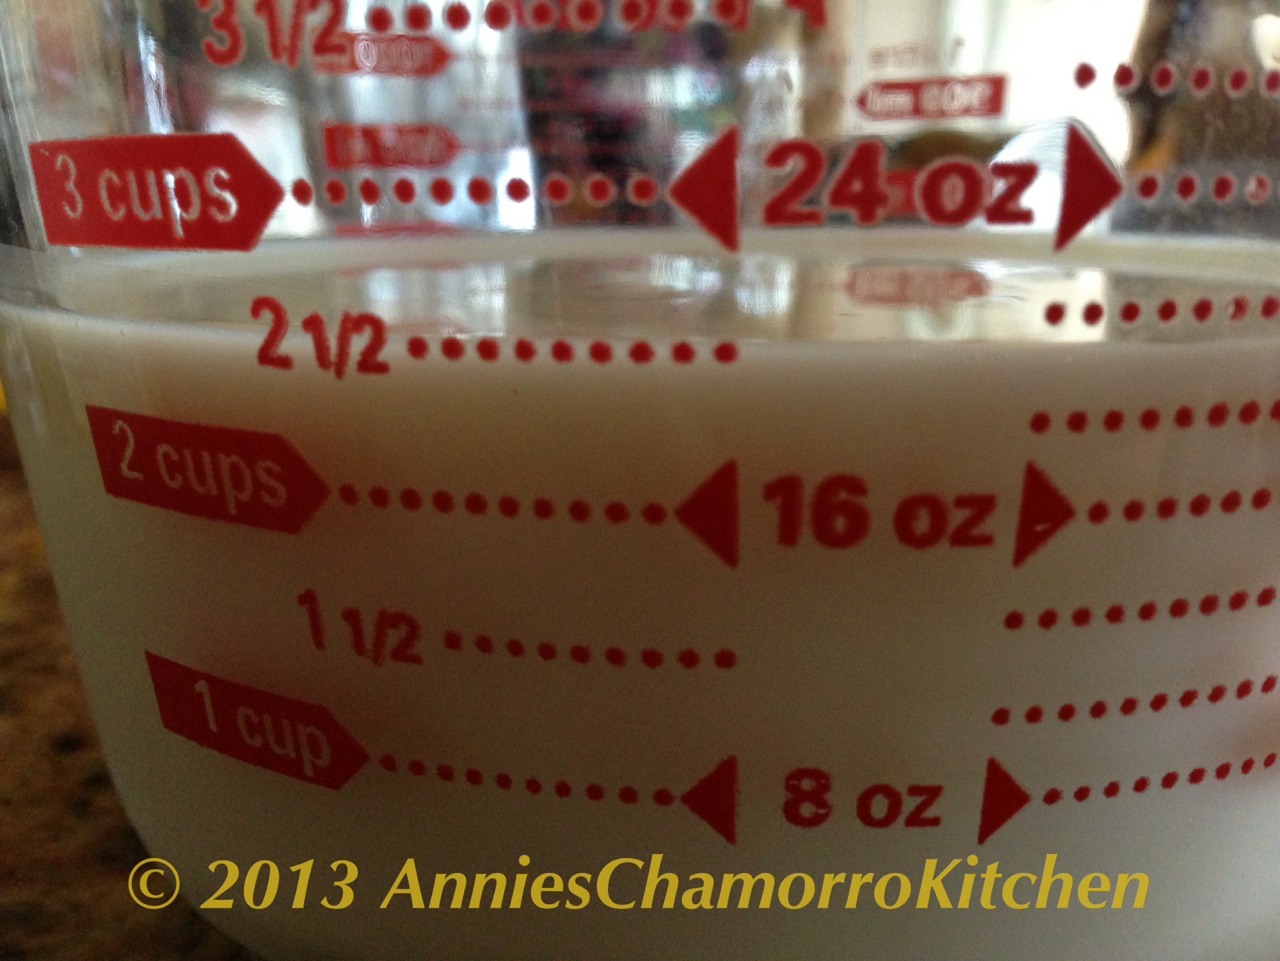
  • 2 1/2 cups cold milk
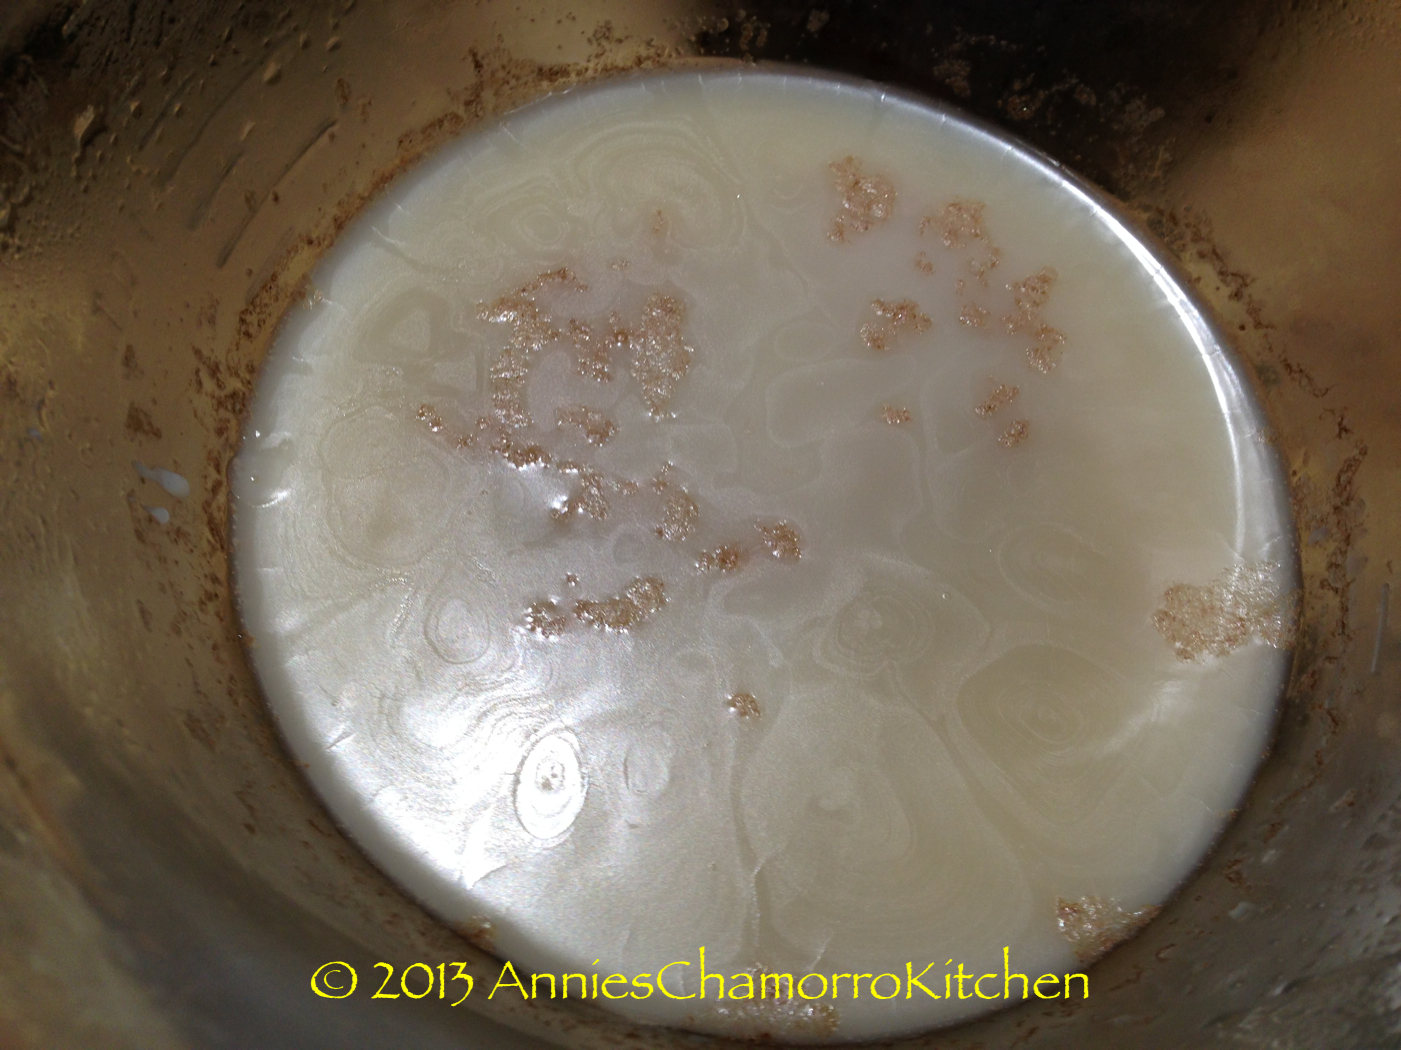
Make the pudding filling.

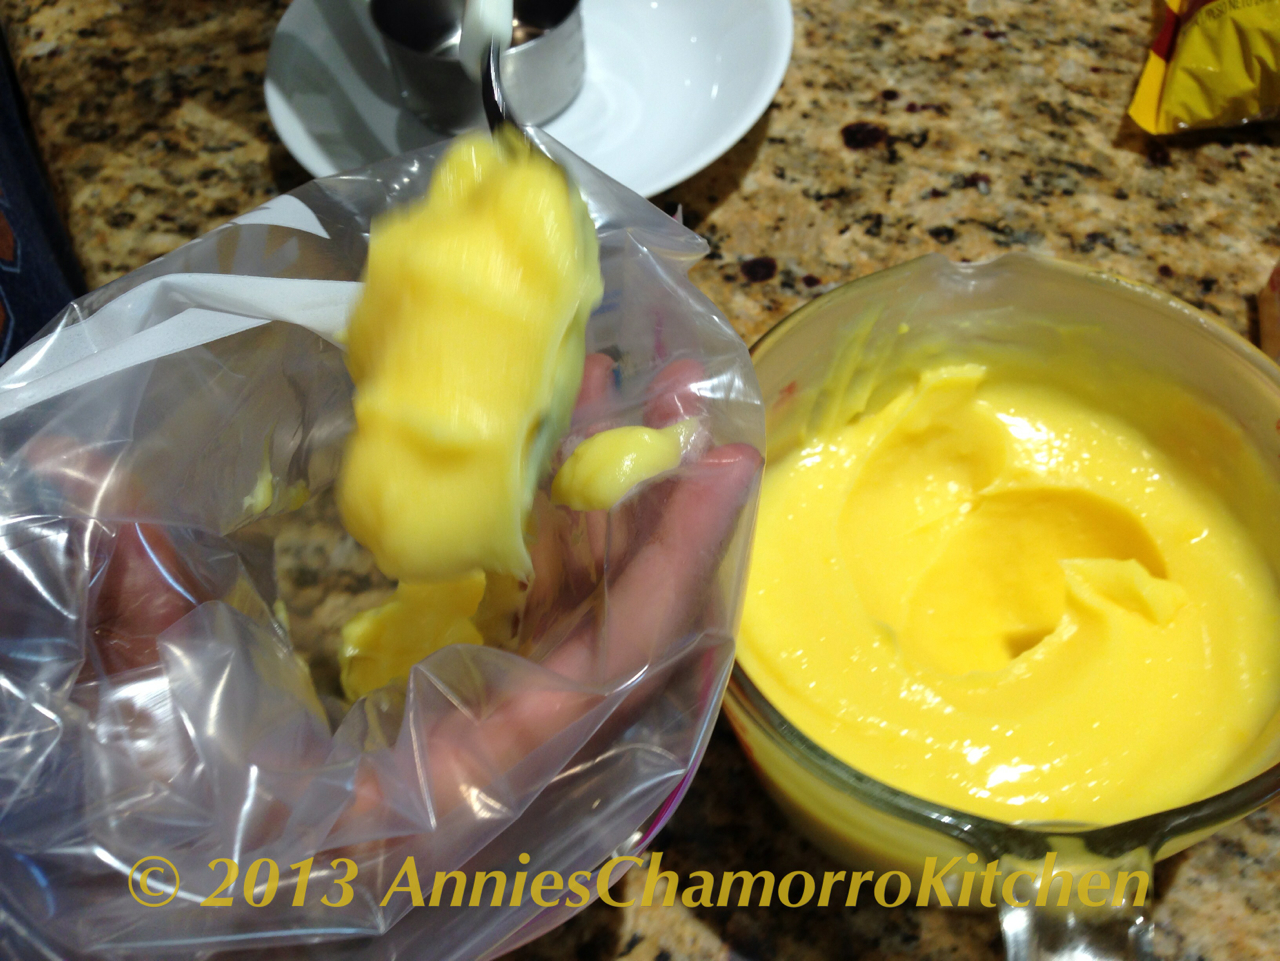
1.  Place the milk in a small mixing bowl (or in this case, a large measuring cup).

IMG_0935

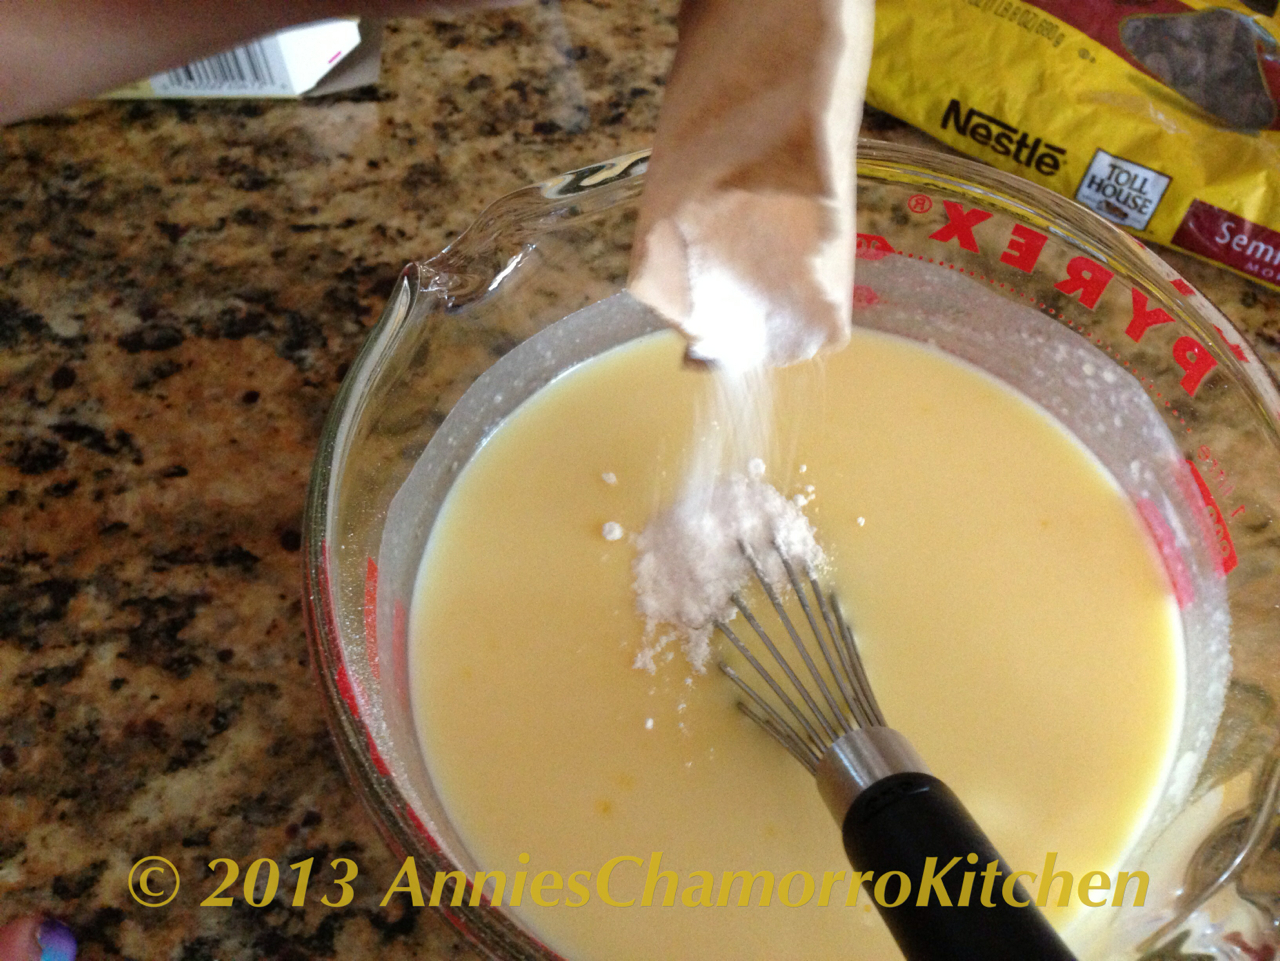
2.  Sprinkle the instant pudding mix over the milk.  Whisk to combine, ensuring all the lumps dissolve.

IMG_0936

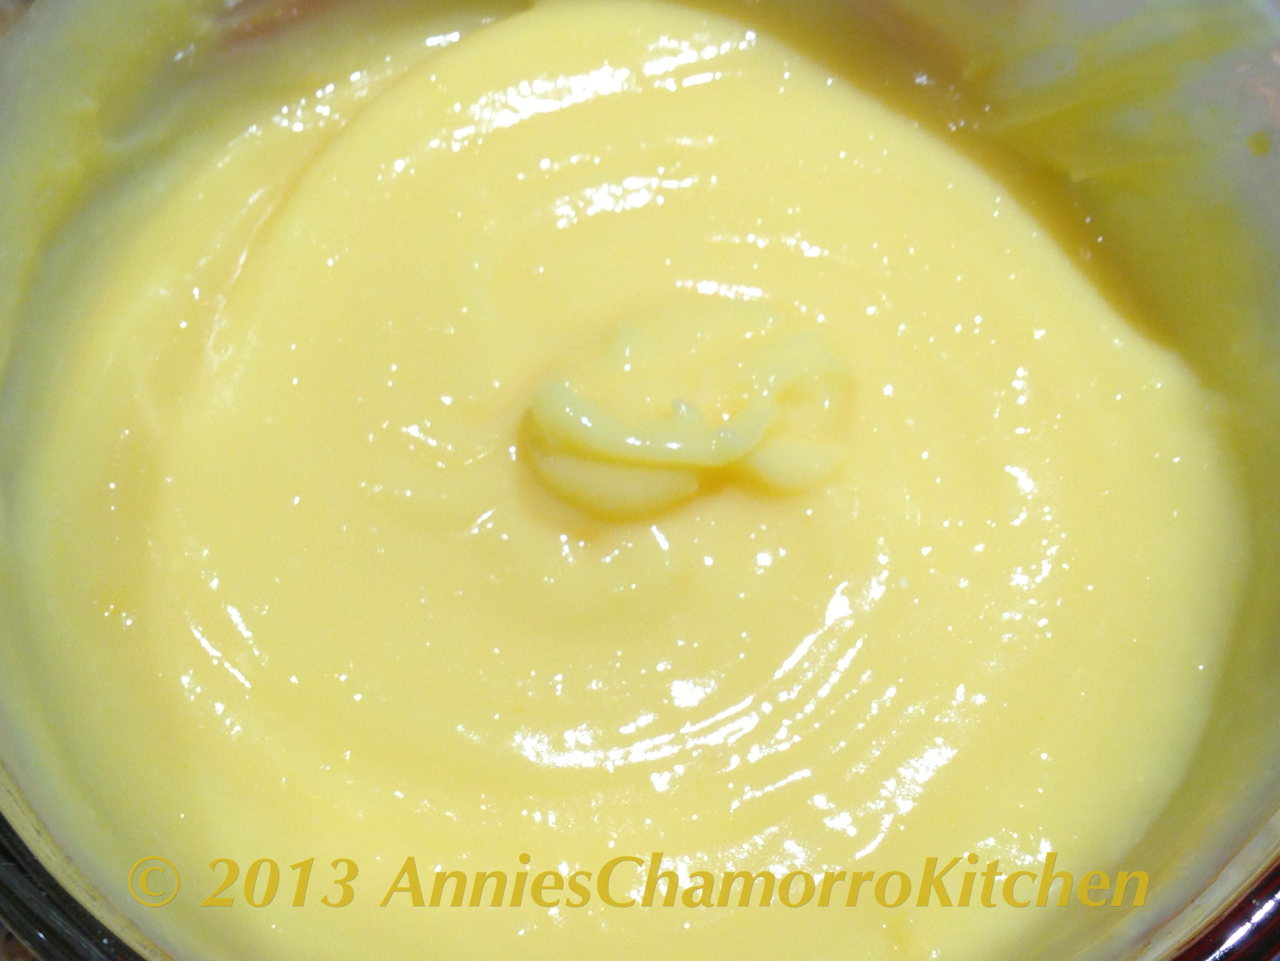
3.  Set the pudding aside to set while the donuts are cooling off.

IMG_0937


FILL THE DONUTS:

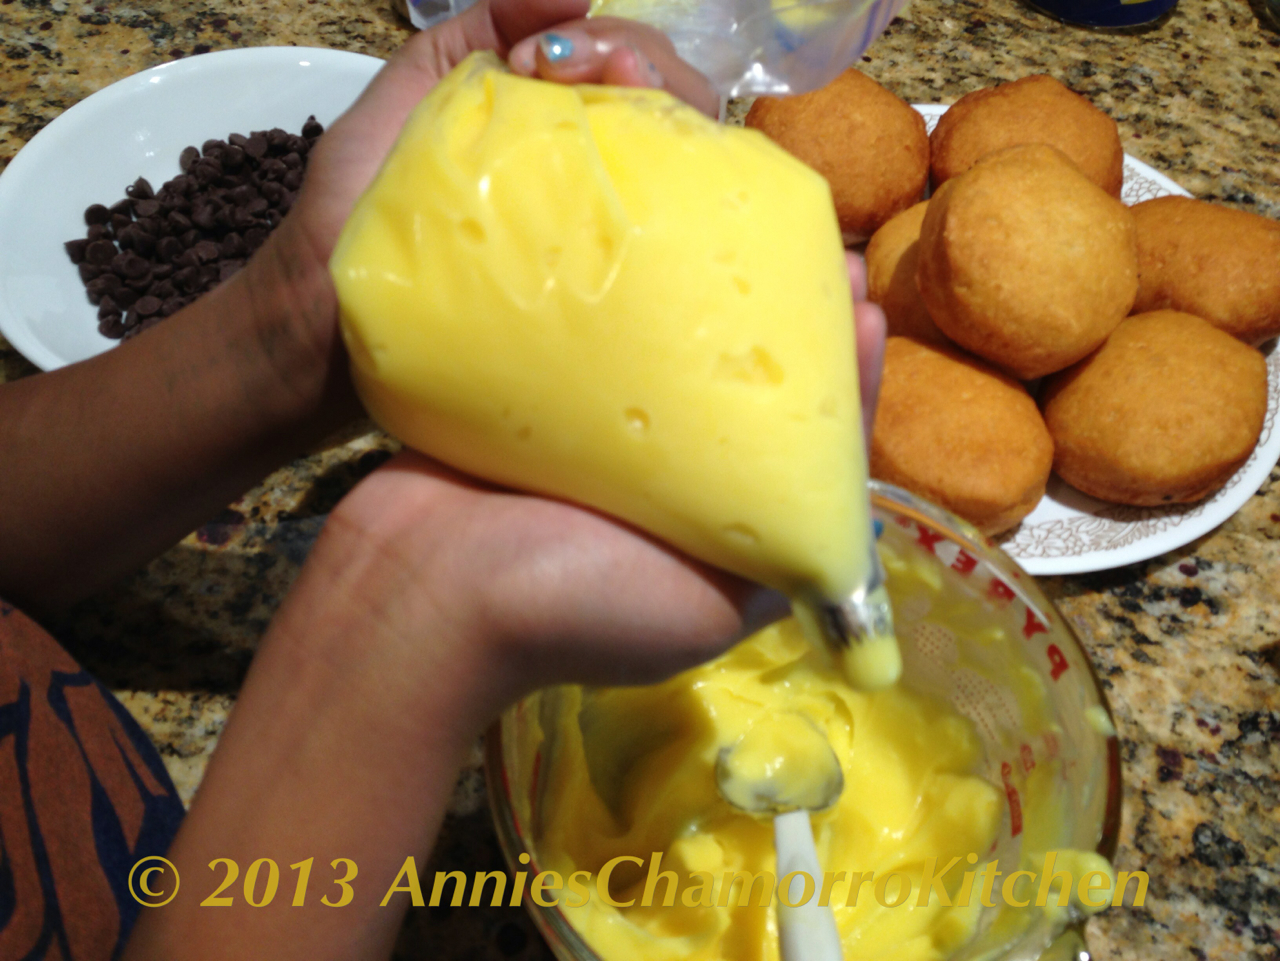
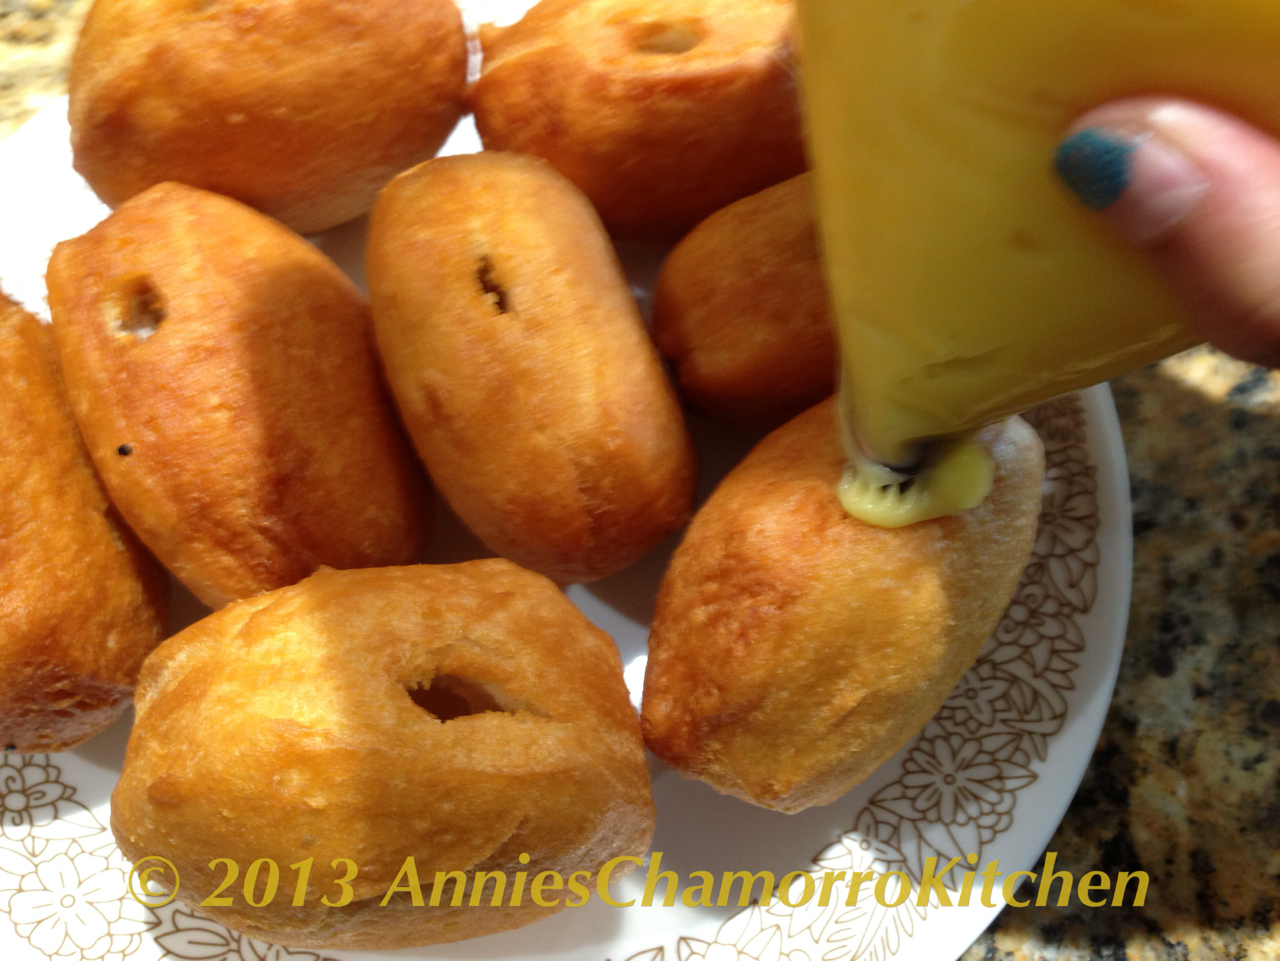
1.  Prepare a pastry bag fitted with a large round tip.  If you don’t have a pastry bag, don’t worry.  Just use a ziplock bag with the tip cut off (cut off only enough for the tip to push through).  Push the tip through the hole, then fill the bag with the prepared vanilla pudding.

IMG_0951

IMG_0956

2.  Use a chopstick to create a space in each donut.  Be careful not to split the donut in half or push the chopstick out the other side or the pudding filling will ooze out.

IMG_0960

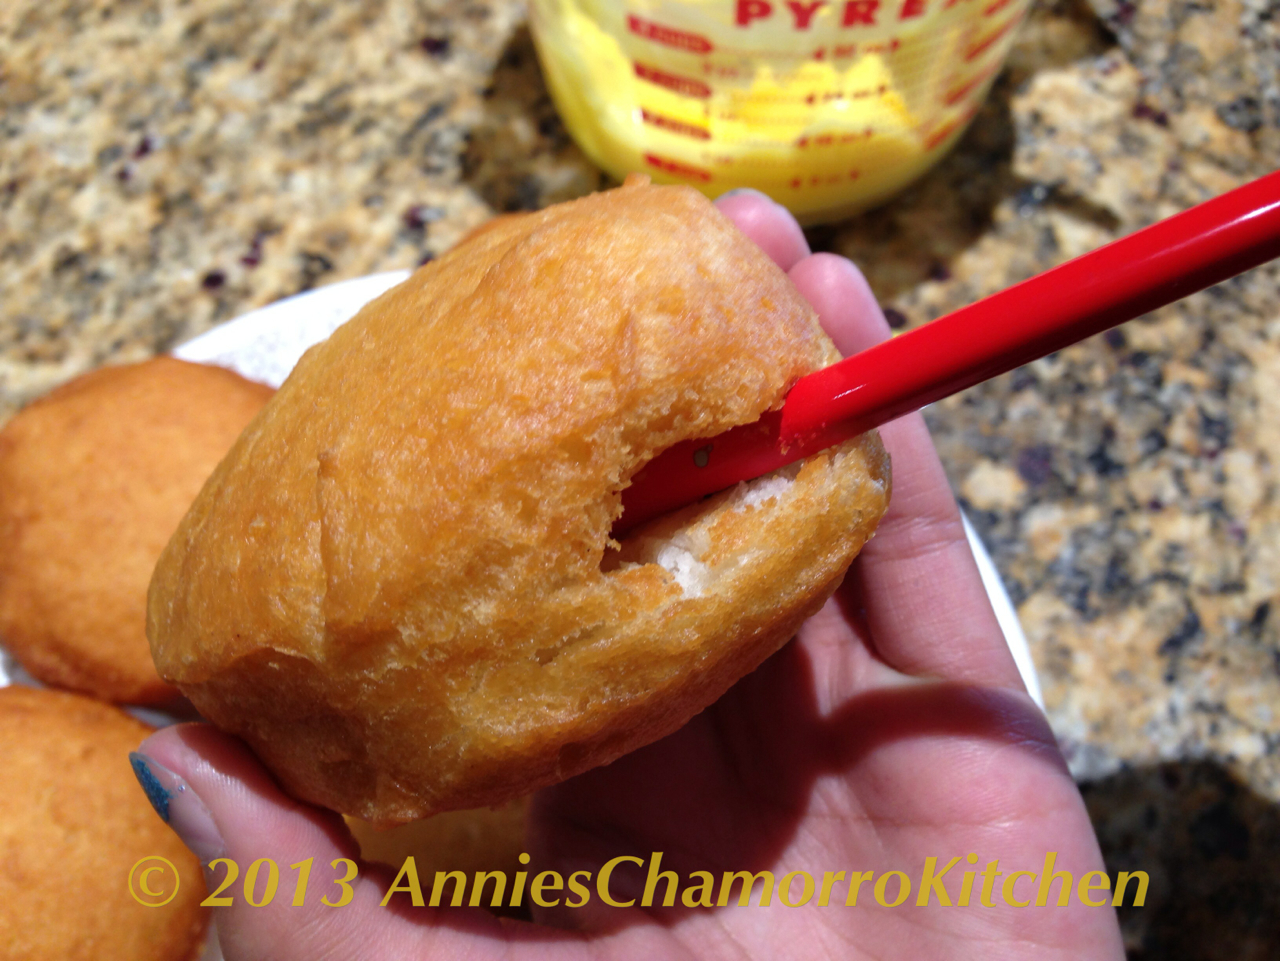
3.  Place the prepared donuts on a plate, hole side up.

IMG_0963

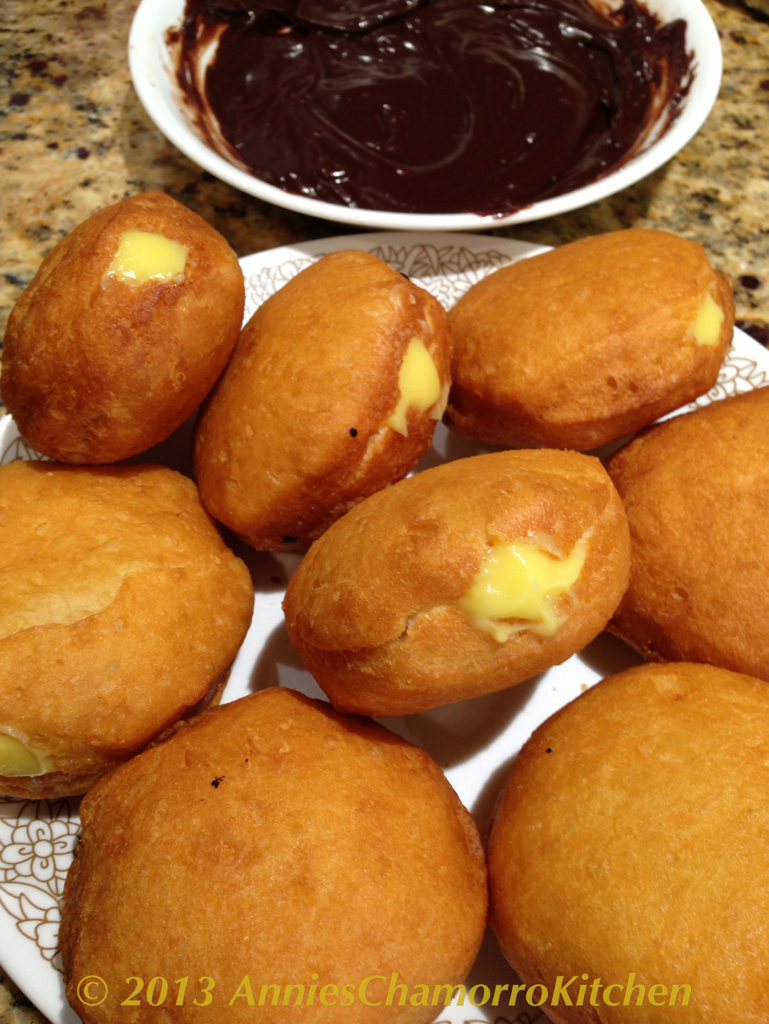
4.  Fill each of the donuts.  Do not over fill.  Top with prepared Chocolate Ganache.

IMG_0964

IMG_0965


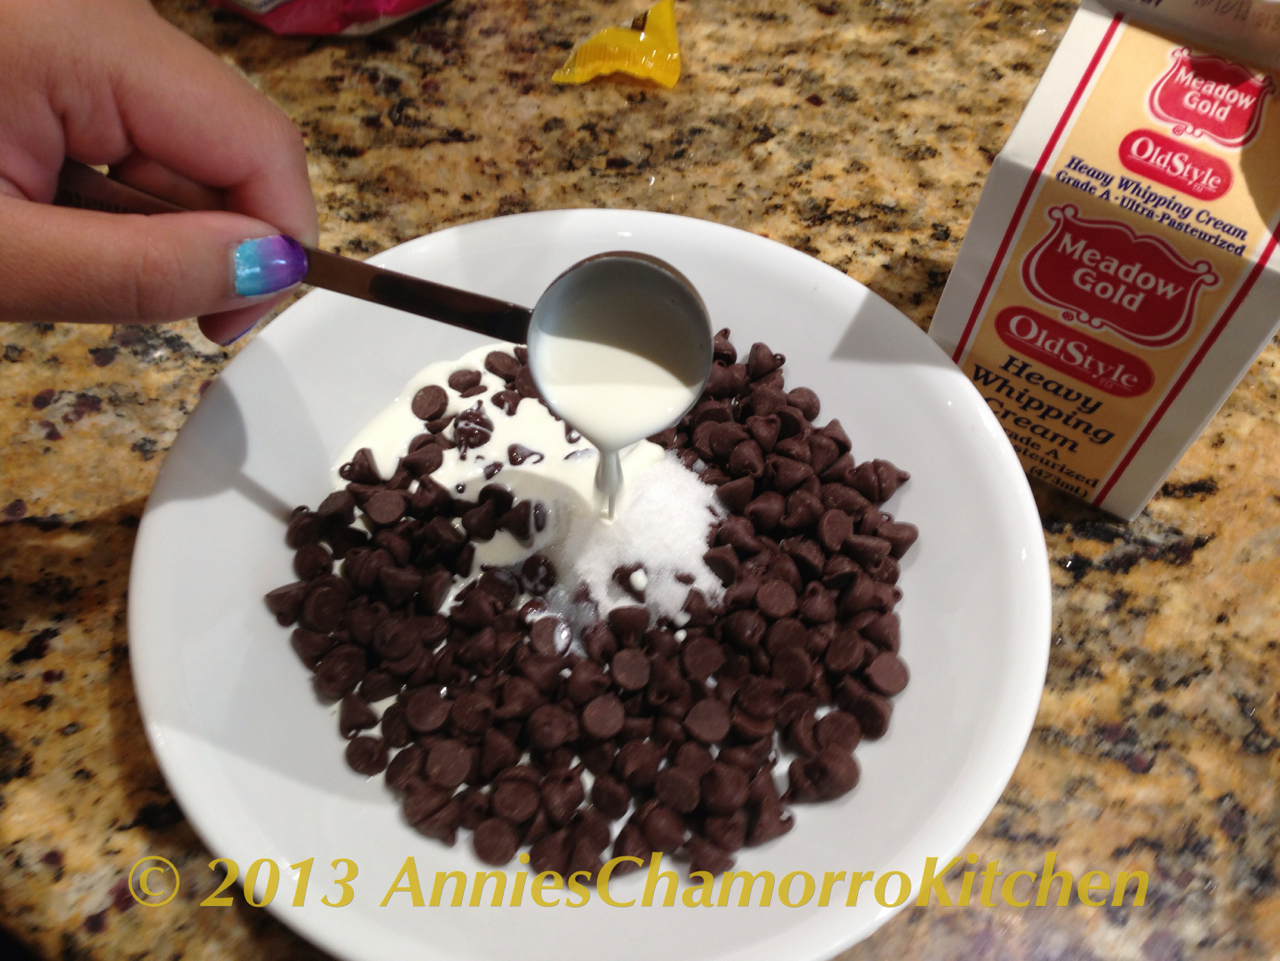
CHOCOLATE GANACHE INGREDIENTS:
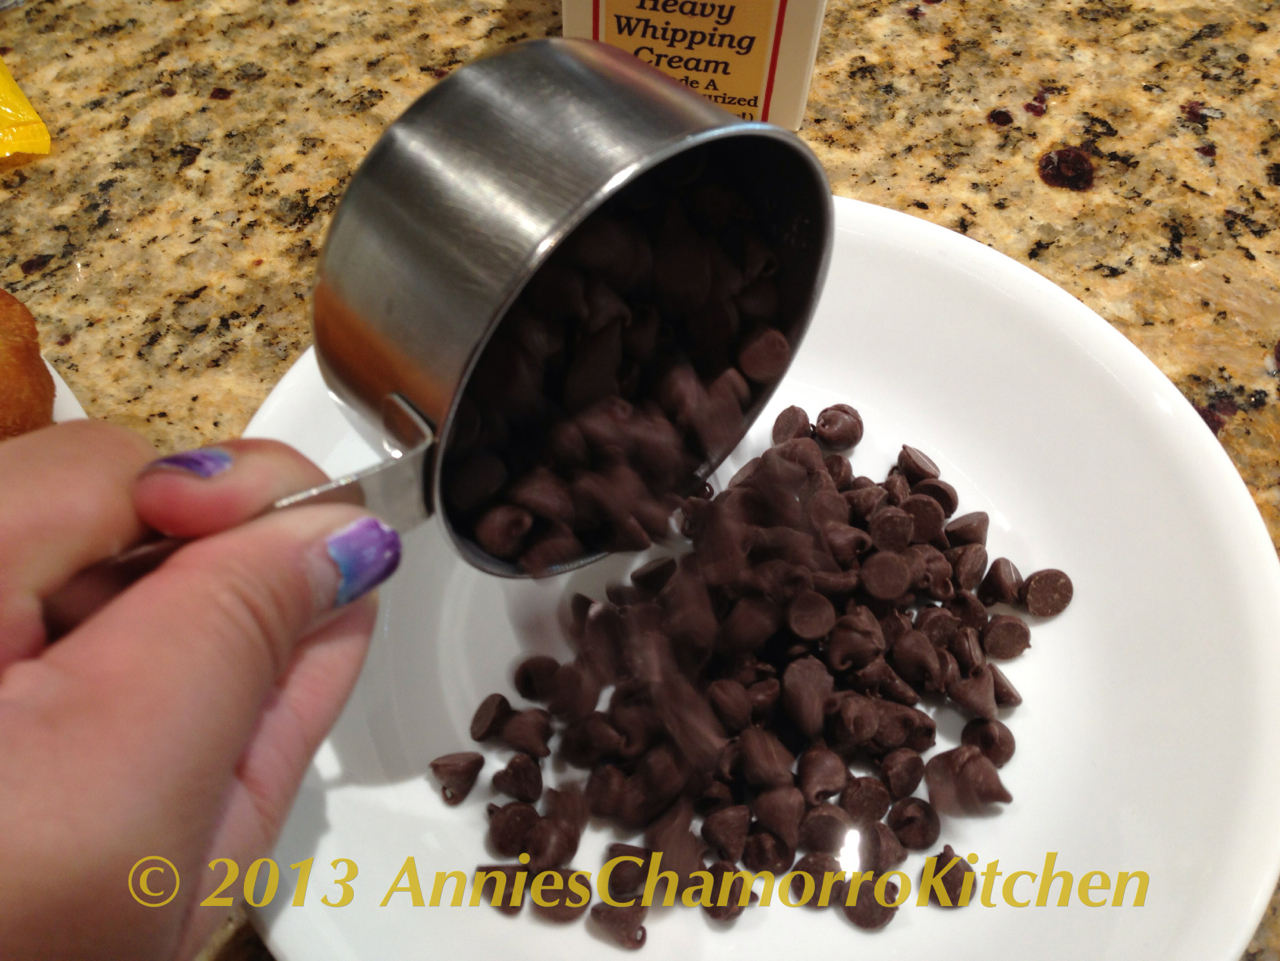
  • 1 1/3 cups semisweet chocolate chips
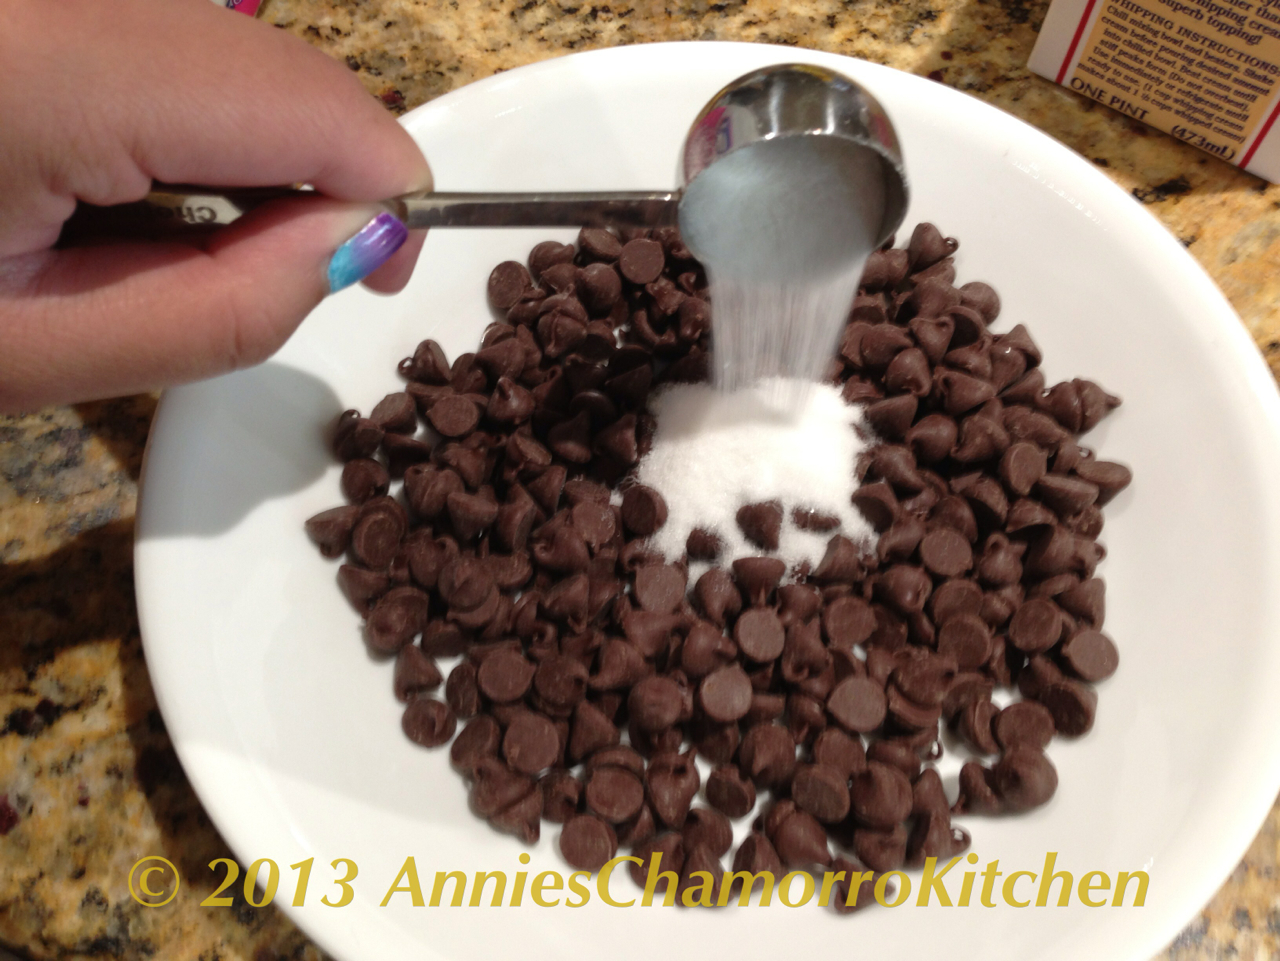
  • 1 tablespoon sugar
  • 8 tablespoons heavy cream
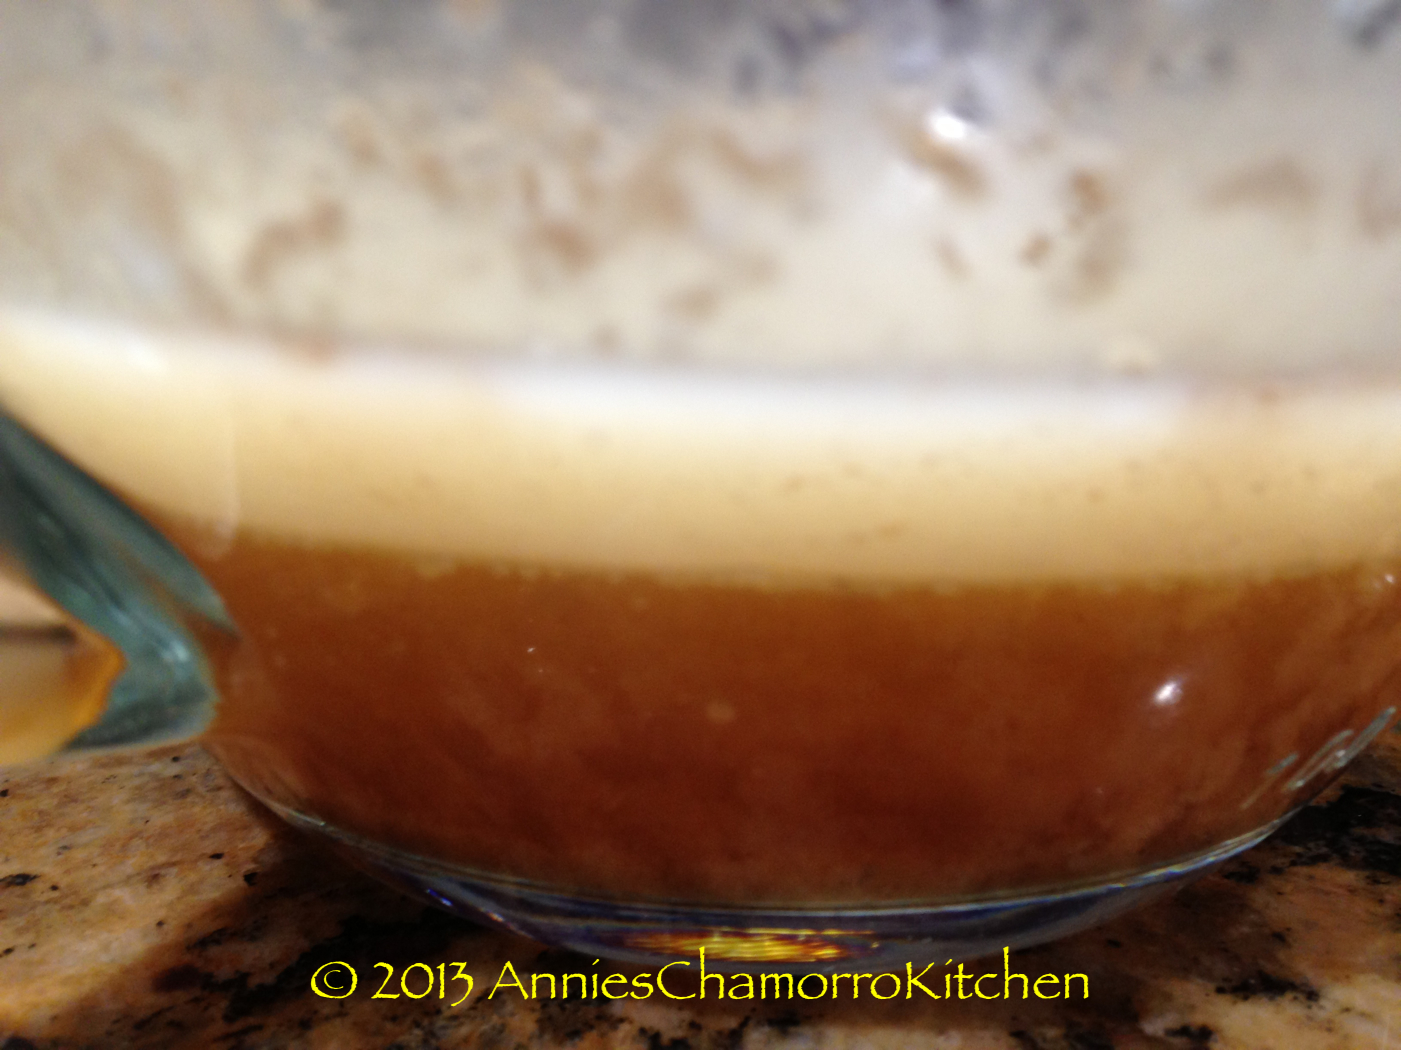
Make the chocolate ganache:

1.  Place the chocolate chips in a shallow microwave-safe bowl.

IMG_0955

2.  Add the sugar.

IMG_0957 

3.  Add the heavy cream.

IMG_0958

4.  Microwave the mixture for 30 seconds.  Remove from the microwave and stir to combine.  If the chocolate chips aren’t melted enough (the chips aren’t soft), microwave for an additional 15 seconds.  

IMG_0961

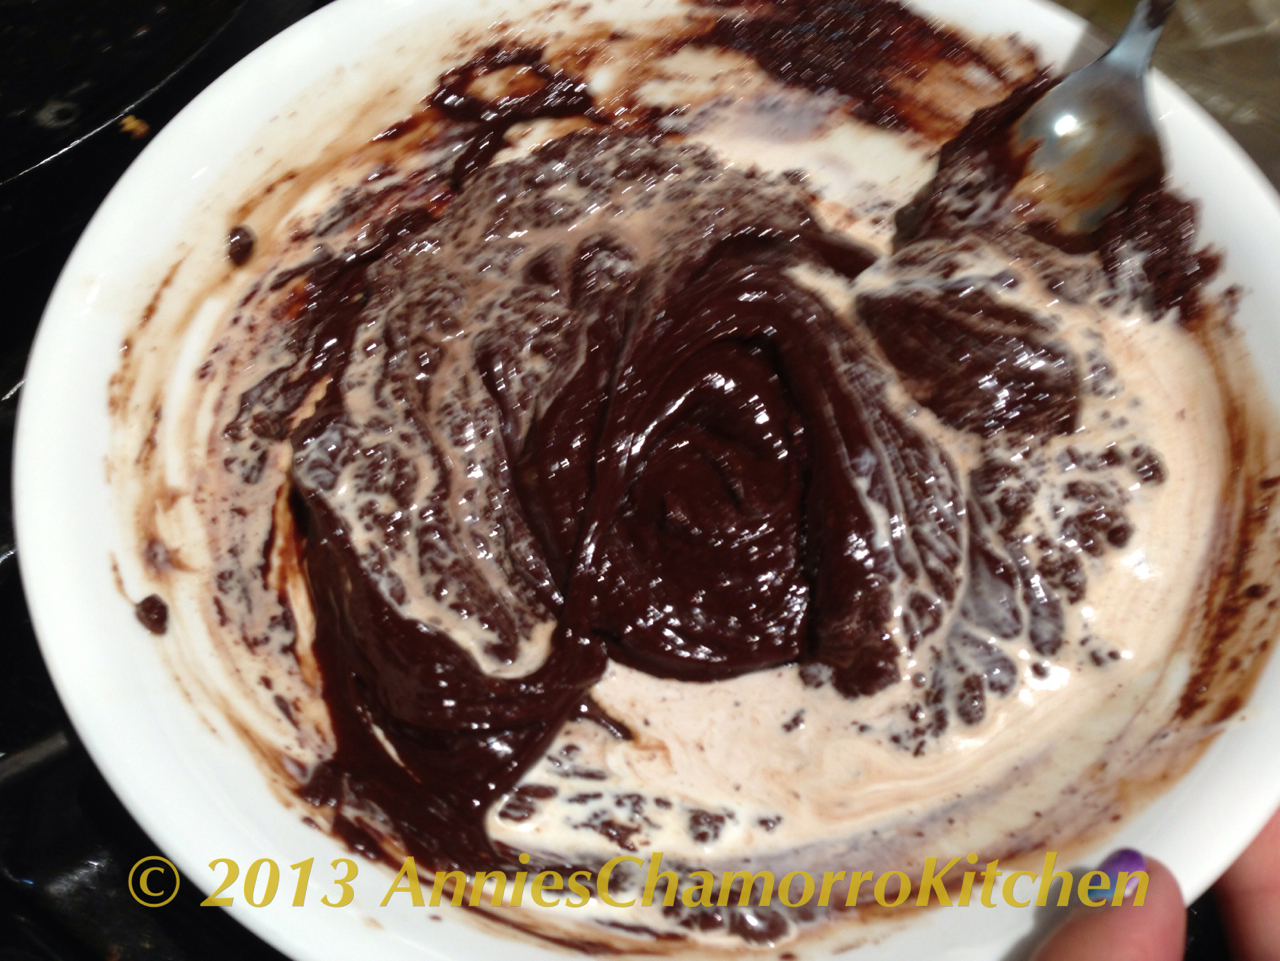
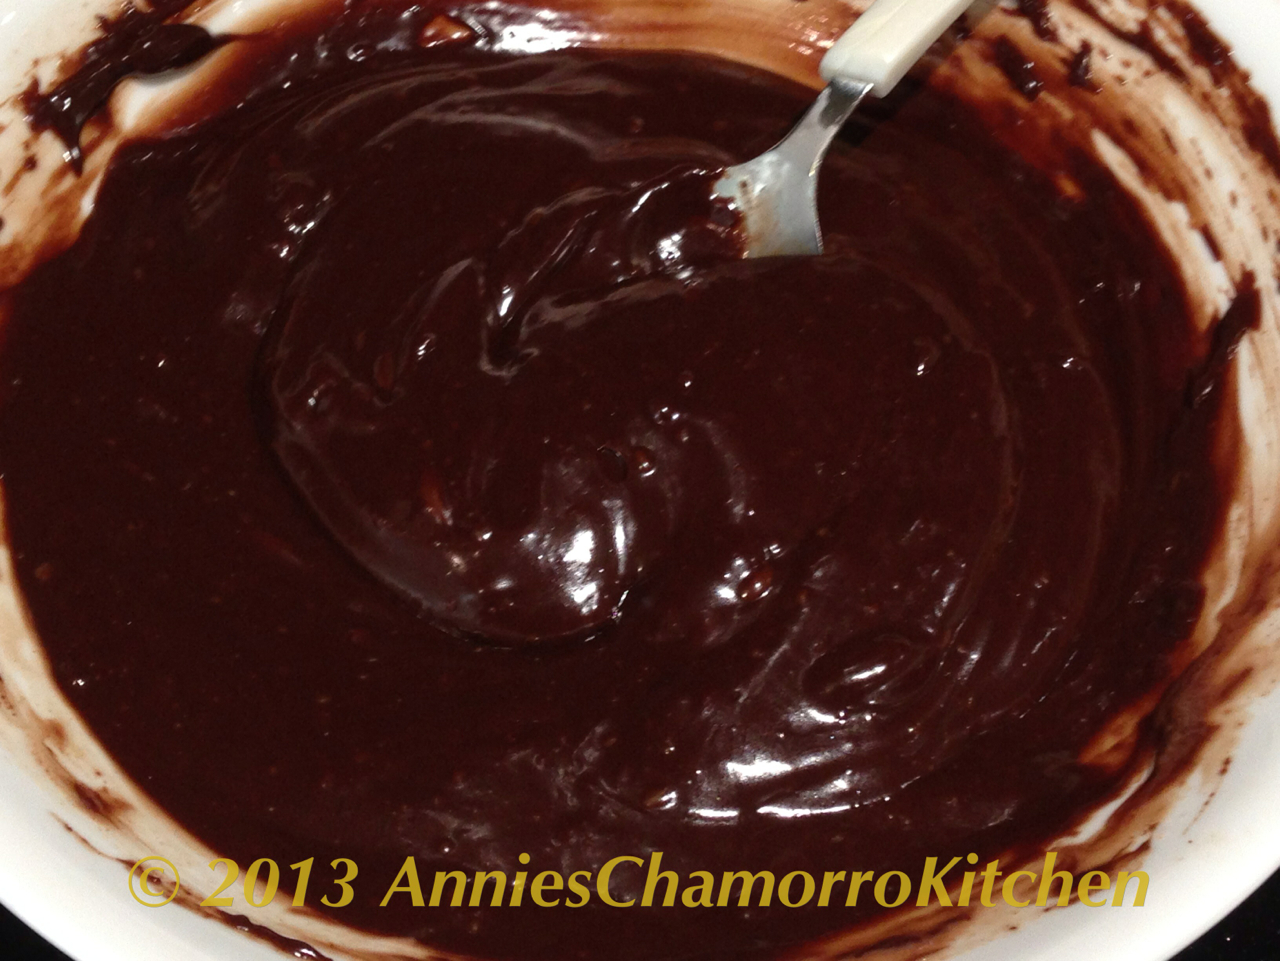
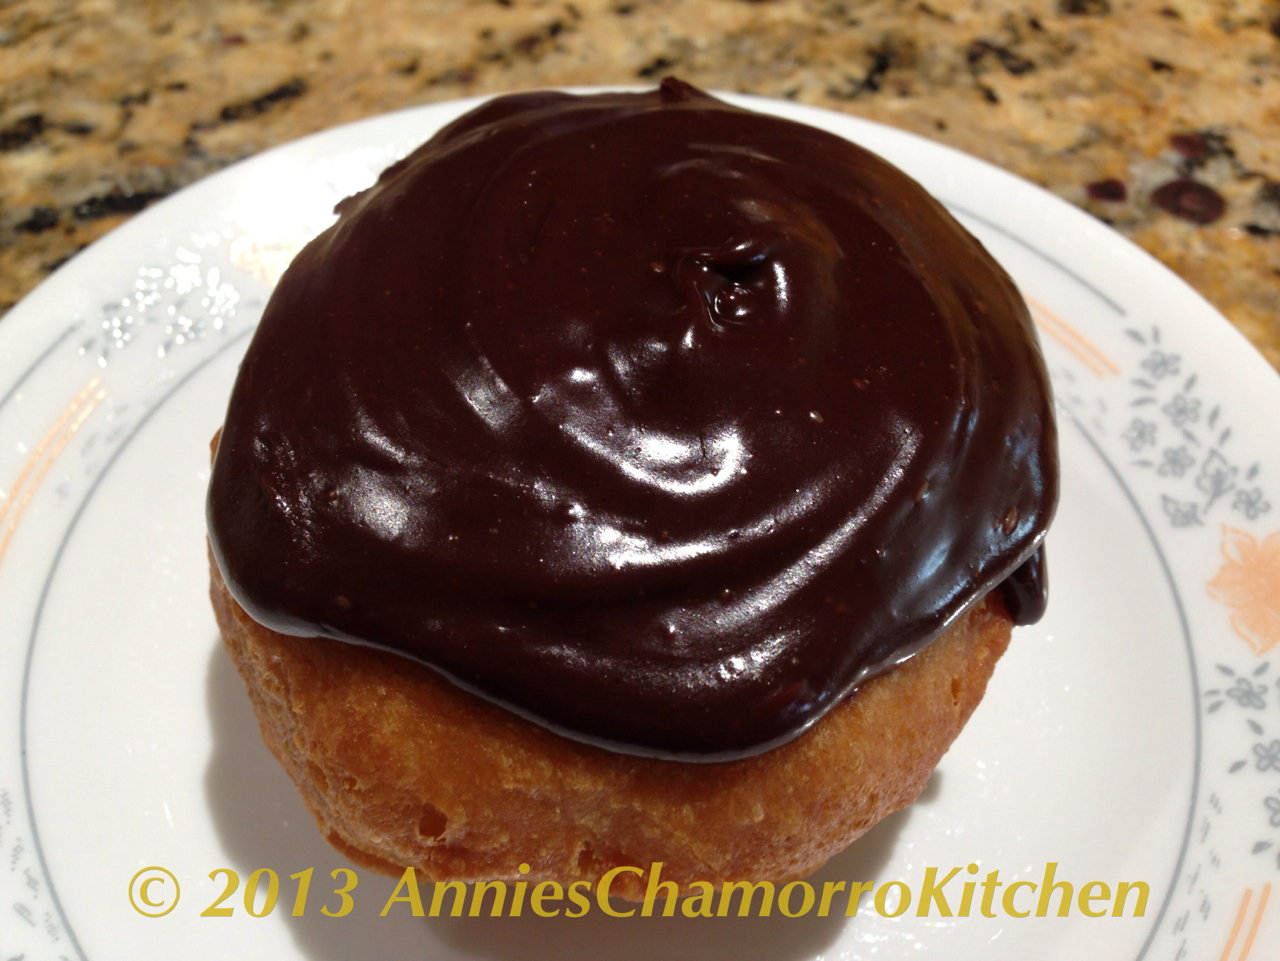
5.  Remove from the microwave and stir until smooth.  The ganache pictured below is the consistency of a smooth frosting that is spreadable.  Mix in two more tablespoons of heavy cream if you want your ganache thinner and almost pourable.

IMG_0962

6. Place a dollop of chocolate ganache on top of a donut. Use a spatula or the back of a spoon to smooth it out.

IMG_0978

IMG_0967

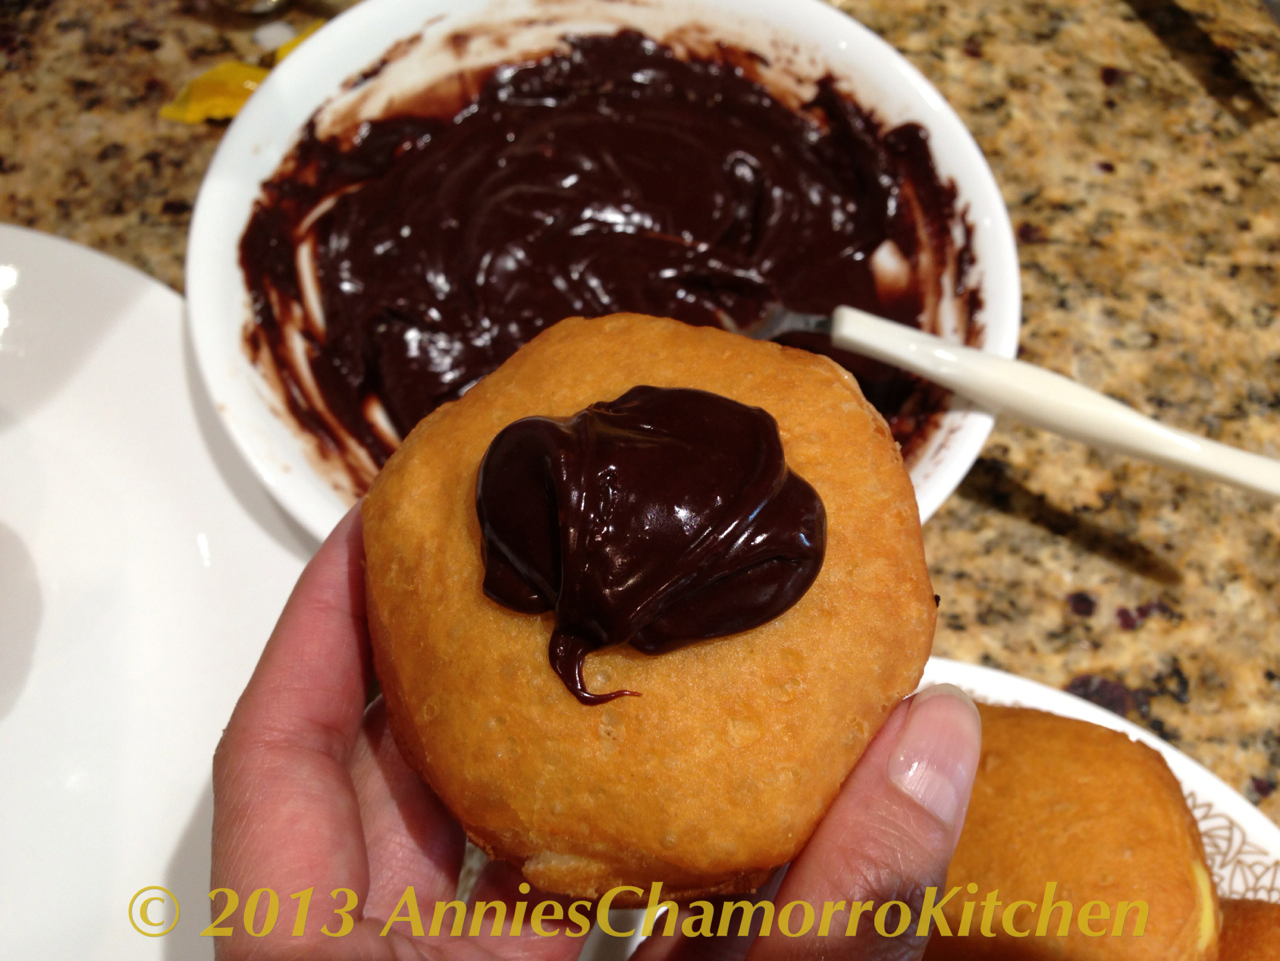
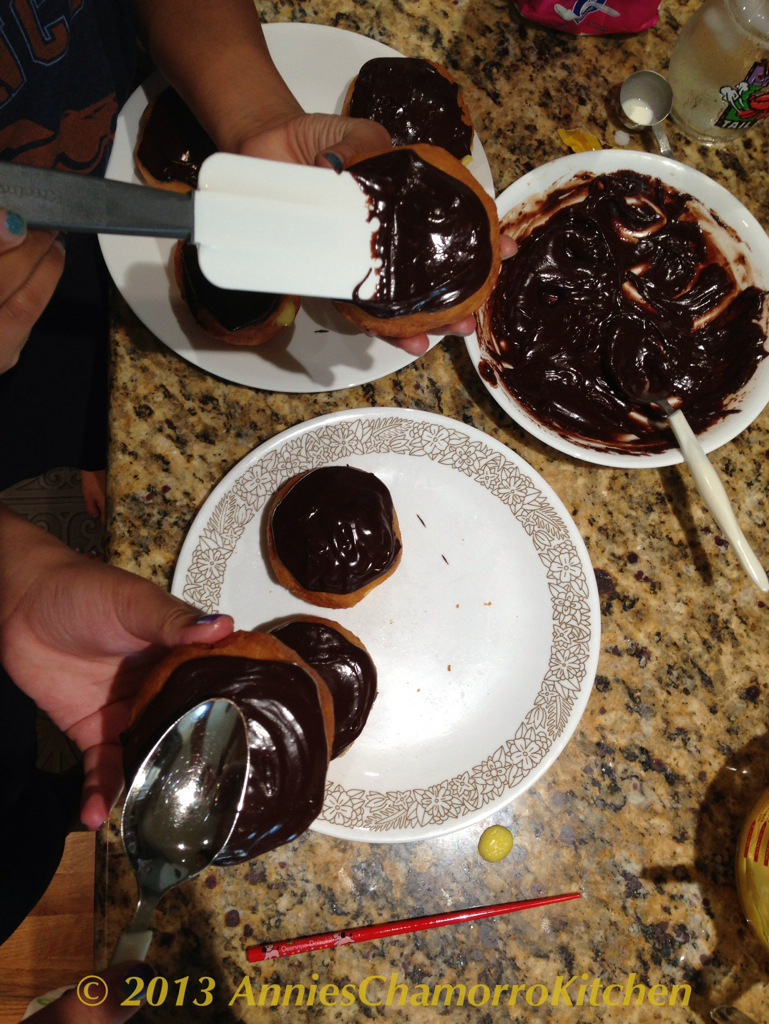
7.  Serve immediately and ENJOY!

IMG_0968

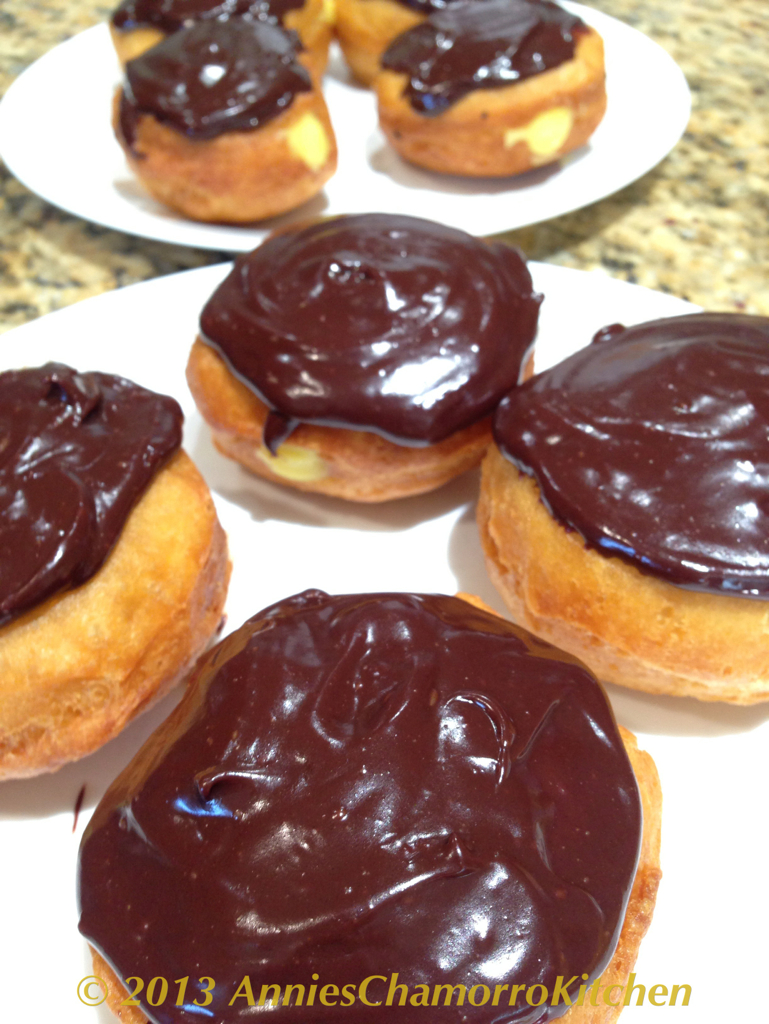
♬ ♫ ♪ ♩ ♩ ♪ ♫ ♬   Ta daaa!!   ♬ ♫ ♪ ♩ ♩ ♪ ♫ ♬

IMG_0971

Yummm!!!  Are you drooling yet???

IMG_0976

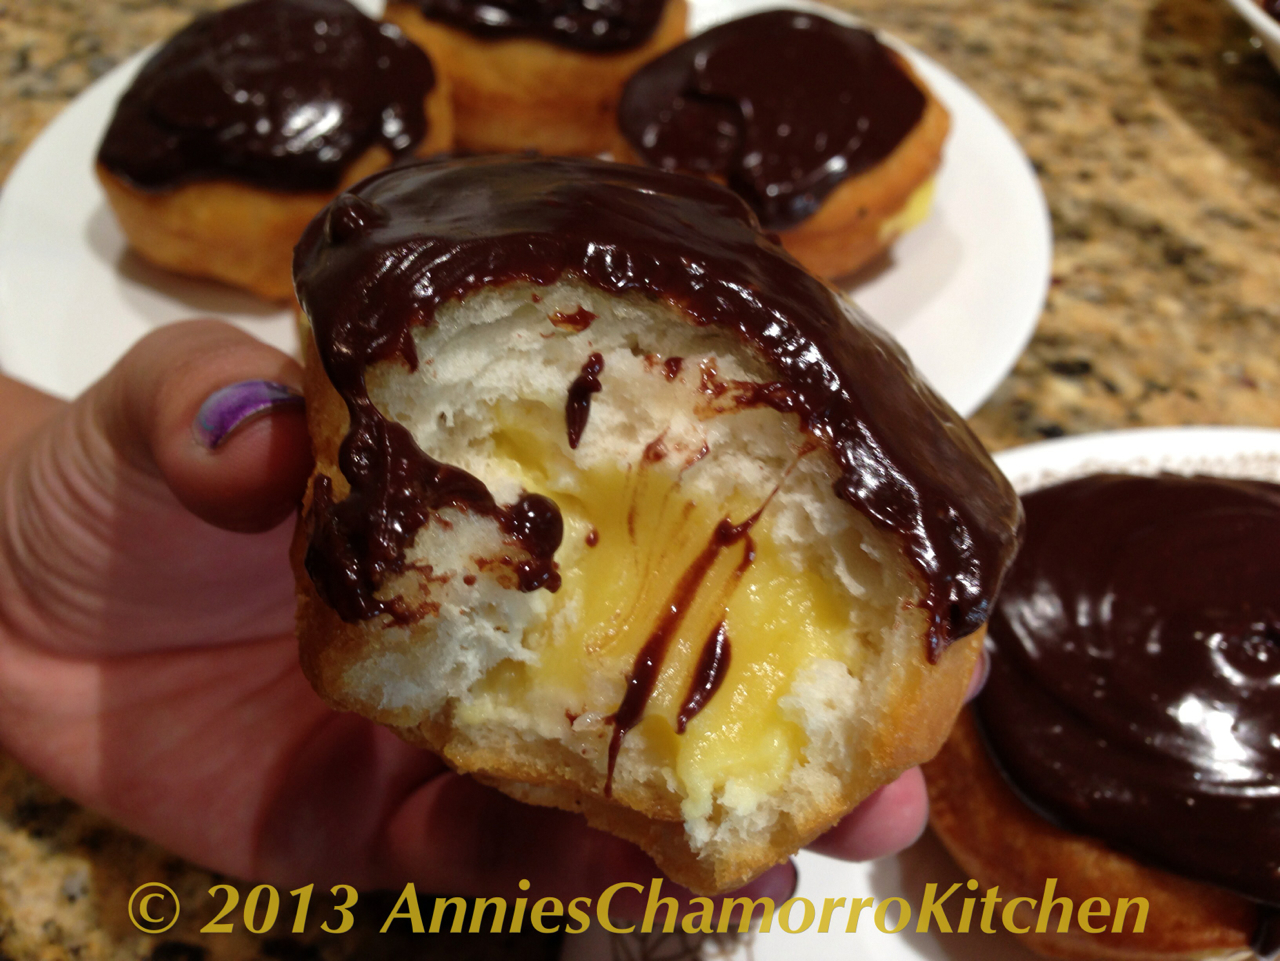
Go on…take another bite!

IMG_0972

These are absolutely DELICIOUS!    What are you waiting for…go out and buy the ingredients and fry up a batch of these fabulous FRIED BOSTON CREAM PIE DONUTS!  🙂

IMG_0973


Lasagne al Forno

I first made this lasagne years ago, when I lived in Germany (yes, Germany, not Italy).  There was this small family run Italian restaurant in the little German town we lived in.  Aside from the restaurants and cafés in Italy, that little Italian restaurant in Germany is the best I’ve ever been to.  It’s been over 15 years since I’ve been there, yet I have not yet found any Italian restaurant to compare to that one in Germany.

This recipe is my take on one of my favorite dishes served there.  The blend of the tomato and bechamel sauces take this pasta dish to a whole new level.  Give my recipe a try.  I think you’ll like it.  🙂 

LASAGNE AL FORNO

IMG_1045 

INGREDIENTS:

  • 1 box no-bake lasagne noodles (have a 2nd box on hand in case you use a large pan)
  • Meat sauce (see below)
  • Bechamel sauce (see below)
  • 1 bag (1 pound) shredded mozzarella cheese
  • 1 cup grated Parmesan-Romano cheese blend

Lasagne al Forno ingredients

Meat Sauce:
    • 1 pound mild Italian sausage
    • 1 pound lean ground beef (you can omit this if you want your sauce less meaty)
    • 1 medium onion, chopped
    • 2 teaspoons garlic powder
    • 2 tablespoons Dashida beef flavored seasoning
    • 2 tablespoons Italian seasoning
    • 6 leaves fresh basil, chopped into small pieces
    • Black pepper, to taste
    • 2 29-ounce cans tomato sauce
Directions to make the Meat Sauce:

1.  Brown the sausage and ground beef.  Drain any excess fat and liquid.

IMG_0982

 2.  After the meat has browned, add the Dashida, onions, garlic powder, Italian seasoning and basil.

IMG_0983

IMG_0987

3.  Cook until the onions are translucent. 

IMG_0991

4.  Add the tomato sauce to the ground meat mixture.  Stir to combine.  Simmer for 5 minutes then turn off the heat.  Set aside.

IMG_0995

IMG_1002

 
Bechamel Sauce:
  • 4 tablespoons butter
  • 6 tablespoons flour
  • 2 cups milk
  • 3 cups heavy cream
  • 1/2 teaspoon salt
  • 1 teaspoon grated nutmeg
  • Black pepper, to taste
  • 1 5-ounce bag grated Parmesan cheese
Directions to make the Bechamel Sauce:

1. In a medium sauce pan, melt the butter.

IMG_0988

2.  Add the flour (all at once) to the melted butter.

IMG_0998

3.  Use a whisk to mix the flour and butter together.  Cook over medium low heat for about 2-3 minutes.  Whisk constantly to prevent burning.

IMG_1003

4. Slowly whisk in the milk and cream.  Whisk vigorously to ensure there are no lumps. 

IMG_1009

5.  Add the grated Parmesan cheese to the milk mixture.  Turn the heat up to medium high. Continue whisking; cook until the cheese melts and the sauce thickens.

IMG_1020

You know the sauce is thick enough when you dip a spoon into it, run your finger down the spoon, and you leave a line down the spoon that doesn’t disappear with runny sauce.

IMG_1024

6.  Add the grated nutmeg, and salt and pepper to taste.  Turn the heat off and set the sauce aside.  NOTE:  This sauce is EXCELLENT for fettuccine alfredo.  🙂

IMG_1023 


Assemble the Lasagne al Forno:

1. Using a large lasagne pan, or a deep dish baking/roasting pan, spread a thin layer of meat sauce on the bottom of the pan.

IMG_1021

2.  Add a layer of noodles.  Don’t worry about filling in the spaces with noodles; these no-cook noodles will expand during the baking process.

IMG_1022

3.  Pour some bechamel sauce over the noodles, just enough to cover the noodles.

IMG_1027

4.  Sprinkle shredded and grated cheese over the bechamel sauce.  Top with another layer of noodles.

IMG_1028

5.  Repeat the layering process — meat sauce, noodles, bechamel sauce, cheese, noodles — until you’ve used up all of your sauce and/or noodles.  The last layer (on top) should be bechamel sauce topped with cheese.

IMG_1033

6.  Heat the oven to 375 degrees.  Place the pan of lasagne on top of a large baking sheet.  Cover the pan of lasagne with aluminum foil.  Bake at 375 degrees for 25 minutes. 

IMG_1038

IMG_1039

7.  After 25 minutes, remove the aluminum foil.  Turn the oven to Broil — continue to bake the lasagne for 5 more minutes to brown the cheese on top.

IMG_1044

8.  Once the cheese has browned, remove the pan from the oven.  Before serving, let the lasagne sit for at least 15 minutes (don’t worry, it will still be hot) to allow the sauces to set.  If you serve immediately after removing the lasagne from the oven, the sauces will run all over the place (it will still taste delicious, but your presentation won’t be as “pretty”).  Serve with your favorite crusty bread and ENJOY!  🙂

IMG_1045


Buñelos Aga (Banana Donuts)

This is a family favorite.  Give it a try.  I think you’ll like it.  😊

BUÑELOS AGA’ (BANANA DONUTS) 


INGREDIENTS:

  • 2 cups mashed ripe bananas
  • 4 Tablespoons sugar
  • 1 teaspoon vanilla extract
  • 1 cup flour
  • 1 tablespoon baking powder
  • Pinch of salt
  • 1 teaspoon cinnamon (optional)

Other:

  • Vegetable oil for frying
  • Maple syrup for dipping cooked donuts


DIRECTIONS:

1. Place the oil in a large frying pan; turn the heat to medium to begin preheating the oil.

2. Mix all of the ingredients in a medium sized mixing bowl. The batter will be  sticky.  Don’t be tempted to add more flour — it has the right amount of flour…the donuts won’t turn out oily or greasy, and they definitely won’t turn out dry. Adding too much flour will make them rubbery.

3.  When oil is hot, drop the mixture by spoonful into the oil, turning frequently.

Note:  When I make these, I use a small cookie scoop to get evenly sized donuts.  The Chamorro method is to scoop up a little bit of batter in your hand, then squeeze out a dollop of batter between your thumb and pointer.

4.  Deep fry over medium heat. Keep your stove settings on medium heat. If the oil is too hot, it will burn on the outside before the inside cooks.  Cook until golden brown.

5.  Serve with a side of maple syrup for dipping, or glaze all of the donuts with maple syrup.

6.  Serve immediately and enjoy!

Short Ribs Soup (Kådun Kåtne)

It’s cold and rainy right now in the Colorado Rockies…perfect weather for Short Ribs Soup.  We call this Kådun Kåtne in Chamorro.  You can substitute short ribs with your favorite cut of beef–other favorites are oxtails (don’t knock it ’till you try it) and beef shanks.

You can even change this up further by adding your favorite vegetables–potatoes, taro, other types of squash, and baby bok choy are delicious in this recipe too!

Give my recipe a try.  I think you’ll like it.  🙂


SHORT RIBS SOUP (KÅDUN KÅTNE)

IMG_0841

INGREDIENTS:

  • 3 packages (9 pieces) thick cut short ribs (rinse each piece well)
  • 1 large onion, diced
  • 2 tablespoons minced garlic
  • 8-10 cups water
  • 6 tablespoons Dashida beef flavored seasoning
  • Black pepper, to taste
  • 1 small head cabbage, cut into small pieces
  • 4 small yellow squash, peeled and cubed

DIRECTIONS:

1.  Place half of the diced onions in a large soup pot.  Add the short ribs and garlic.  Brown the ribs on all sides over medium high heat.

IMG_0411 IMG_0415 IMG_0424

2.  After the ribs are browned on all sides, add 8 cups of the water, the remaining onions and Dashida.  Place a lid on the pot and bring to a boil.  Every now and then, skim off and discard any scum that rises to the surface.

IMG_0433

3.  Cook the ribs for 45 minutes to an hour over medium high heat.  Keep the lid covered while cooking; uncover only to skim off any scum on the surface then replace the lid.  If you need to, add the remaining water (keep the ribs submerged in liquid during cooking).  After an hour, the ribs should be tender.  If the ribs are not as tender as you’d like, cook for 15-20 more minutes.

This is what the scum looks like — you want to scoop this out and discard it.

IMG_0834

4.  When the ribs are done (and as tender as you’d like them), add the vegetables.  First, layer the cabbage on top of the ribs.  Press down on the cabbage, just slightly so that the leaves are moistened with the broth.  Layer the squash on top of the cabbage leaves, also pressing them into the broth (do not stir the vegetables into the soup–they will cook ON TOP of the ribs).  Cook for 5 minutes then turn off the heat.

IMG_0835 IMG_0836 IMG_0838

NOTE:

Before serving, I usually scoop out a good amount of kådu (soup broth) into a freezer-safe bowl, then place the bowl in the freezer for several minutes.  All of the fat will rise to the surface and harden.  After the fat solidifies, I scoop it out and discard it, then reheat the kådu.

IMG_0846 IMG_0848

5.  After the kådu is reheated, remove the pot from the heat.  Taste the broth; re-season if necessary with Dashida and pepper.  Serve with hot white rice and fina’denne’.  Enjoy!

IMG_0844

Pumpkin-Carrot Crunch Cake

Fall is one of my favorite seasons, not just because of the beautiful fall colors and cooling temperatures, but because I love the smell of the house when I bake up a batch of pumpkin anything.  I say anything because my family loves most everything made with pumpkin.  Pumpkin pie, Pumpkin Turnovers (Pastit or Buchi Buchi), and one of our favorites — Pumpkin Carrot Crunch Cake.

This recipe is my take on the popular Pumpkin Crunch Cake that you must have seen making its rounds on the internet.

I make mine differently.  One thing I do differently is instead of sprinkling dry cake mix over the pumpkin filling, I make a cake and nut layer by mixing together melted butter, chopped nuts and the cake mix, then spreading it onto the bottom of a pan, making a delightful crust of sorts.

My pumpkin filling is essentially a custard, forming a rich and creamy layer on top of the cake and nut crust.

And finally, the top layer is not just plain old Cool Whip Whipped Topping, but a thicker version made so by adding sweet vanilla pudding to it.

My version also uses carrot cake instead of regular yellow cake mix, although yellow cake is perfectly fine if that’s what you prefer.  We love carrot cake in our house, so I incorporated two favorites into one, and voila, there you have my Pumpkin Carrot Crunch Cake!

Give my recipe a try.  I think you’ll like it.  🙂

PUMPKIN CARROT CRUNCH CAKE

IMG_0820

INGREDIENTS:

Pumpkin Filling:
  • 1 15-oz can pumpkin puree
  • 4 eggs
  • 1 cup evaporated milk OR heavy cream
  • 3/4 cup sugar
  • 1 teaspoon vanilla extract
  • 2 teaspoons cinnamon
  • 1/2 teaspoon salt
Cake & Pecan Crust:
  • 2 sticks butter, melted
  • 1 teaspoon cinnamon
  • 1 1/2 cups pecans
  • 1 box super moist carrot cake mix
Whipped Topping:
  • 16 ounces Cool Whip
  • 1 box (3.4 oz) instant vanilla pudding & pie filling
  • 1 1/2 cups milk

DIRECTIONS:

1.  Preheat the oven to 425 degrees F.

2.  In a medium sized mixing bowl, whisk together the ingredients for the Pumpkin Filling (pumpkin, eggs, evaporated milk OR cream, sugar, vanilla extract, cinnamon and salt). Set aside.

IMG_0050 IMG_0058

3.  Finely chop the nuts using a food chopper or processor.

IMG_0062

4.  In a separate bowl, mix together the ingredients for the Cake & Pecan Crust (melted butter, chopped nuts, cinnamon and cake mix).  Spray the bottom and sides of a 13×9 cake pan with cooking spray (butter flavored, or the one for baking that has flour in it).  Spread the cake mixture evenly into the bottom of a 9×13″ pan.

IMG_0065 IMG_0068 IMG_0069 IMG_0070 IMG_0064 IMG_0072

5.  Pour the pumpkin filling over the cake and pecan mixture.  Bake at 425 degrees for 10 minutes then reduce the temperature to 350 degrees and continue to bake for 45-50 more minutes. The cake is done when a knife inserted comes out clean and the sides are set (the pumpkin filling will look firm and dry from the edge of the pan inward about two inches) but the middle may still be jiggly.  When you take the cake out of the oven, it will continue to cook as it cools.  Allow the cake to completely cool on the countertop.  Top with Whipped Topping when the cake is completely cooled.

IMG_0073 IMG_0074 IMG_0816

6.  To make the whipped topping, place the Cool Whip into a large mixing bowl.  Sprinkle the dry pudding mix over the Cool Whip.  Add the milk.  Using an electric mixer, mix until all the ingredients are combined.  Let it sit for about 5 minutes to set.  Keep refrigerated until ready to use.

IMG_0075 IMG_0076 IMG_0083 IMG_0085

7.  After the cake has cooled, top with the whipped topping mixture.

IMG_0088 IMG_0091

8.  Serve and enjoy!

IMG_0094

IMG_0093

« Older Entries Recent Entries »