Archive for Lunch

Chicken Stir Fry with Noodles

If you’re looking for a weeknight meal that’s delicious and quick to prepare, look no further.  My Chicken Stir Fry with Noodles takes approximately 30 minutes to prepare, letting you get dinner on the table quickly!

In fact, it went so quickly that I didn’t get a chance to take any step-by-step photos. You see, my husband was testing out my recipe, so he was the cook and I was “directing”. 😄 Before I knew it, he had it all cooked and was setting the table before I could grab my camera. So I guess you can say this recipe is foolproof! Haha! {Not that my hubby is a fool by any means. He’s just the type of cook who needs precise instructions.}

Normally I’d wait to post a recipe until I have step-by-step photos, but this recipe is so good that I had to share it right away.

Give it a try. I think you’ll like it. 🙂

Chicken Stir Fry with Noodles
 
Prep time
Cook time
Total time
 
Stir fried chicken and vegetables with noodles in a savory sauce.
Author:
Serves: Serves 4
Ingredients
  • ½ Box spaghetti noodles
  • 6 boneless skinless chicken thighs, cut into small strips
  • 2 tablespoons vegetable oil
Veggies: (use what you like; I used these)
  • 1 red or orange bell pepper, sliced
  • 1 green bell pepper, sliced
  • 1 zucchini or yellow squash, cut into ¼” slices
  • 1 small yellow onion, sliced
  • Mushrooms, sliced
  • Sugar snap peas
  • 1 carrot, julienned
Sauce:
  • ½ cup soy sauce
  • 6 garlic cloves, minced
  • 1 tablespoon minced ginger
  • 6 tablespoons brown sugar
  • 1 tablespoon sesame oil
  • 2 tablespoons cornstarch
  • 1 cup water
  • 2 tablespoons hoisin sauce
  • 1 tablespoon rice vinegar
  • 2 tablespoons garlic chili sauce or chili oil
    (This is the chili oil I used.)
Instructions
  1. Cook the spaghetti noodles according to package directions. Drain and set aside.
  2. Cook the chicken and 2 tablespoons vegetable oil in a large pan over medium high heat, about 2 minutes.
  3. Add all the vegetables to the pan; cook for about 2 minutes (they should still be slightly crisp).
  4. Stir the sauce to dissolve the cornstarch. Add the sauce and noodles to the pan. Stir to combine all the ingredients. Cook for a minute, or just until the sauce begins to thicken then remove from the heat.
Serve and enjoy!


Print Friendly, PDF & Email

Ham Hocks with Mongo (Mung) Beans

Ham hocks and beans go so well together.  For those who’ve never heard of it before, a ham hock is the pork knuckle and is usually salt-cured and smoked. It’s typically cooked long and slow until tender, with added beans and broth for the ultimate comfort food.

The Chamorro way to cook this is with mongo (or mung) beans and coconut milk. (Read below for what my grandmother and mom think about this addition. 😁)

Give my recipe a try.  I think you’ll like it.

HAM HOCKS WITH MONGO (MUNG) BEANS


You’ll need:

Mongo Beans:

  • 1 bag mung beans
  • 1 tablespoon Dashida seasoning
  • 1 tablespoon onion powder
  • 1 tablespoon garlic powder
  • 1 teaspoon black pepper
  • Water (initially, 2 inches above the level of beans)


Ham Hocks:

  • 1 package ham hocks (smoked, if you can find it), about 3-4 large pieces in a package
  • Water
  • 1 medium onion, diced
  • 4 cloves garlic, chopped
  • 1/2 cup soy sauce
  • 1/4 cup vinegar
  • Black pepper, to taste
  • 1 package achote powder
  • 1/2 teaspoon liquid smoke (omit if you are using smoked ham hocks)
  • 1 can coconut milk


You can find my full, printable recipe at the bottom of this page.


The first thing we need to is prepare the mung beans.  Ideally you’ll do this the day before you intend to cook your ham hocks.

Place the dry beans in a medium sized bowl.


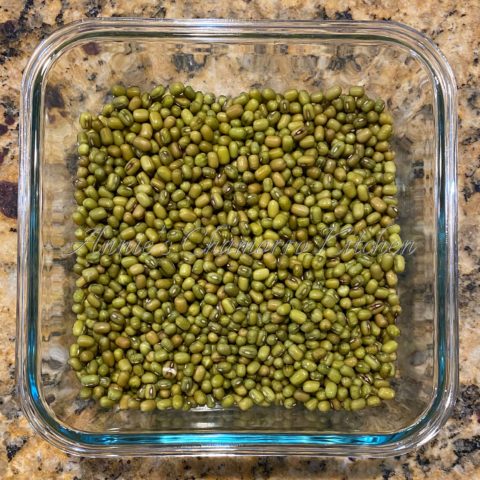
Add water and soak overnight.  Make sure to add enough water to go at least 2 inches above the beans.


The next morning, pour out the soaking water, if any is left. Rinse once more and drain.

Look how plump the beans have become after soaking in all that water overnight.


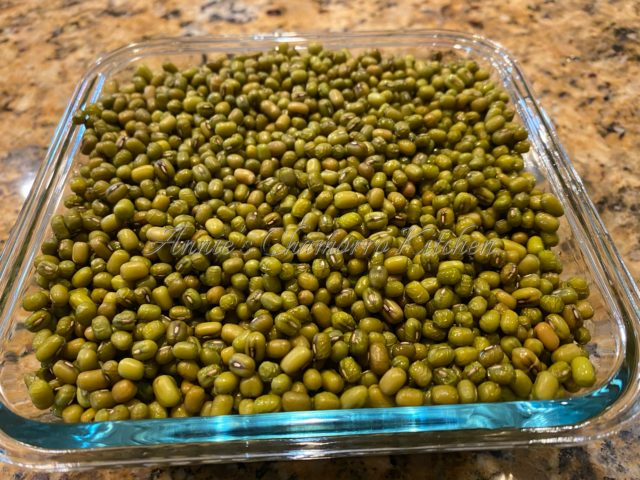
Add the mung beans to a medium sauce pan. Add more water, enough for it to reach about 2” above the beans.  Stir in the dashida, onion powder, garlic powder, and black pepper.


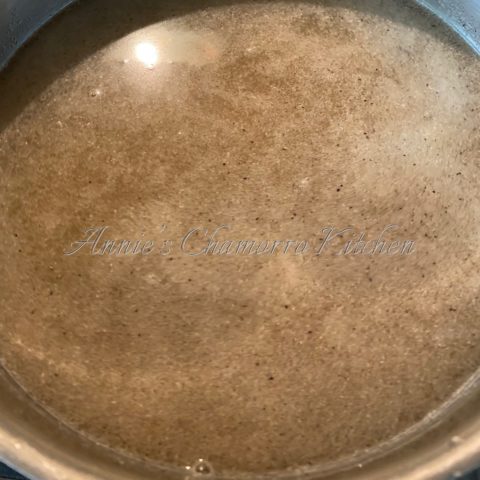
Bring to a boil then reduce the heat to low.  Simmer (covered) until the beans have softened, about 1 hour, stirring periodically. Add more water if required (you don’t want the beans cooking “dry”). Note: you should not need to add more water if you’ve soaked the beans overnight.

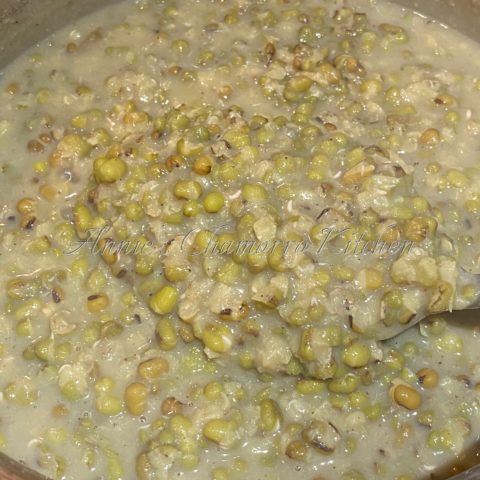
This is what the beans look like after one hour of cooking.  Remove the pot from the heat and set the beans aside.  The beans will not be not fully cooked at this point.  It will continue cooking with the ham hocks later.


Place the ham hocks in a large pot.

Note: Smoked ham hocks are usually what’s used for this dish.  However, I could only find “regular, uncooked/raw” ham hocks.  I will make a note of recipe adjustments where required for when using smoked ham hocks.


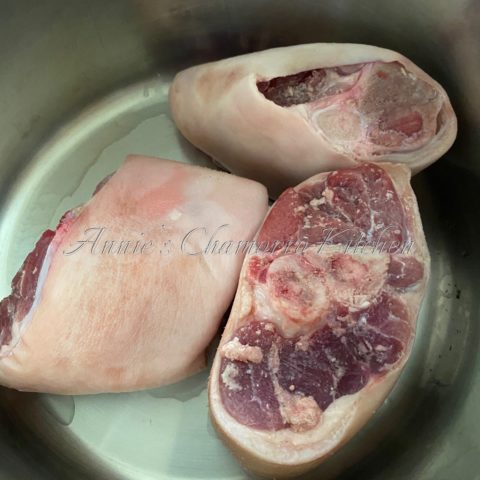
Add water until the ham hocks are submerged.  


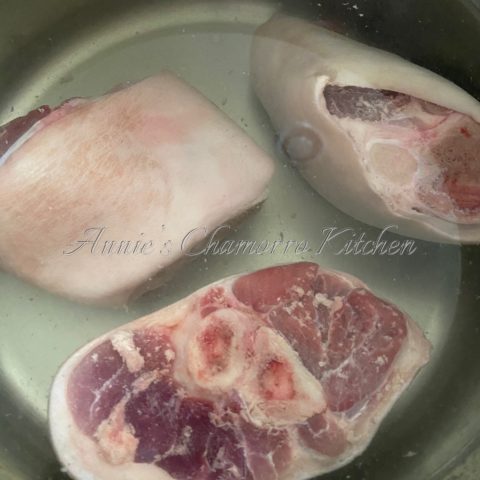
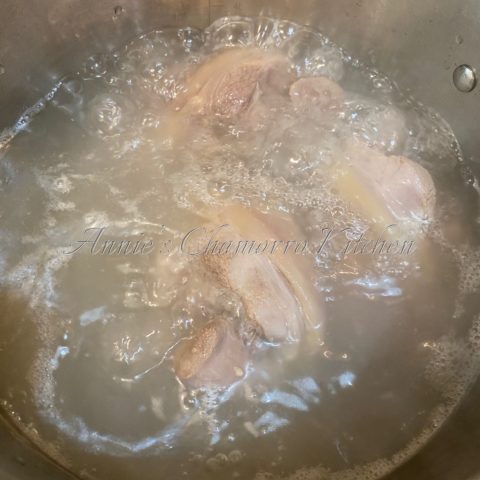
Bring to a boil and cook for 30 minutes. Drain the water, being careful not to burn yourself.  Don’t worry about seasoning the water at this point since the intent is to cook off a lot of the fat beneath the skin as well as to tenderize the meat.


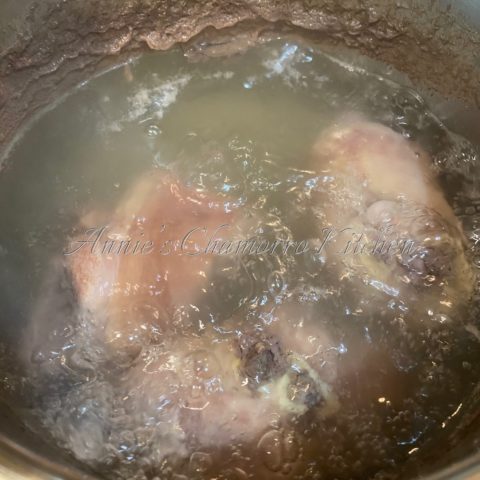
Repeat the previous step once more (add water, bring to a boil, cook, drain).


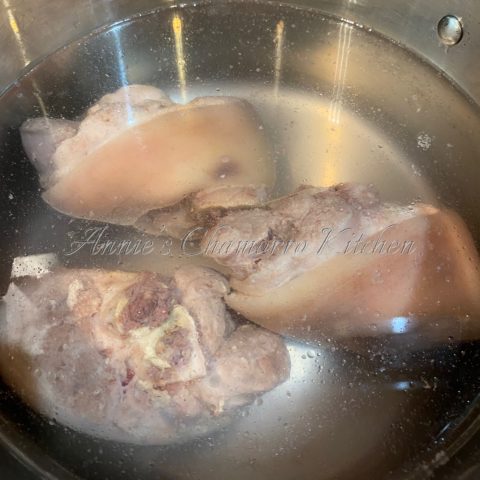
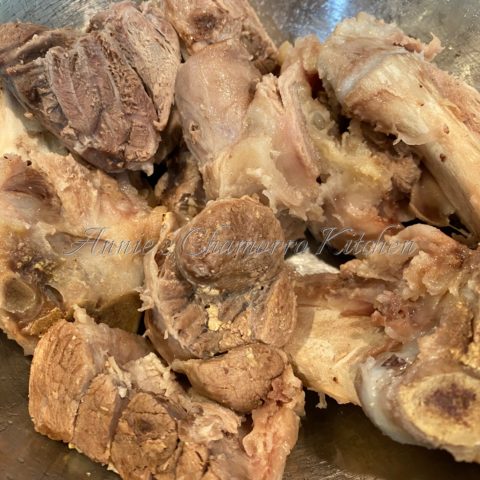
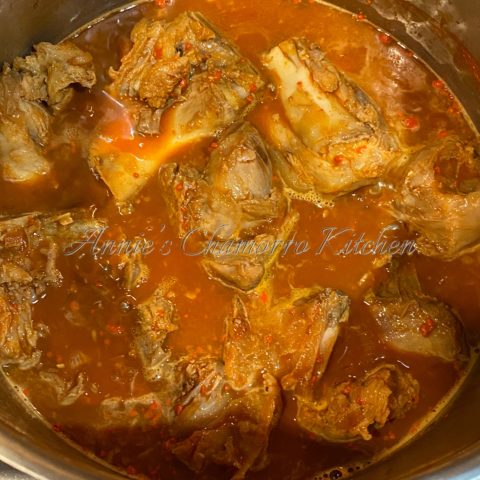
After you’ve drained the cooking water, this is what the ham hocks should look like.  This is optional, but I like to cut the ham hocks into smaller pieces and discard the thick skin.  Place the cut pieces back into the pot.


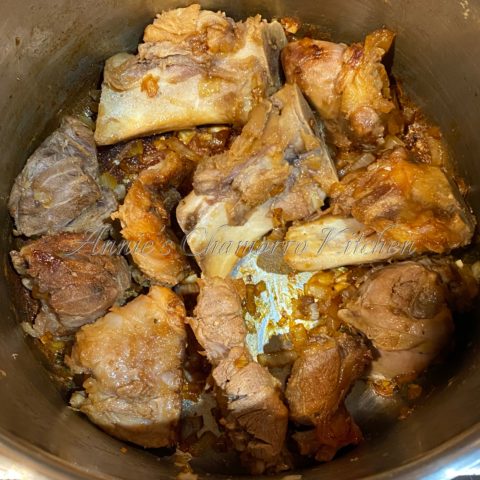
Add the diced onions, soy sauce, vinegar, black pepper and liquid smoke.  If you’re using smoked ham hocks, omit the liquid smoke.


Cook the ham hocks as if you’re cooking estufao.  Cook until the liquid has reduced—you want a relatively dry pot (no or not too much gravy/kådu).  This should take about 10-15 minutes over medium-low heat.


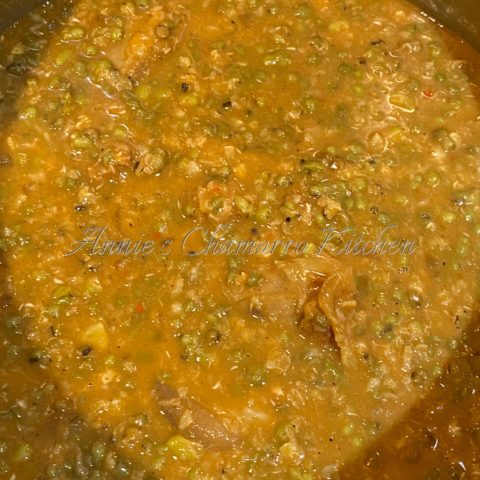
When the liquid has dried down, add more water (as much water for the amount of kådu you want, but keep in mind that you’ll be adding coconut milk and the cooked mung beans got the pot as well).  I added 3 cups of water.


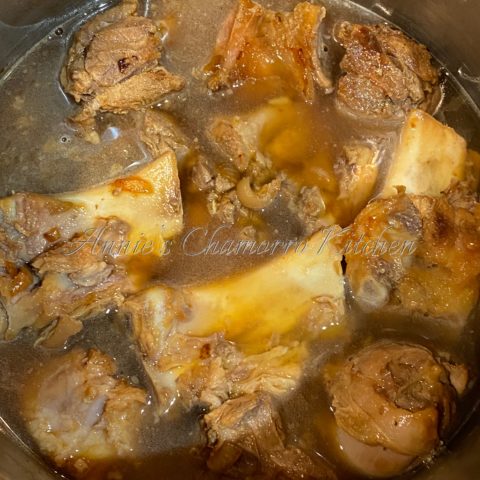
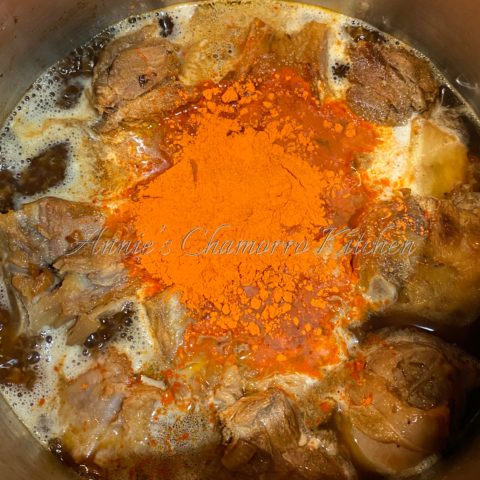
Turn the heat up to medium; cook for a few minutes, just long enough for the water to heat up (achote powder dissolves better in hot liquid).  Add the achote powder, stirring until it dissolves in the liquid.


Add the partially cooked mung beans to the pot.  Taste and adjust your seasonings at this point.  I added a tiny bit more salt as the ham hocks I used were not smoked and needed a bit more flavor.

Turn the heat down to low.  Simmer for 45 more minutes to one hour, or until the ham hocks are tender.  If you want to cut down on the cooking time, you can transfer the mixture to a pressure cooker at this point.  I like to cook this the slower stovetop method as I can periodically check to see if I need to add more water if it’s drying down too much.  Speaking of which, if your mixture is drying down too much during this last hour of cooking, add some water, about a half cup at a time.  Don’t forget that toward the end of the cooking time, you’ll be adding more liquid in the form of coconut milk.


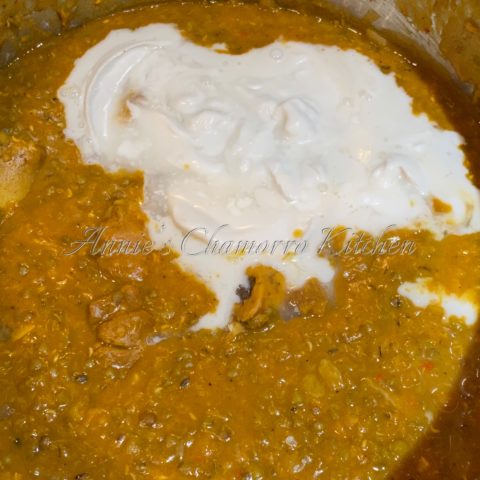
When the ham hocks are tender enough to your liking, stir in the coconut milk.

My grandmother and mother never added coconut milk to their ham hock kådu.  My grandmother always said you don’t eat pork with coconut milk.  I rather like it myself. 😉


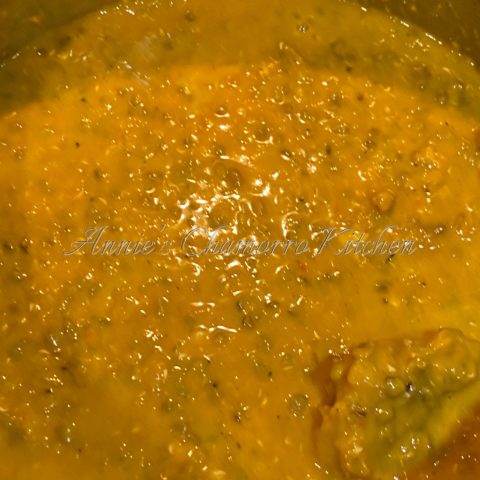
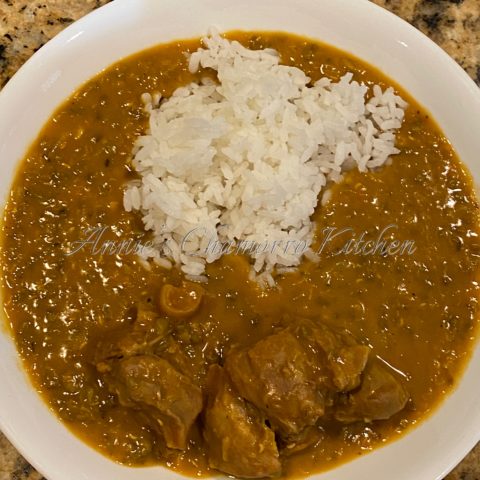
Serve with hot steamed rice and enjoy!


Ham Hocks with Mongo (Mung) Beans
 
Author:
Ingredients
Mongo Beans:
  • 1 bag mung beans
  • 1 tablespoon Dashida seasoning
  • 1 tablespoon onion powder
  • 1 tablespoon garlic powder
  • 1 teaspoon black pepper
  • Water (initially, 2 inches above the level of beans)
Ham Hocks:
  • 1 package ham hocks (smoked, if you can find it), about 3-4 large pieces in a package
  • Water
  • 1 medium onion, diced
  • 4 cloves garlic, chopped
  • ½ cup soy sauce
  • ¼ cup vinegar
  • Black pepper, to taste
  • 1 package achote powder
  • ½ teaspoon liquid smoke (omit if you are using smoked ham hocks)
  • 1 can coconut milk
Instructions
Mongo Beans:
  1. Place the beans in a medium sized bowl. Add water to 2 inches above beans and soak overnight. The next morning, pour out any remaining soaking water. Rinse the beans and drain.
  2. Place the soaked beans in a medium sized pot. Add more water, again up to 2 inches above the beans. Bring to a boil then simmer (covered) for one hour. Add more water if required. Note: you shouldn’t need to add more water if you’ve soaked the beans overnight.
Ham Hocks:
  1. Place the ham hocks in a large pot. Add water to cover the ham hocks. Bring to a boil and cook for 30 minutes. Drain the water.
  2. Repeat once more (add water, cook 30 minutes, drain).
  3. Cut the ham hocks into smaller pieces and return to the pot.
  4. Add diced onions and garlic to the pot, as well as the soy sauce, vinegar and black pepper. Add liquid smoke if you are not using smoked ham hocks.
  5. Cook over medium-low heat until the liquid has dried down.
  6. Add more water (add as much as you’d like for a soup) to the pot (I added 3 cups of water). Cook for a few minutes to allow the water to heat up.
  7. Add the achote powder; stir until the powder dissolves in the water.
  8. Add the mung beans to the pot. Taste and adjust your seasonings.
  9. Reduce the heat to low. Simmer for 45 minutes to one hour, or until the ham hocks are tender. Add water periodically if the liquid is drying down too much.
  10. Stir in the coconut milk when the ham hocks are tender.
Serve with steamed rice and enjoy!


Print Friendly, PDF & Email

Rigatoni with Shrimp and a Creamy Tomato Sauce

Hello!  Hannah here…Annie’s daughter, if you haven’t “met” me yet.  I have a few other recipes on my mom’s blog, so be sure to check them out.  I’m sure you’ll like them. 😊

I love cooking and making up my own recipes.  This is one of them.  Pasta is one of my favorite foods, and I think this is the best one I’ve made so far, if I do say so myself. 😉  It has a creamy, tomatoey, cheesy sauce with savory, buttery shrimp. Rigatoni is my pasta of choice; I love the ridges in them, and I especially love when the tubes get filled with the delicious sauce…..so good!

Alright, let’s get down to it, shall we?

Scroll all the way to the bottom of this post for my full, printable recipe.


Hannah’s Rigatoni with Shrimp
and a Creamy Tomato Sauce


Ingredients:

1 lb Rigatoni pasta

Sauce:

  • 1 lb container cherry or grape tomatoes
  • 3-5 whole garlic cloves, peeled
  • 1 teaspoon kosher salt
  • 1 teaspoon red pepper flakes
  • 1/4 cup olive oil
  • 1 teaspoon Italian seasoning
  • 1 tablespoon fresh Basil
  • 1 5.2-oz block Boursin brand garlic and herb flavored Gournay cheese
  • 1/2 cup heavy cream
  • 1/2 cup grated Parmesan cheese

Shrimp:

  • 1 pound raw shrimp, peeled and deveined
  • 4 teaspoons Old Bay seasoning
  • 1 teaspoon garlic powder
  • 1 teaspoon red pepper flakes
  • 1 tablespoon olive oil
  • 4 tablespoons unsalted butter

Garnish:

  • Chili garlic oil, optional
  • Fresh basil
  • Grated Parmesan cheese


Directions:

Preheat the oven to 425° F.

Place the tomatoes and garlic in a 9 x 13 pan.  If the tomatoes are on the larger side, cut them in half or even quarter them.

Add the olive oil, salt, red pepper flakes, Italian seasoning, and basil.

Stir the tomato and garlic mixture then place the Boursin cheese in the center.

This is what Boursin cheese looks like.  You can find it in most grocery stores.

Bake for 20-25 minutes or until the tomatoes have softened.  This is what it will look like after it’s done baking.  We’ll get back to this later.

I’m a fan of multi-tasking.
While the tomatoes are baking in the oven, start cooking the pasta. Drain and set aside when done (do NOT coat the pasta in oil).

Next, start cooking the shrimp.
If using larger shrimp, cut into 1-inch pieces. You can leave smaller shrimp whole.  Place the shrimp in a medium pan along with the old bay seasoning, garlic powder, red pepper flakes, and olive oil.

Cook over medium heat, just until the shrimp is no longer translucent.

Add the butter and reduce heat to low.

Cook until the butter is melted then remove the pan from the heat. That buttery sauce is going to add so much flavor to the pasta sauce!  😋  Set aside.

The tomatoes should be done right about now. Once the tomatoes are out of the oven, lightly mash the tomatoes and garlic with the back of a cooking spoon.  I’m also a fan of not dirtying more dishes or utensils than I have to, so just use the same spoon you used to cook the shrimp.

Mix everything together; this is the start of the sauce.  Gosh, this looks (and tastes) so good already.

Add the heavy cream.

Add in the shrimp (and all that buttery goodness), pasta, and Parmesan cheese.

Stir to combine.

Serve with more Parmesan cheese and basil.

Optional: Drizzle a spoonful of chili oil.

This is the chili oil I used.  You can use any brand you like.


Enjoy!


Rigatoni with Shrimp and a Creamy Tomato Sauce
 
Prep time
Cook time
Total time
 
Rigatoni with shrimp and a tomatoey, cheesy, creamy sauce
Author:
Recipe type: Pasta
Serves: 6
Ingredients
  • 1 lb Rigatoni pasta
Sauce:
  • 1 lb container cherry or grape tomatoes
  • 3-5 whole garlic cloves, peeled
  • 1 teaspoon kosher salt
  • 1 teaspoon red pepper flakes
  • ¼ cup olive oil
  • 1 teaspoon Italian seasoning
  • 1 tablespoon fresh Basil
  • 1 5.2-oz block Boursin brand garlic and herb flavored Gournay cheese
  • ½ cup heavy cream
  • ½ cup grated Parmesan cheese
Shrimp:
  • 1 pound raw shrimp, peeled and deveined
  • 4 teaspoons Old Bay seasoning
  • 1 teaspoon garlic powder
  • 1 teaspoon red pepper flakes
  • 1 tablespoon olive oil
  • 4 tablespoons unsalted butter
Garnish:
  • Chili garlic oil, optional
  • Fresh basil
  • Grated Parmesan cheese
Instructions
  1. Preheat the oven to 425 degrees F.
Cook the Tomatoes:
  1. Place the tomatoes and garlic in a 9x13” pan.
  2. Add the olive oil, salt, red pepper flakes, Italian seasoning, and basil.
  3. Place the Boursin cheese in the center of the pan and bake for 20-25 minutes or until the tomatoes have softened.
Cook the Pasta:
  1. Cook the pasta while tomatoes are baking.
Cook the Shrimp:
  1. Cook the shrimp over medium heat with the Old Bay seasoning, garlic powder, red pepper flakes, and olive oil, just until the shrimp is no longer translucent.
  2. Add the butter and reduce heat to low; continue cooking until the butter has melted then remove the pan from the heat. Set aside.
Make the Sauce:
  1. Once the tomatoes are done, lightly mash the tomatoes and garlic with the back of a cooking spoon. Stir the tomato-garlic-cheese mixture.
  2. Add the heavy cream, shrimp, cooked pasta, and Parmesan cheese.
  3. Stir to combine.
Serve:
  1. Garnish with fresh basil leaves and more Parmesan Cheese.
  2. Optional: drizzle some chili oil on top.
Enjoy!


Print Friendly, PDF & Email

Miso Salmon with Sake Butter Sauce

I love salmon, and this is one of my favorite ways to prepare it.  I first had this dish at a popular chain restaurant.  I wanted to recreate it at home, and luckily the basic recipe could be found all over the internet (I’m not sure who the original source is).

Give it a try.  I think you’ll like it. 🙂

Miso Salmon with Sake Butter Sauce


In a shallow baking pan, place the salmon filets, skin side down.

In a small bowl, whisk together the ingredients for the miso sauce.  Pour the sauce over the salmon filets, covering each filet entirely.  Bake at 475 degrees for 12-15 minutes.


In a small saucepan over medium high heat, saute the ginger and shallots in two tablespoons of butter.  Cook for about two minutes.

Add one cup of sake; bring to a boil and cook until the sake has reduced by about half.


Add the heavy cream to the reduced sake mixture.  Bring to a boil and cook for two minutes.

Whisk in the remaining pieces of butter, one piece at a time.  Once all of the butter has been incorporated, whisk in the remaining sake, lime juice, and honey.  Add salt to taste.

Optional:  Use an immersion blender to puree the bits of shallots and ginger for a smooth sauce.


Spoon some sake butter sauce into a shallow dish.

Using a small bowl as a mold, fill with cooked rice.  Unmold the rice on top of the sake butter sauce.

Place one salmon filet on top of the rice.  Sprinkle chopped chives on top of the salmon.

Serve and enjoy!


Miso Salmon with Sake Butter Sauce
 
Author:
Ingredients
Miso Salmon:
  • 8 salmon filets, about one inch thick
  • Cooked (steamed) white rice
  • 2 tablespoons chives, sliced
Miso Sauce
  • ½ cup brown sugar
  • 4 tablespoons soy sauce
  • 4 tablespoons hot water
  • 4 tablespoons miso paste
Sake Butter Sauce
  • 1 one-inch piece ginger, peeled and julienned
  • 2 tablespoons minced shallots
  • 2 tablespoons butter for sauteing
  • 1 cup plus 1 tablespoon sake
  • ¼ cup heavy cream
  • 8 tablespoons cold butter, cut into pieces
  • 1 teaspoon lime juice
  • 2 tablespoons honey
  • Salt, to taste
Instructions
Bake the Miso Salmon:
  1. In a shallow baking pan, place the salmon filets, skin side down.
  2. In a small bowl, whisk together the ingredients for the miso sauce. Pour the sauce over the salmon filets, covering each filet entirely. Bake at 475 degrees for 12-15 minutes.
  3. Set aside.
Make the Sake Butter Sauce:
  1. In a small saucepan over medium high heat, saute the ginger and shallots in two tablespoons of butter. Cook for about two minutes.
  2. Add one cup of sake; bring to a boil and cook until the sake has reduced by about half.
  3. Add the heavy cream to the reduced sake mixture. Bring to a boil and cook for two minutes.
  4. Whisk in the remaining pieces of butter, one piece at a time. Once all of the butter has been incorporated, whisk in the remaining sake, lime juice, and honey. Add salt to taste.
  5. Optional: Use an immersion blender to puree the bits of shallots and ginger for a smooth sauce.
Assemble the dish:
  1. Spoon some sake butter sauce into a shallow dish.
  2. Using a small bowl as a mold, fill with cooked rice.  Unmold the rice on top of the sake butter sauce.
  3. Place one salmon filet on top of the rice.  Sprinkle chopped chives on top of the salmon.
  4. Serve and enjoy!


Print Friendly, PDF & Email

Chicken Thighs with Honey Mustard Garlic Wine Sauce

Hafa Adai!  I know, I know…it’s been a while since I added a new recipe.  But this one is worth the wait, trust me.  I made this with skin on, bone in thighs, but you can use boneless, skinless thighs as well, just reduce the cooking time by half. 


I’ll get right to it then.

Mix all the sauce ingredients together then set aside.  You can use any white wine you like to drink. I had just enough moscato leftover from Thanksgiving (leftover moscato…what? 😂) so I used that.

Heat 4 Tbsp oil in a large skillet over medium high heat. (Note: don’t overcrowd the chicken; use two pans if needed.)  Cook the chicken skin side down for 12 minutes (do not turn it while cooking; you want the skin to brown and crisp).  Season the other side of the chicken thighs with salt and black pepper. 

If you’re using boneless, skinless thighs, cook it smooth side down, or what would have been skin side.  Cook for 5-8 minutes or until a nice brown crust has formed on the surface.

After 12 minutes, flip the chicken over. If you have a large enough pan, fit all the chicken into one pan. Otherwise, split the sauce between the two pans.  Cook for 2 minutes over medium high heat then pour in the sauce. 

Turn heat down to medium.  Simmer for 10 minutes or until the sauce has reduced, the alcohol has cooked out, and the thighs are done. 

Spoon the sauce all over the chicken. Serve with rice or potatoes, and/or steamed vegetables. 

Give my recipe a try. I think you’ll like it.

Enjoy!


Chicken Thighs with Honey Mustard Garlic Wine Sauce
 
Prep time
Cook time
Total time
 
Author:
Recipe type: Entree
Cuisine: American
Serves: 5-8
Ingredients
  • 1 pkg (10 pieces thighs with skin and bone)
  • Salt
  • Black pepper
  • 4 tablespoons vegetable oil
    Sauce:
  • ½ cup honey
  • ½ cup stone ground mustard
  • 1 cup white wine
  • 6 cloves garlic, chopped
  • 1 tsp dried thyme
  • 1 tsp dried rosemary
  • ¼ tsp paprika
  • ¼ tsp cayenne pepper
Instructions
  1. Mix all the sauce ingredients together then set aside.
  2. Heat 4 Tbsp oil in a large skillet over medium high heat. (Note: don’t overcrowd the chicken; use two pans if needed.) Cook the chicken skin side down for 12 minutes (do not turn it while cooking; you want the skin to brown and crisp). Season the other side of the chicken thighs with salt and black pepper.
  3. After 12 mins, flip the chicken over (they may all fit in one pan now). Cook for 2 mins over medium high heat then pour in the sauce.
  4. Turn heat down to medium. Simmer for 10 minutes or until the sauce has reduced, the alcohol has cooked out, and the thighs are done.
  5. Spoon sauce all over the chicken. Serve with rice or potatoes, and/or steamed vegetables.


Print Friendly, PDF & Email
« Older Entries